

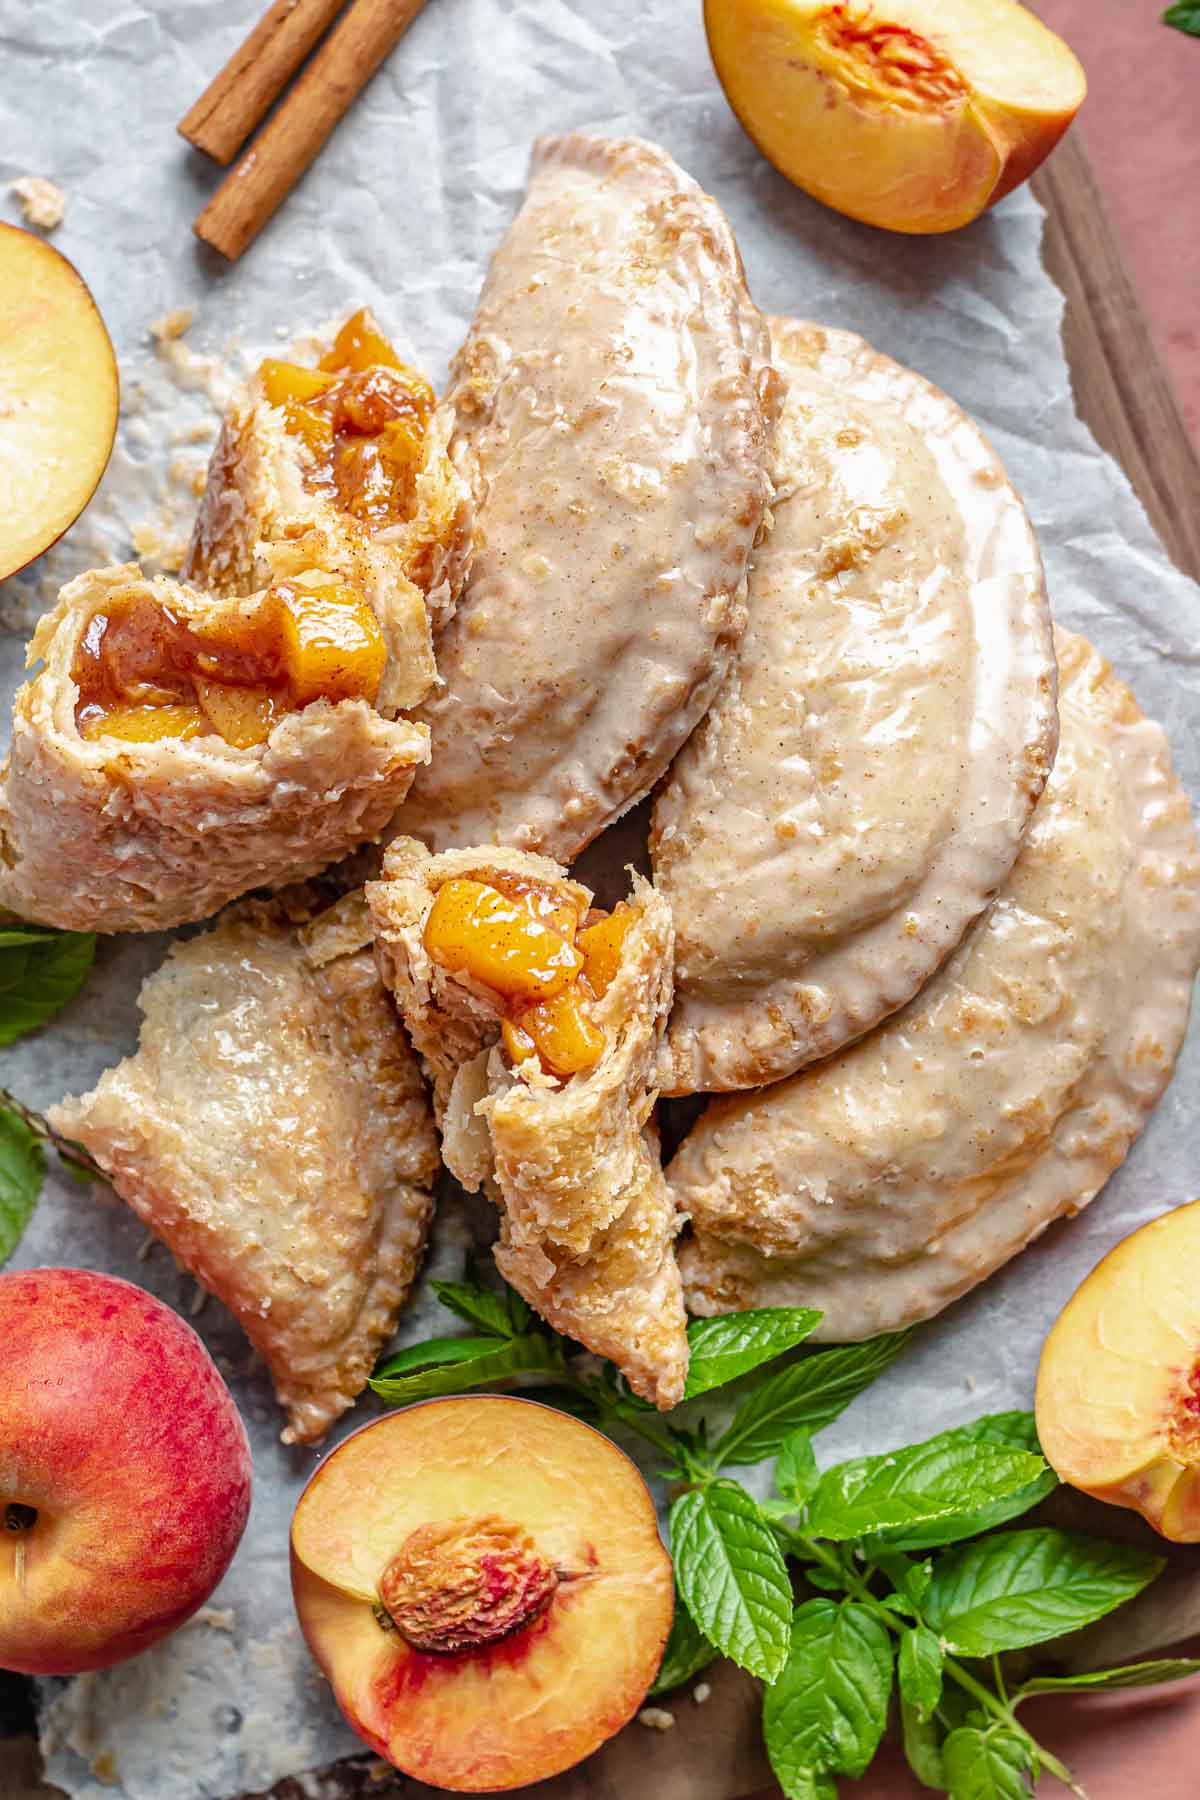
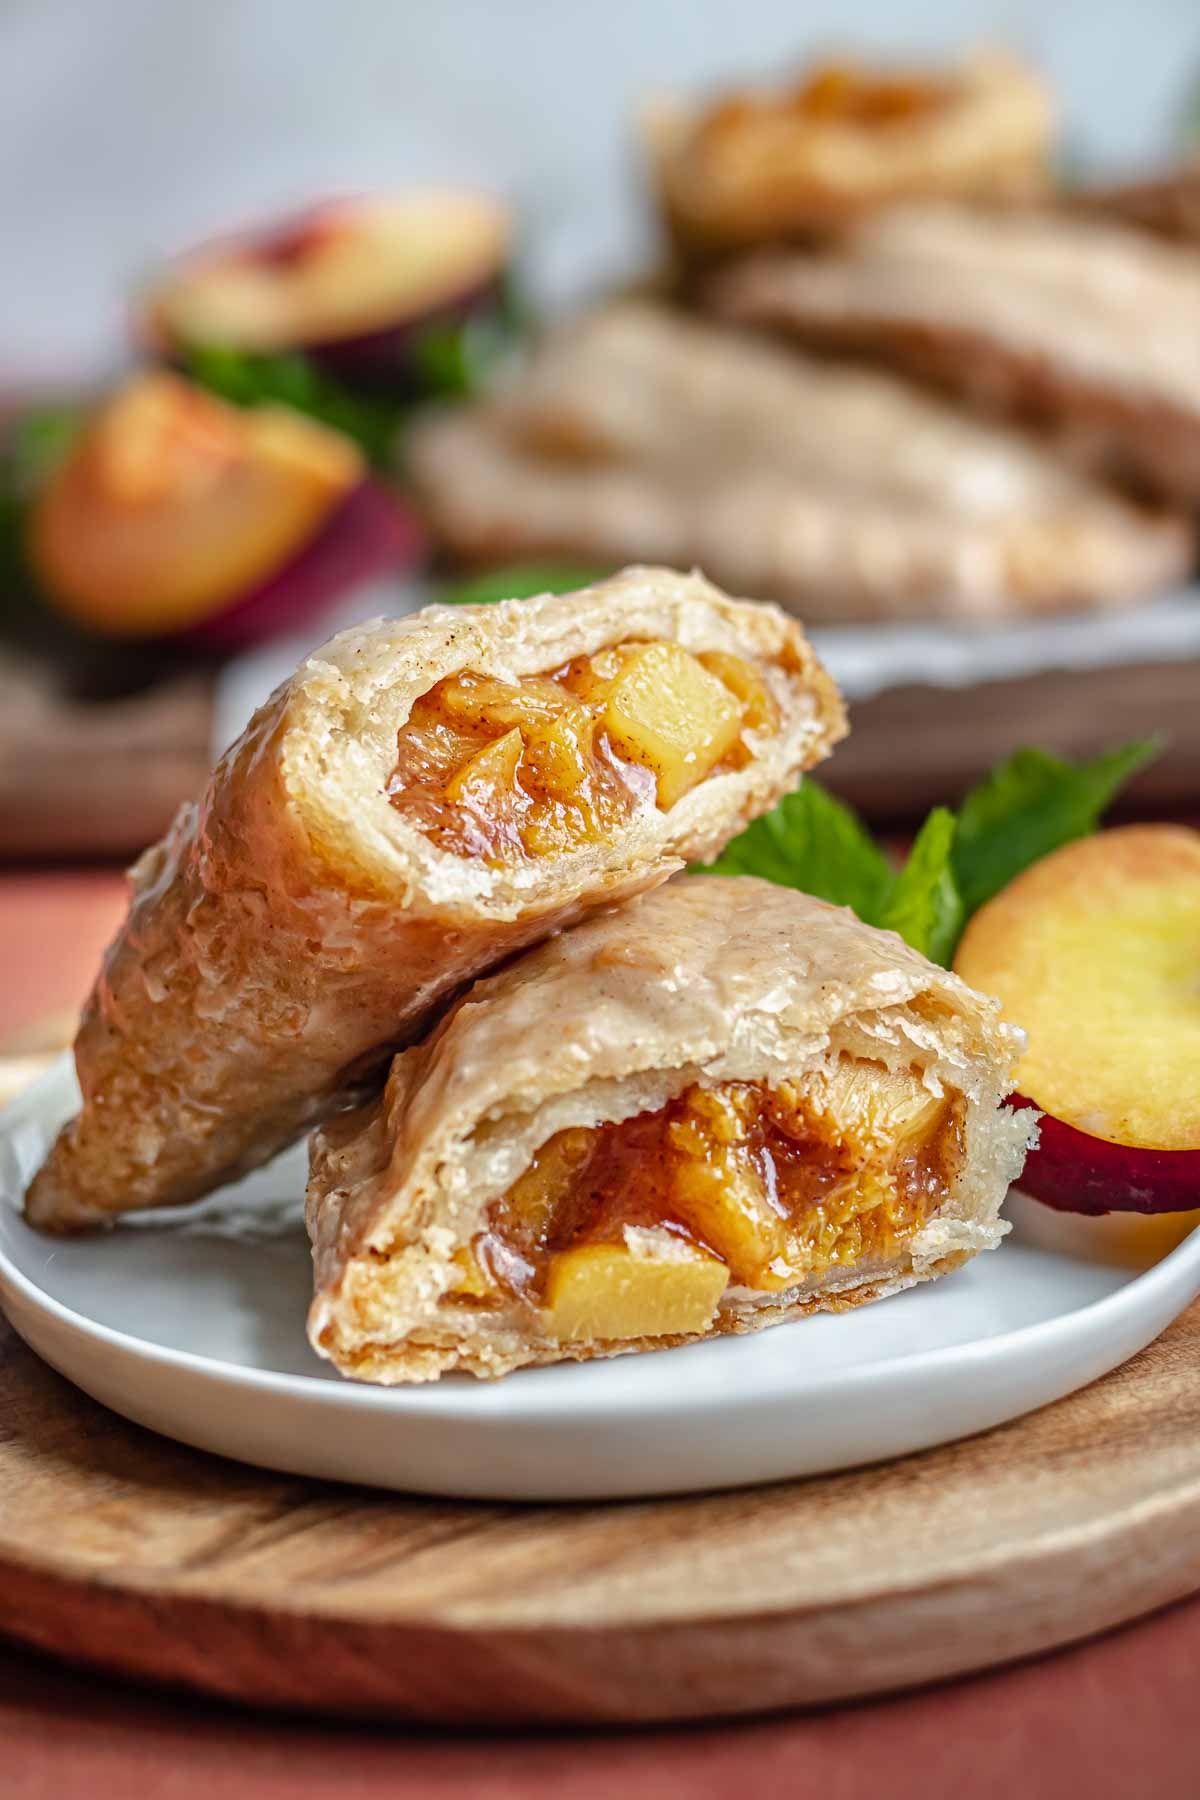
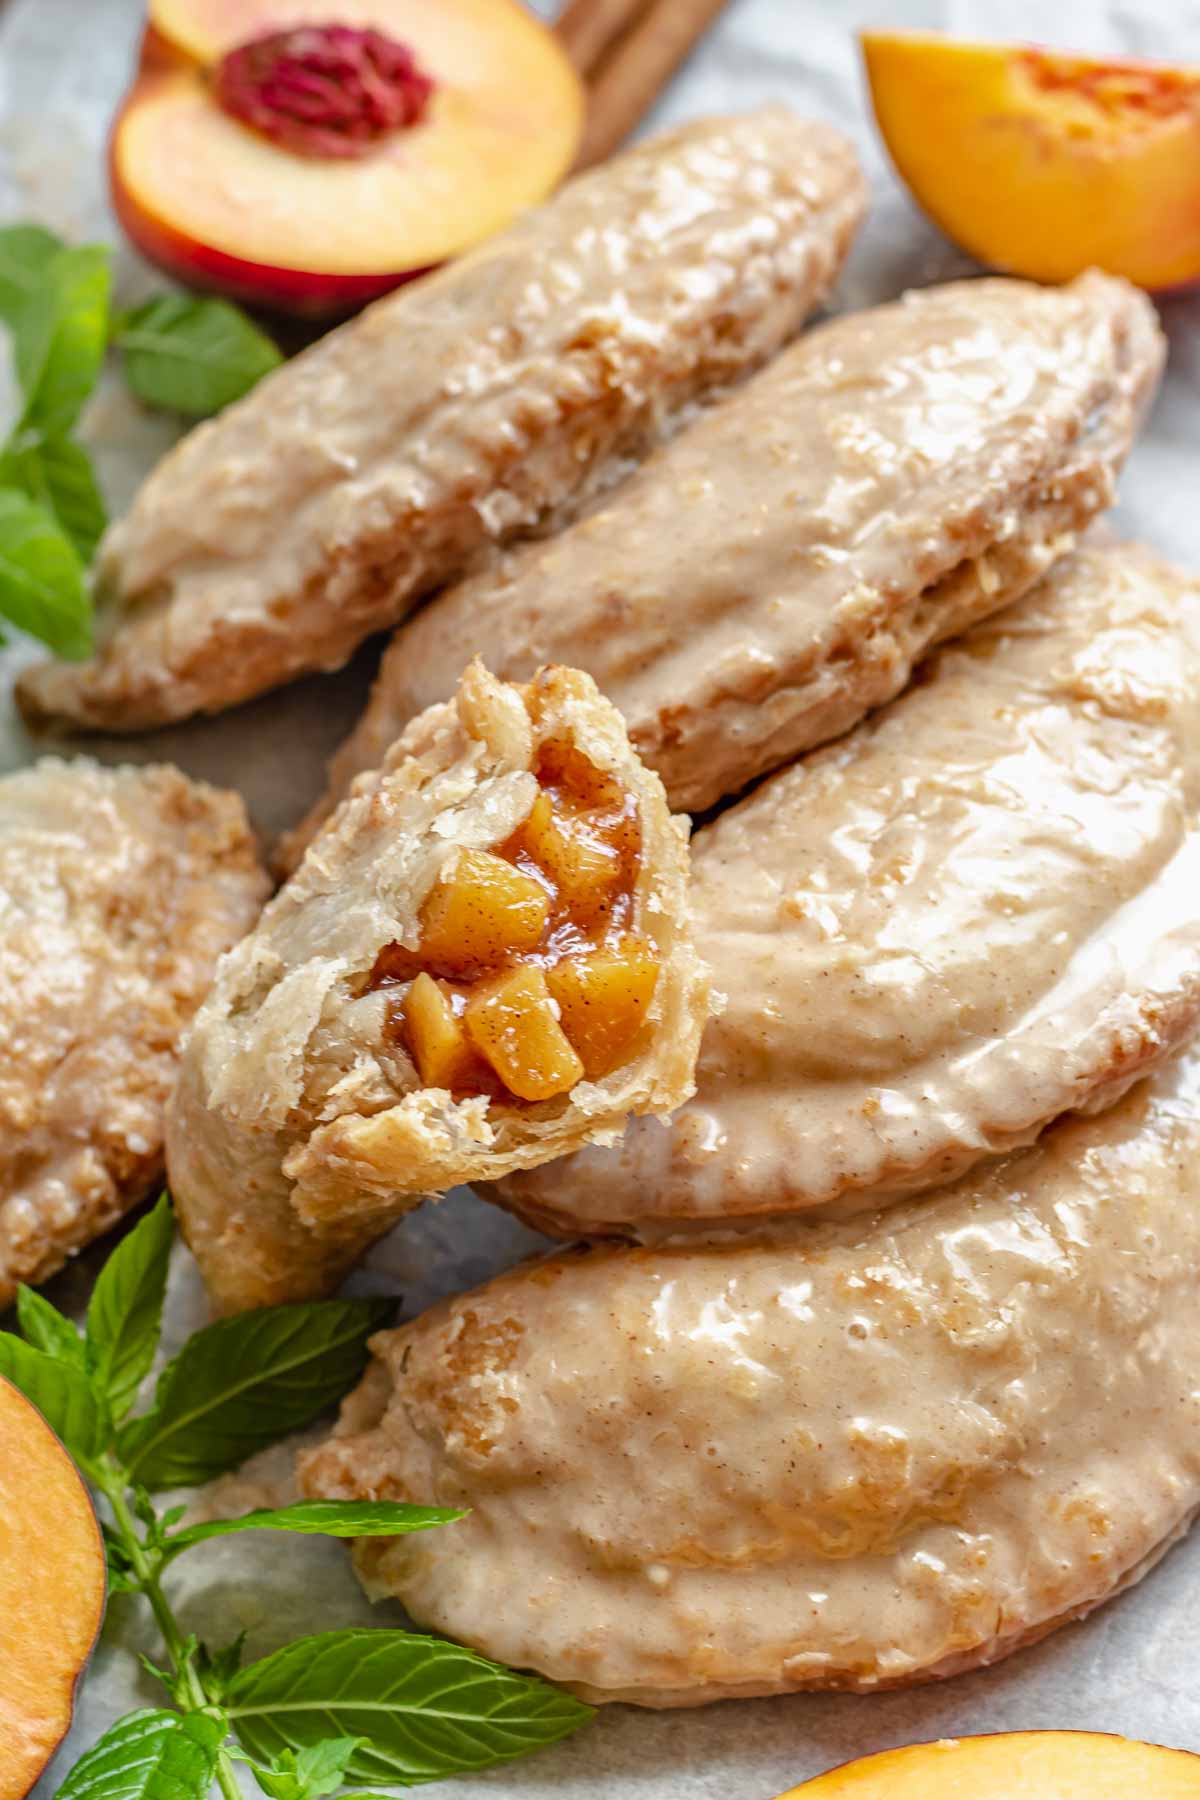
Homemade fried peach pies bring all of the flavor and nostalgia to your home kitchen. Fresh peaches doused in warm spices get folded into flaky pie crust, deep fried, and covered in a cinnamon glaze. They're the peach hand pies of dreams and will leave you going back for bite after bite!
Why You'll Love This Recipe
Flavor & texture - the peaches get cooked down with brown sugar and warm spices, which extracts the peach juices and intensifies the fresh peach flavor! They're SO comforting.
The homemade pie crust becomes so flaky and perfect after frying and stays slightly soft on the inside from the moisture of the peach pie filling. It's crispy, doughy, and so incredibly delicious. The cinnamon glaze also encases the pie dough for the slightest extra bit of texture, which I love!
Simple - I love that these are made as handheld pies rather than made in a pie dish. It makes it quite simple to assemble and then everyone can have their own individual pie, which I think is really special!
Make ahead - these peach hand pies can be assembled and frozen so you can easily remove a few to fry up and glaze when the craving hits! It's such a great option for a last-minute gathering or if you need to provide a housewarming or hostess gift.
If you love peaches, don't forget to check out my Peach Frangipane Galette, Brown Butter Peach Crisp, Brown Butter Peach Bars, and Cast Iron Peach Cobbler!
Jump to:
Fried Peach Pie Roots
A traditional southern fried peach pie recipe uses dried fruit and a dough that is akin to biscuit dough. Back in the day, this was easy to make with ingredients readily available, and dried fruit was always preserved to extend shelf life throughout the year. The dried peaches would then get rehydrated with sugar, spices, and thickeners and then broken down with a potato masher to make the peach pie filling.
While many southern recipes will go this route, I chose to make the recipe with homemade pie dough and fresh peaches, as I love that texture best. You can read about more variations of the recipe in the blog post.
Ingredients
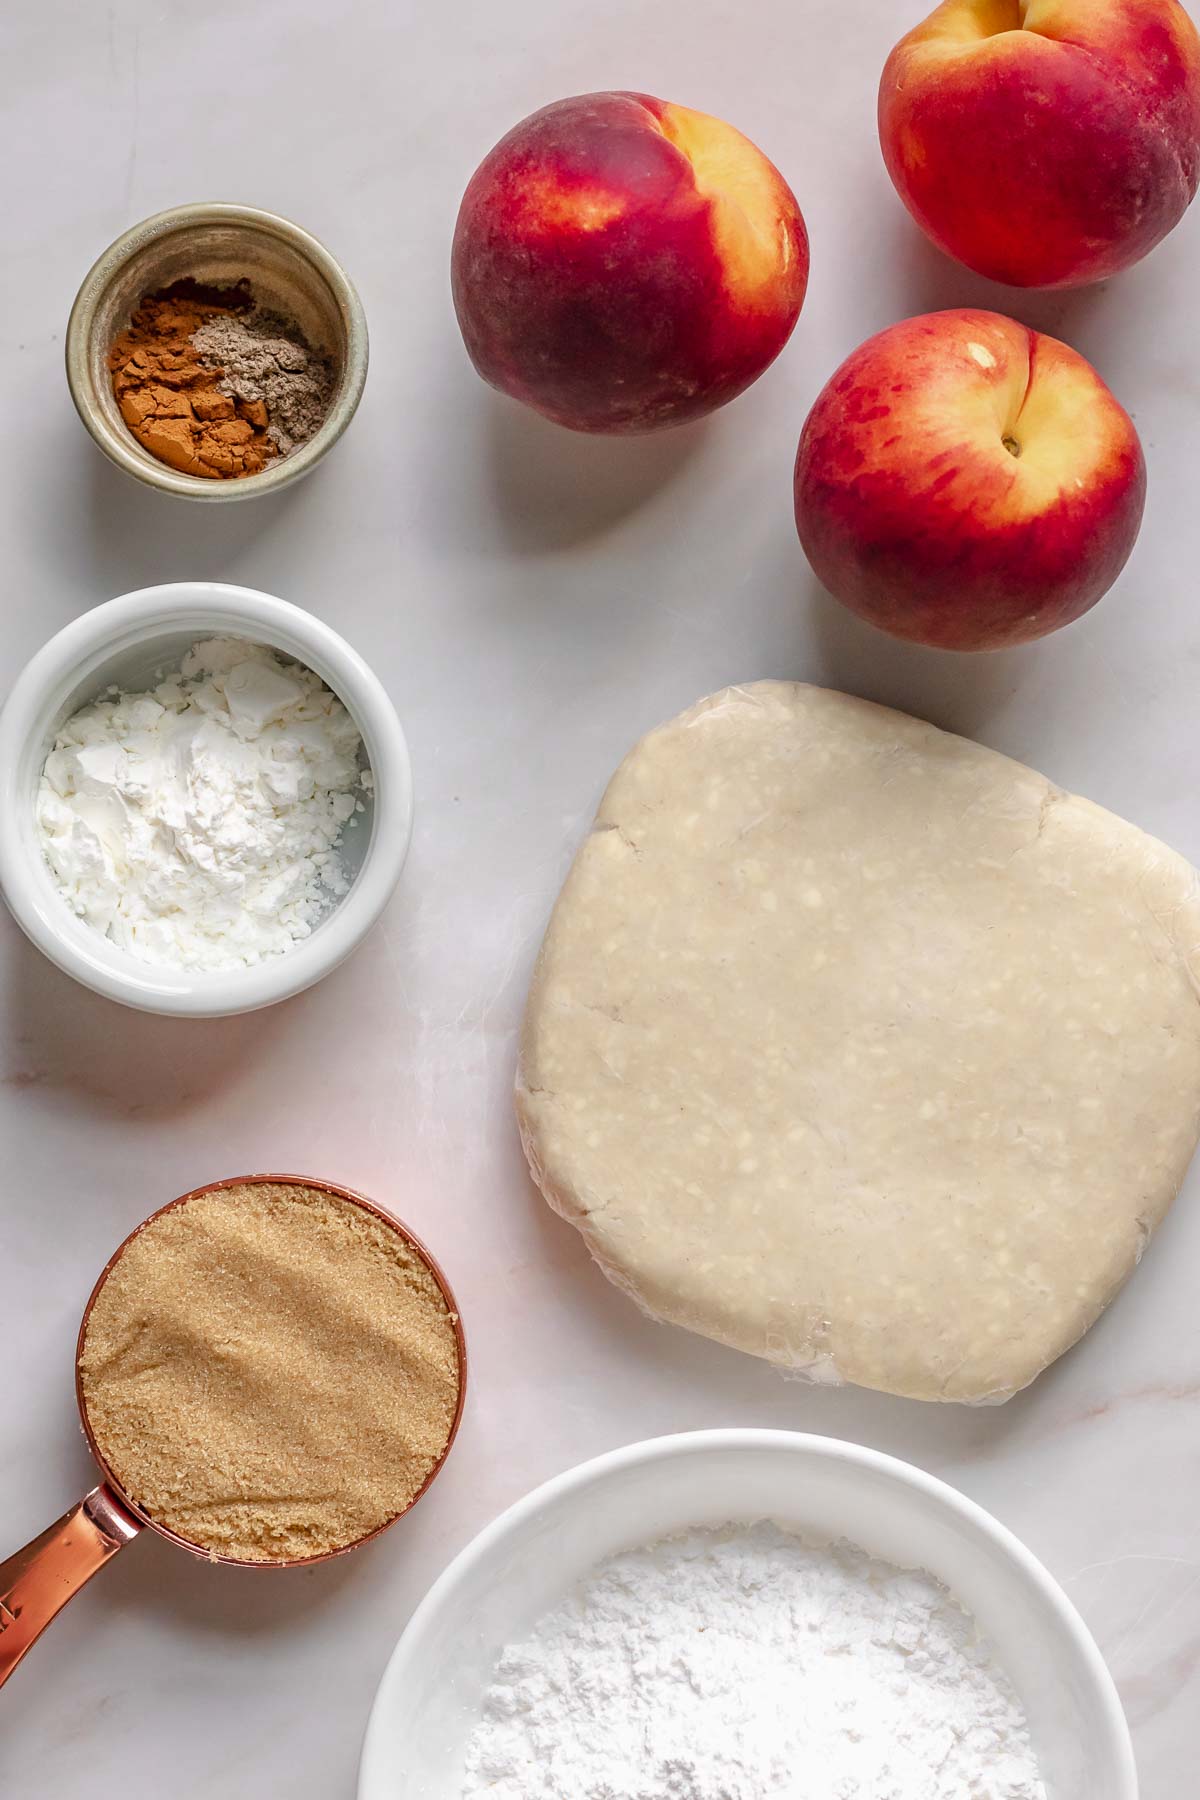
The ingredients list for these handheld pies is relatively minimal:
- Peaches. I used fresh, slightly ripe peaches in this recipe, but canned peaches or frozen peaches can also be used. See the substitutions section for details.
- Spices. Both cardamom and cinnamon are used to flavor this. You'll also need a touch of cornstarch to help thicken the filling.
- Pastry. This recipe uses my homemade sweet pie crust, which holds up to frying and creates a nice and crispy crust. Feel free to use store-bought dough if you need a quicker option.
- Oil. This recipe calls for vegetable oil or canola oil, but peanut oil can also be used for the fried pies.
See recipe card for full ingredients and quantities.
Freestone vs Clingstone Peaches
If you can find freestone peaches, use those! Freestone means the flesh removes itself easily from the stone so you can cut it in half and remove the pit without issue.
In clingstone peaches, the flesh "clings" to the pit, making it nearly impossible to cleanly separate the peach from the pit. If you can only find clingstone, simply cut the flesh off of the pit on each side (making 4 cuts) and then slice. If you try to separate the peach in halves, you'll end up with a squashy mess.
Clingstone peaches are typically available from May to early June, and freestone peaches can be found from mid-June to mid-August. Note that these typically aren't labeled in grocery stores, so you'll want to go by month of purchase or ask a grocery attendant.
How to Peel Peaches for Pie
There are two ways that you can peel your peaches, but it's dependent on the ripeness of the stone fruit. If the peaches are relatively firm and the flesh has not started to soften, you can simply peel them with a vegetable peeler.
Once the flesh has ripened and started to become soft, they are no longer able to be peeled with a vegetable peeler. Instead, cut an X in the bottom skin of each peach, drop them in boiling water for 1 minute, then transfer them to an ice bath. Then, the skins will peel right off!
Substitutions
Here are a few substitutions that can be made for the fried peach pies:
- Frozen peaches - add the chopped frozen peaches directly to the pan without thawing first to make the peach pie filling.
- Canned peaches - drain the syrup or water and chop the peaches. Melt together all of the ingredients and then add the peaches towards the end so they don't become overly mushy.
- Pie crust - use store-bought pie crust rather than making your own. Note that you will need about three rounds of pre-made dough for this recipe if you don't make the homemade version.
Variations
- If you don't want to use peaches for this, you can use any type of stone fruit! Try this with plums, nectarines, apricots, or even cherries! Apples are also great for a fall version.
- Roll the freshly fried hand pies in cinnamon sugar if you don't want to go the cinnamon glaze route.
💌 Save This Recipe
How to Make This Recipe
Note it's best to make the pie crust and peach pie filling a day in advance, or at least up to two hours prior to assembly.
Peach Pie Filling for Fried Pies
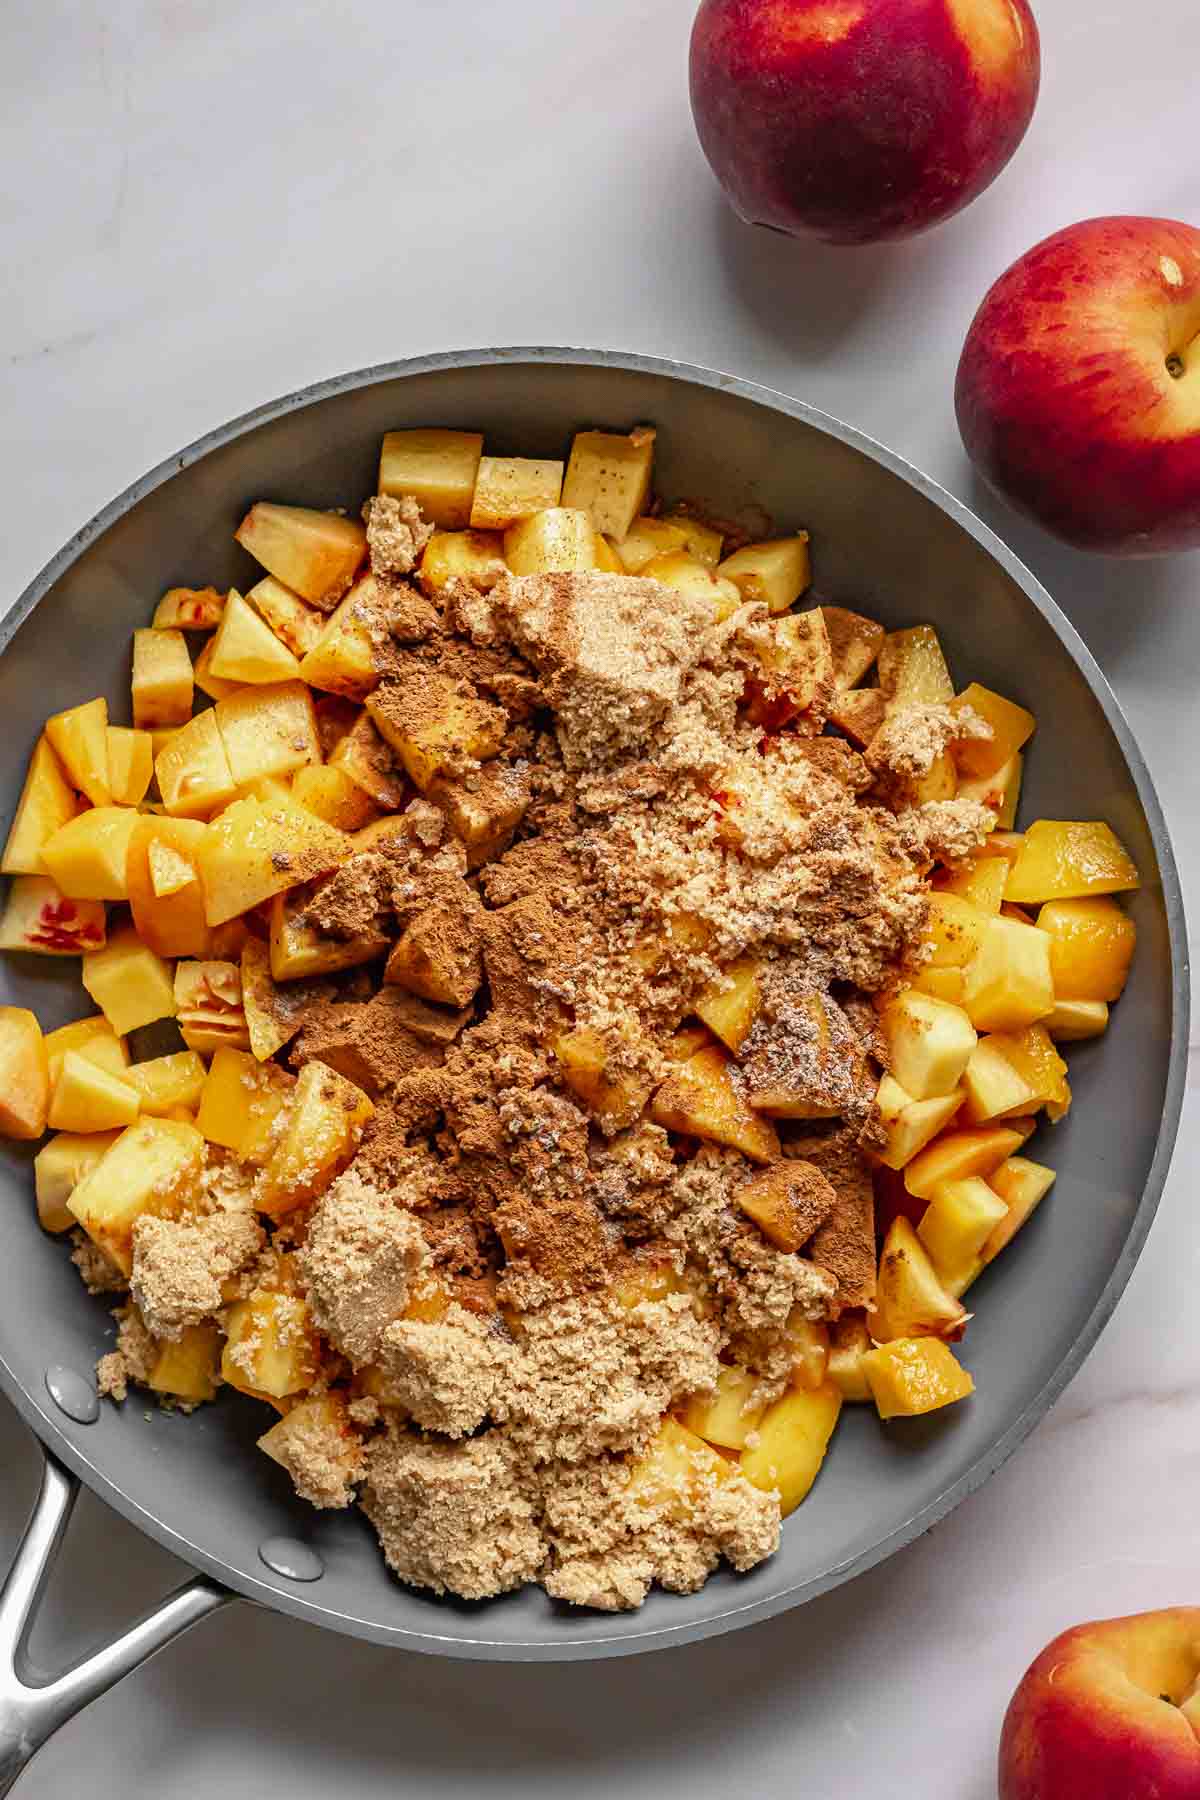
One: Peel and chop the peaches into 1cm pieces, then combine peaches in a large skillet with the spices and sugar.

Two: Cook the peaches until the juices release, then mix the cornstarch with cold water and stir it into the peach pie filling until it thickens. Cool completely.
Assembling Hand Pies
Three: Take the rested pie dough and roll it out on a floured work surface until it's about ⅛ inch thick.

Four: Cut out six-inch rounds using a bowl or another round object and the tip of a paring knife and transfer them to a large baking sheet lined with parchment paper.
Hot tip! Take the dough scraps and layer them on top of each other, then roll it out again to get more rounds. Continue until you have 6 rounds of dough.

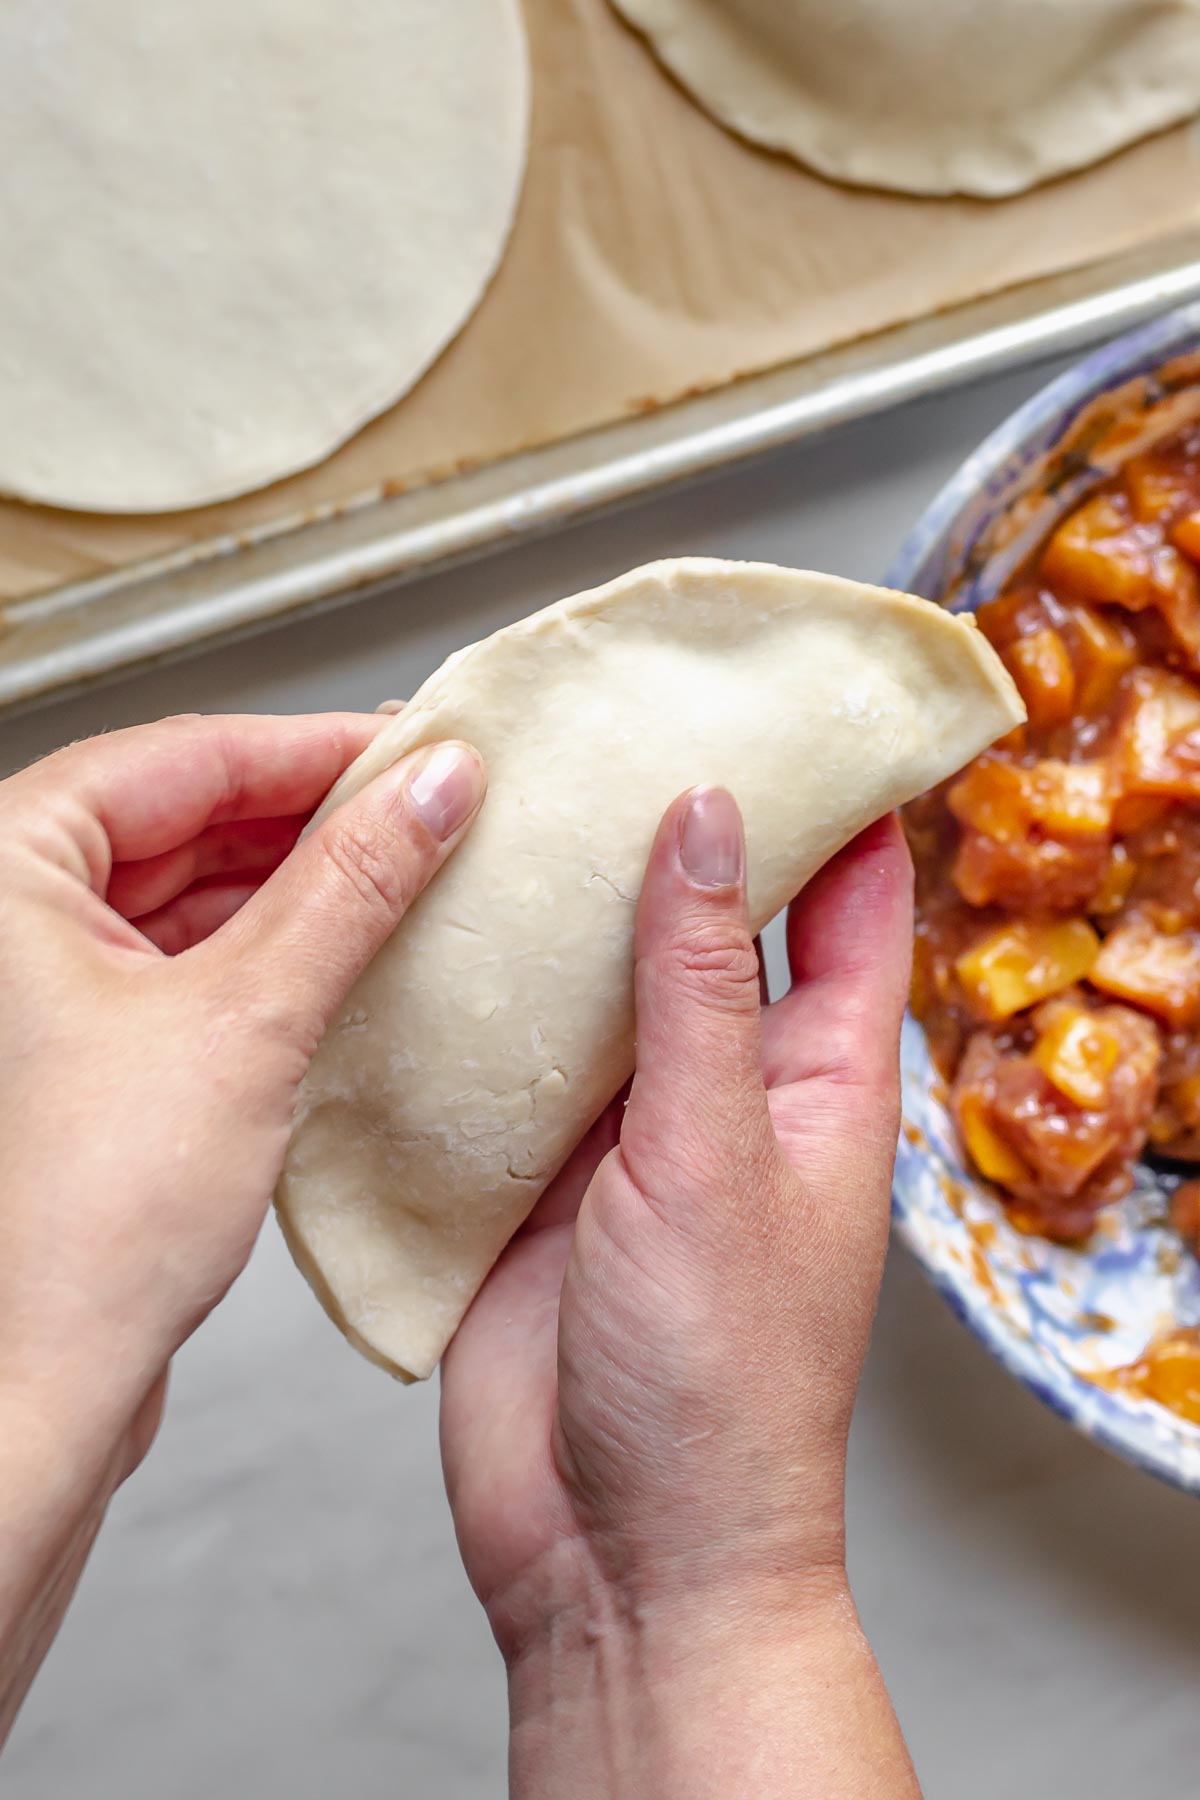
Five: Add a scoop of peach pie filling to the center of each dough circle and gently lift the sides to start pressing the dough together into a half-moon shape.
Six: Pick up the half circle and pinch the edges together for the first seal.
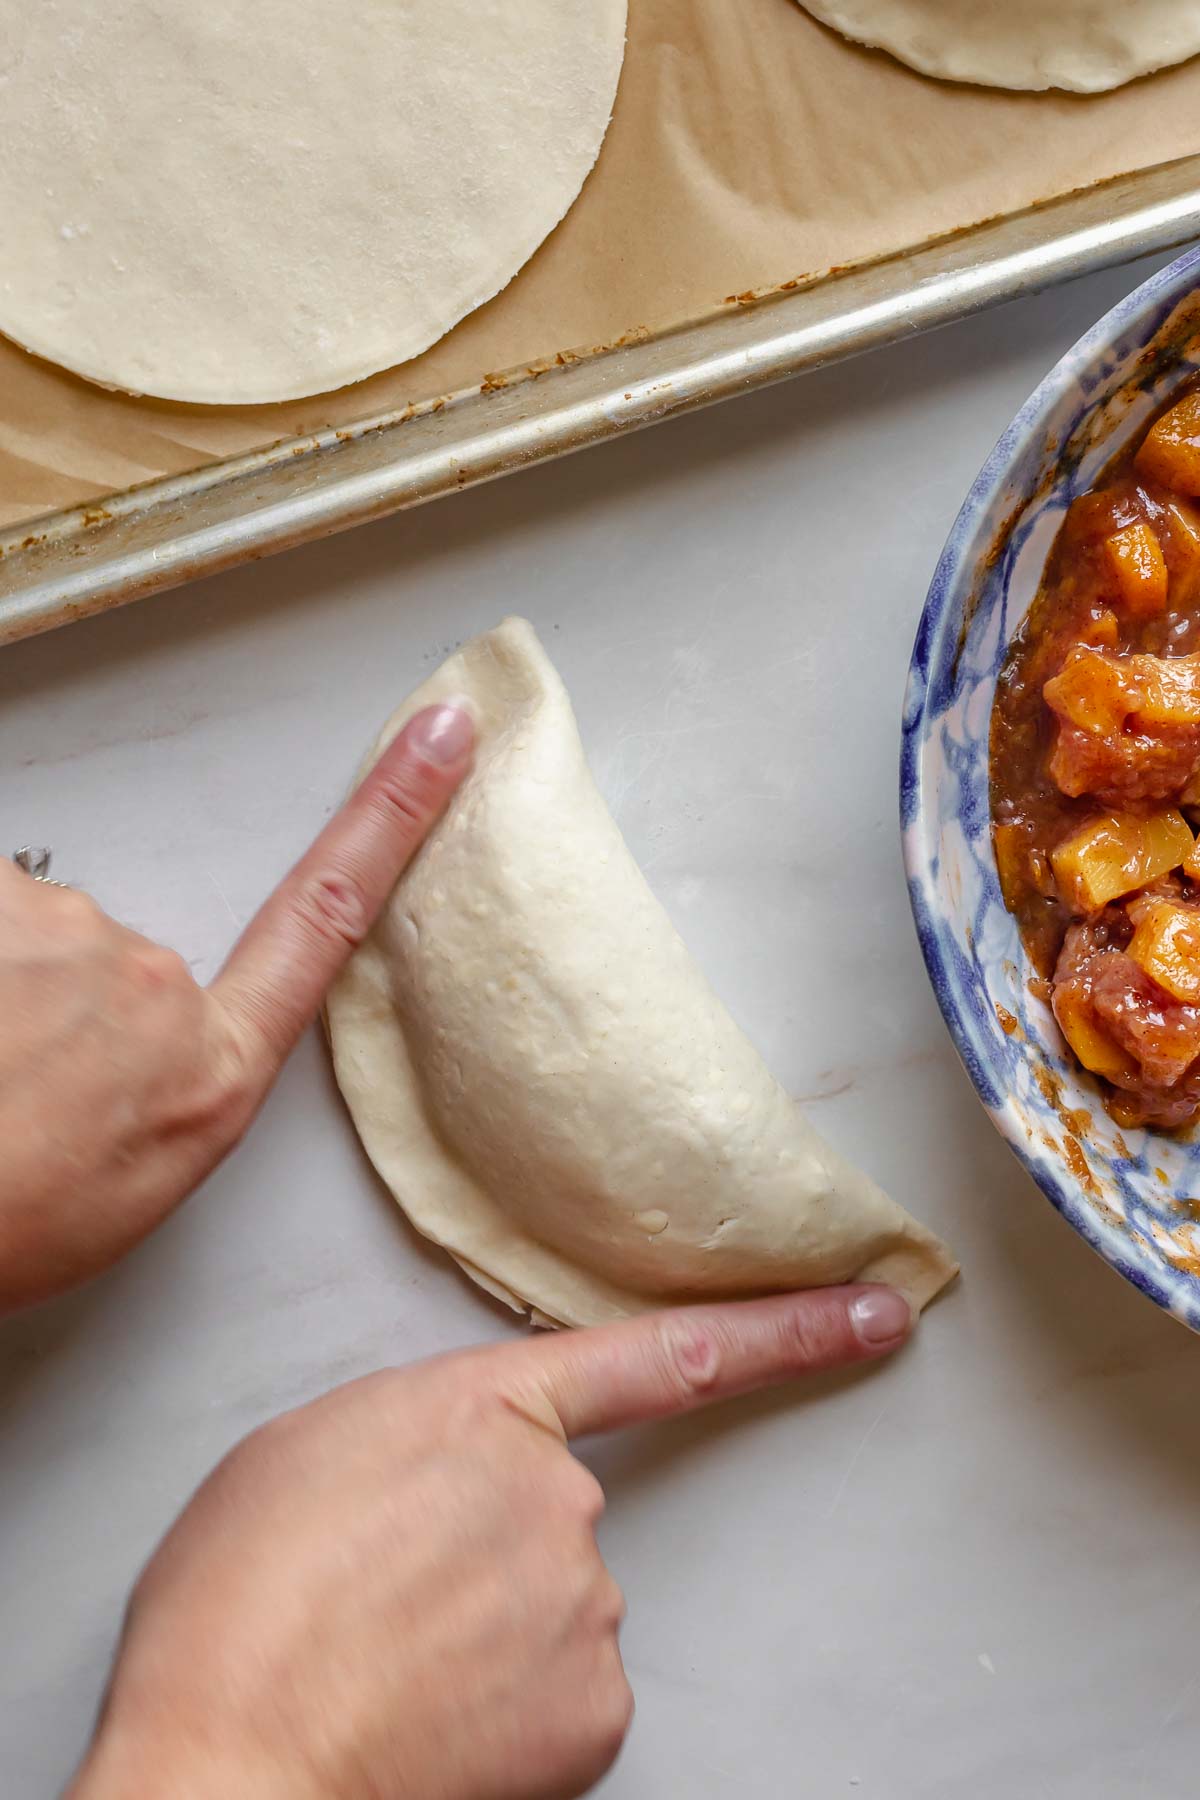
Seven: Place it back on the counter and use your fingers to push down on the edges and create a tight seal.
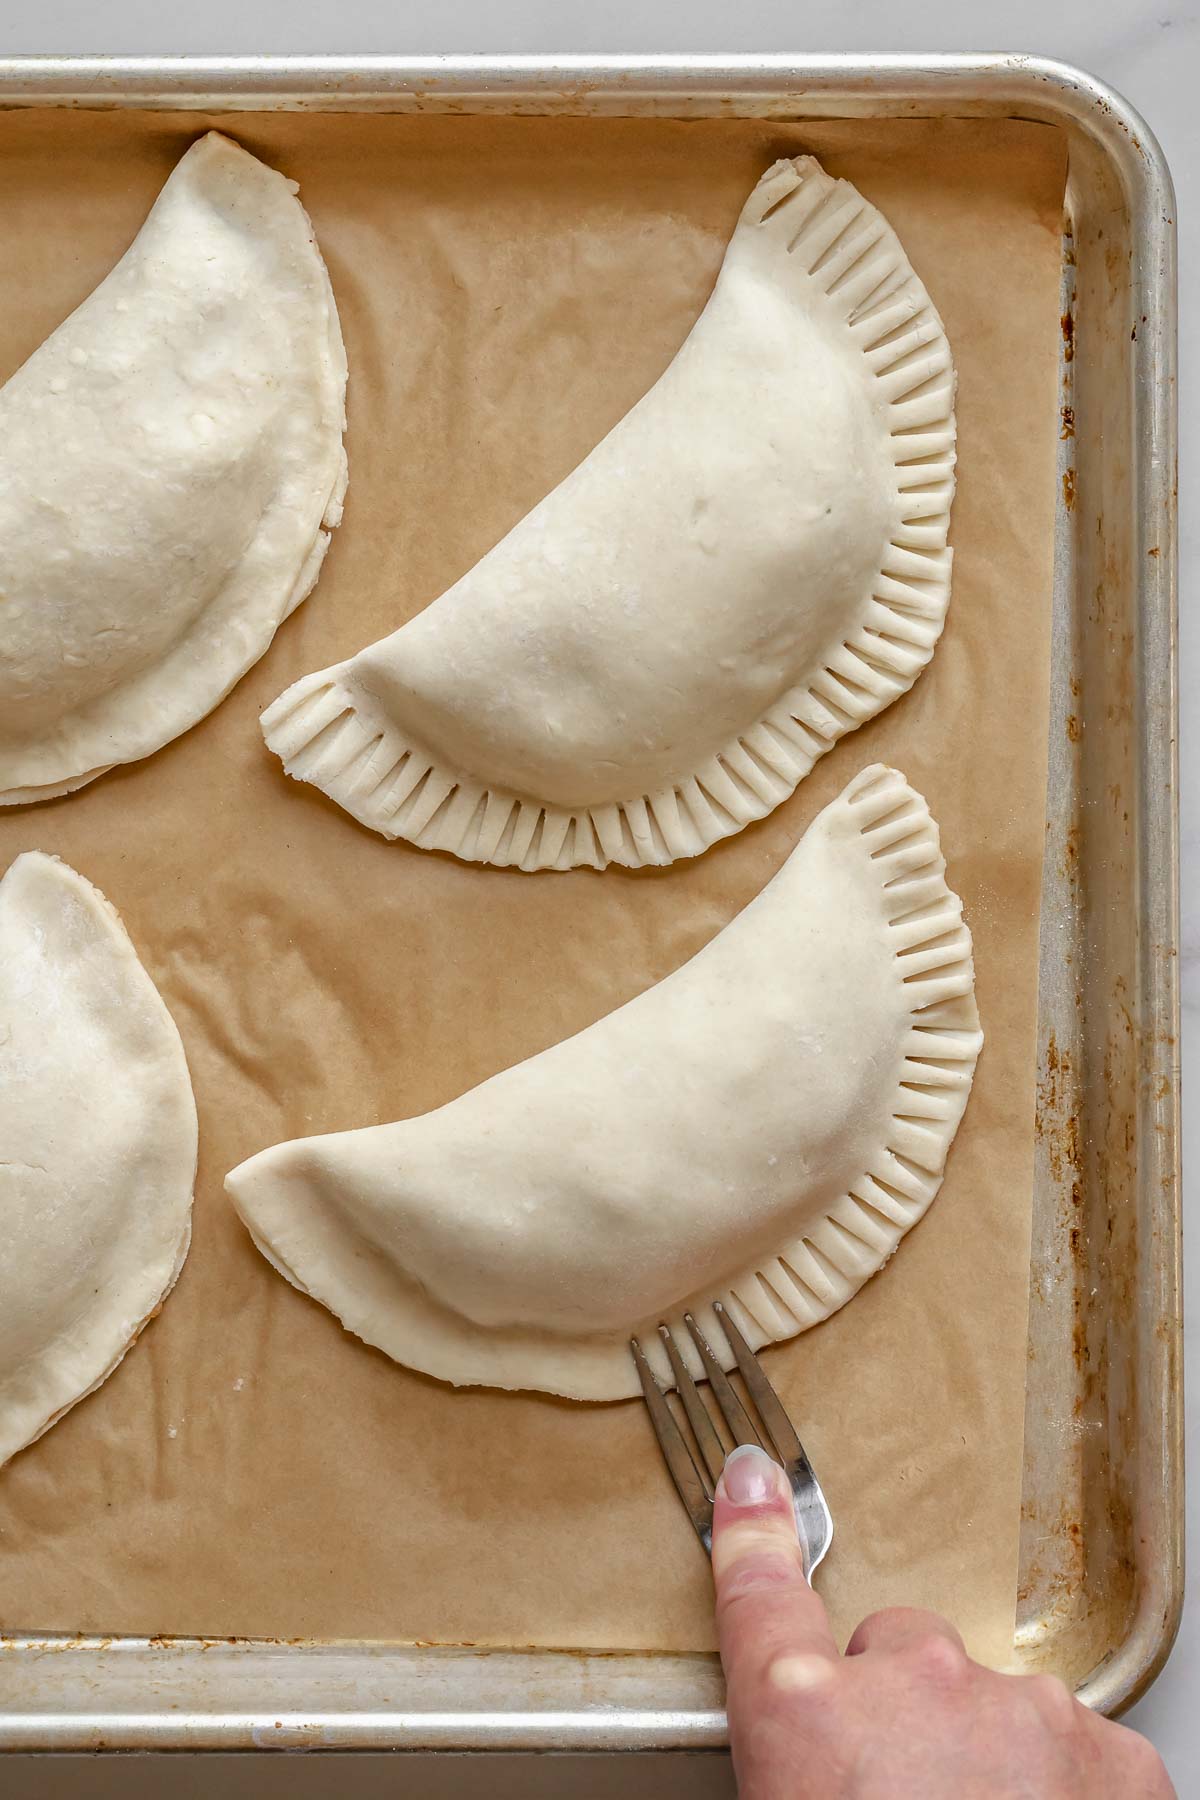
Eight: Use the tines of a fork to press the edges of hand pies together for the final seal. Freeze while the oil heats up.
Frying and Glazing Hand Pies
Hot tip! Have your oil frying station set up with paper towels, a wire rack or sheet pan, and a spider or slotted spoon next to it so everything is ready to go.
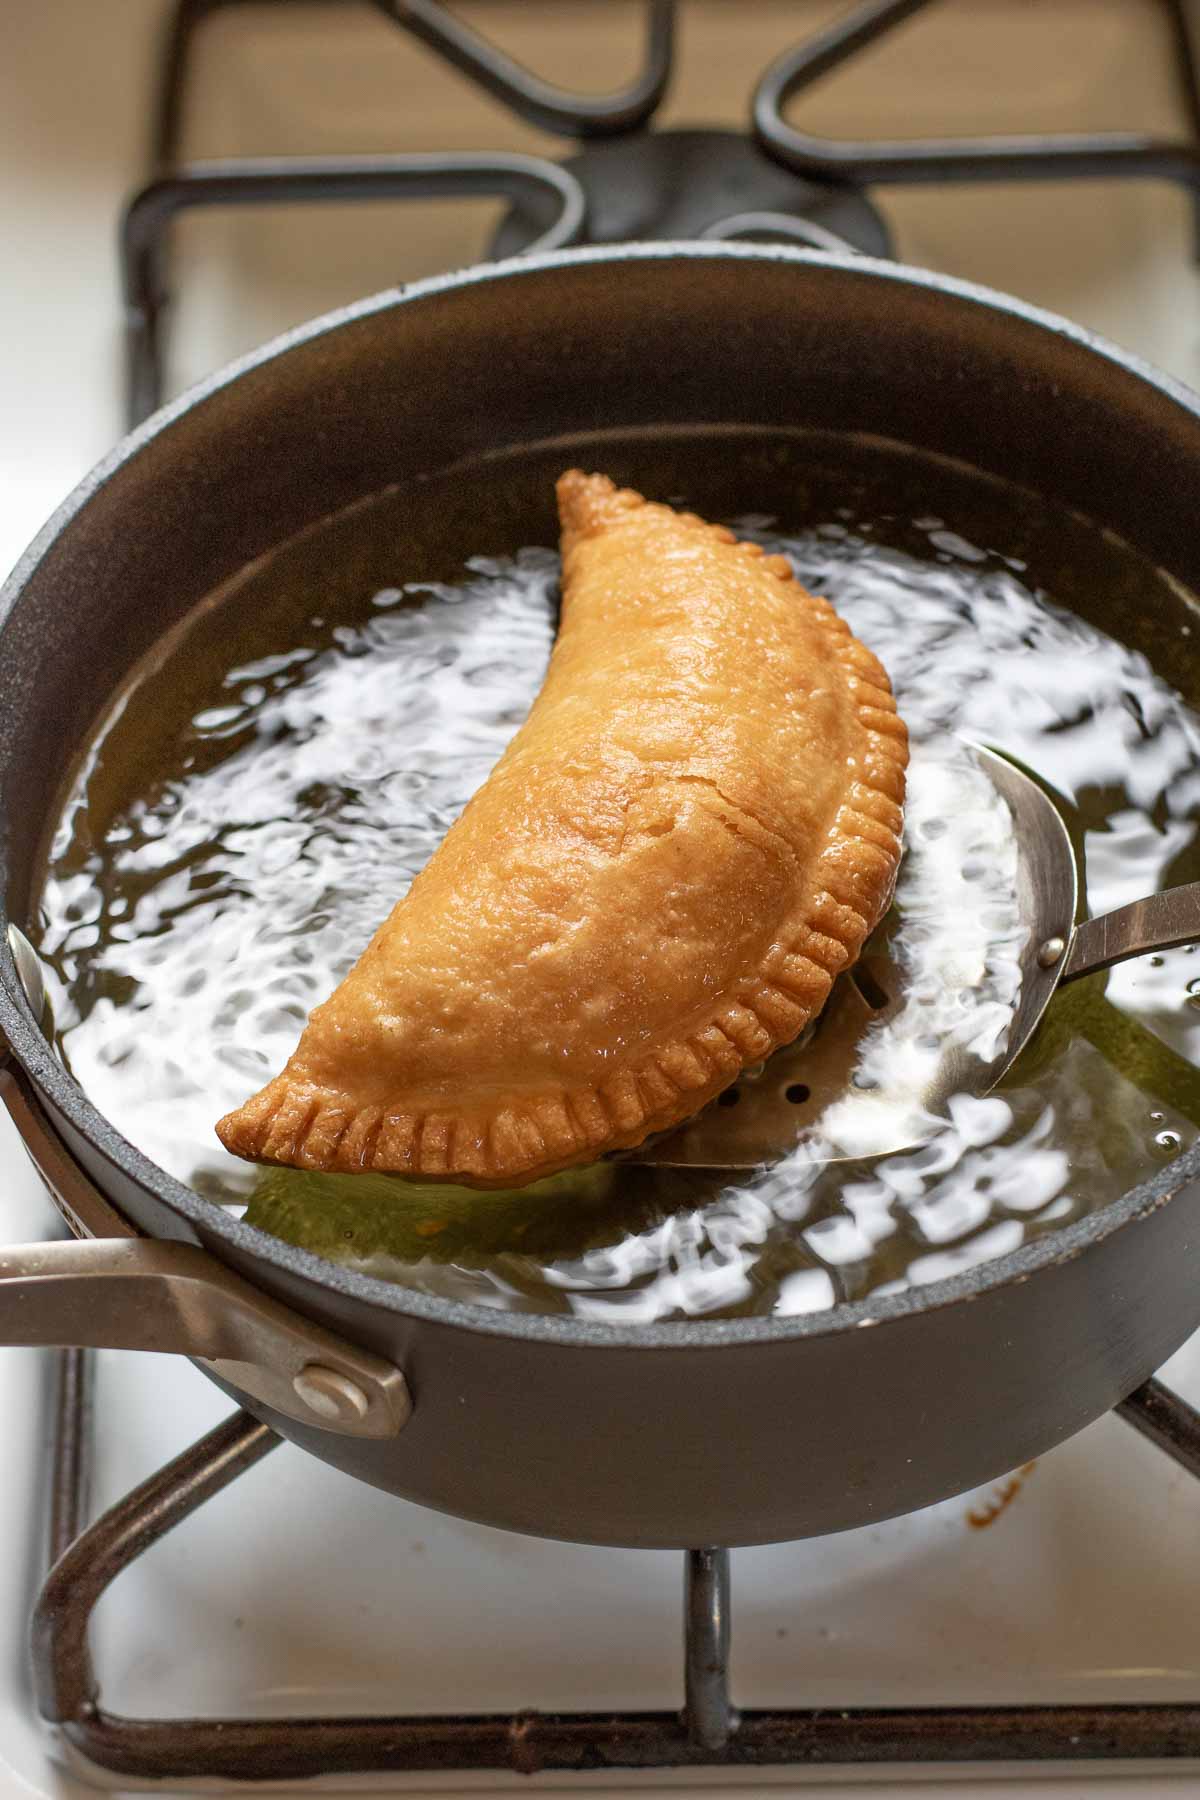
Nine: Fry the peach pies 1-3 at a time in hot oil until golden brown, then transfer to a wire rack or paper towel to cool.
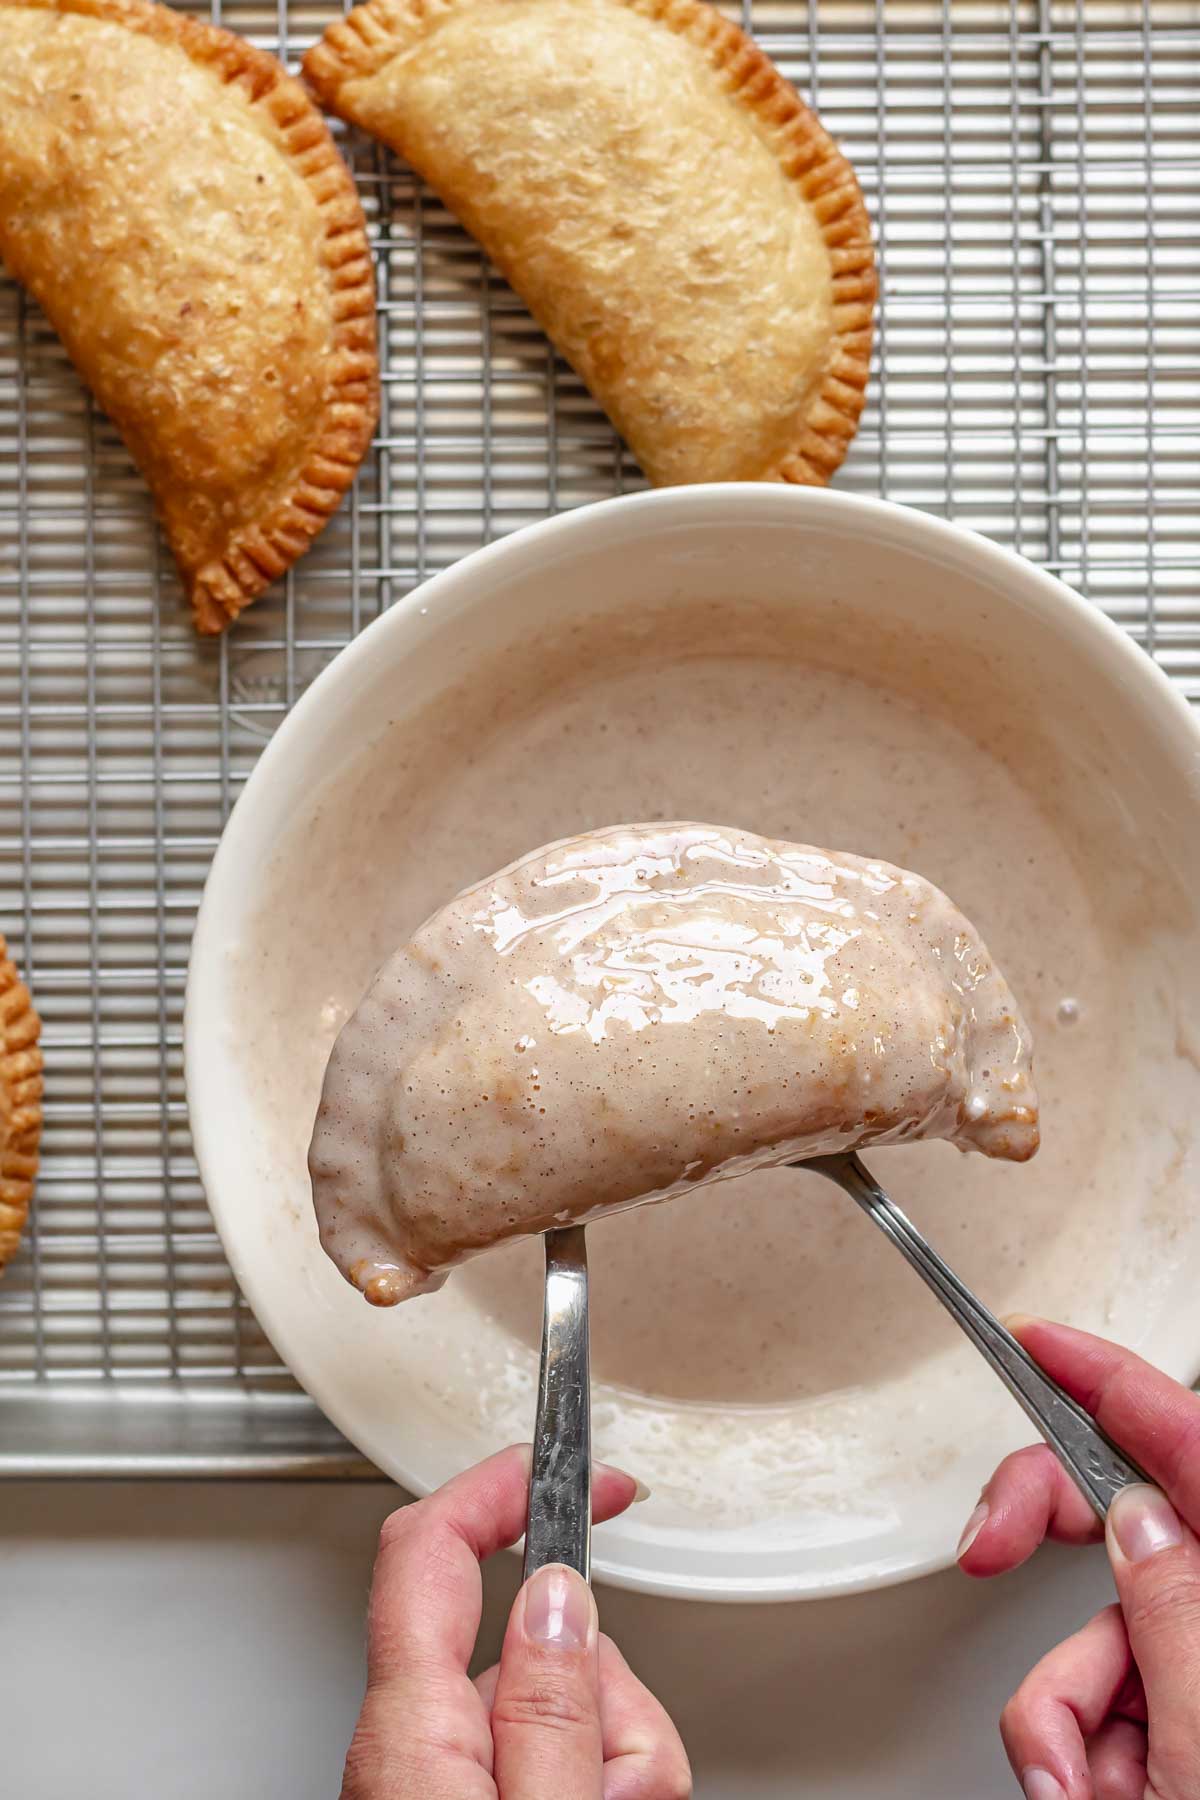
Ten: Once cool, mix together the glaze, coat each fried peach pie completely, then remove to a wire rack to set. Then, enjoy!
Expert Tips
- It's best to plan ahead for this recipe. I like to make the pie crust and pie filling a day in advance, then assemble and fry the next day!
- The pie dough can be made with a food processor or pastry cutter. See my all-butter pie crust post for tips!
- The dough circles can be cut to any size you'd like, the filling amount added will just need to be adjusted.
- Use a pastry brush to add a bit of water or egg wash to the areas you'll press together if you're worried about getting a good seal.
- Trim the very edges of the dough with a parking knife after crimping for super clean-looking half moons.
- Use a dutch oven or pot for deep frying. Or use a deep skillet or cast iron skillet to shallow fry (turning the pies over every 2 minutes to cook both sides).
- Be sure to keep a thermometer handy to check that the temperature of the oil remains between 350-375℉.
Recipe FAQs
This is likely because the oil temperature was not hot enough prior to adding the dough. Alternatively, it could also mean the pies were not fried for long enough and the inside layer of the dough did not cook completely.
To fix this, add the fried pies (with no glaze) to a sheet pan and bake for an additional 10 minutes or so in a preheated 350℉ oven.
I love a standard yellow peach for peach pie (free-stone if you can find it). However, you can absolutely use a white peach or even nectarines! Donut peaches can also be used, but you'll need more of them because they are smaller.
Yes! I recommend freezing the assembled and pre-fried dough. To do this, flash freeze the assembled hand pies on a cookie sheet for 30 minutes, then transfer to a zip-top bag and freeze them for up to three months. Fry directly from frozen.
You can also freeze the pies after frying, but only prior to adding the glaze. Allow the fried pies to cool completely, then place in a zip-top bag or sealed container and freeze for two to three months.
Storage
Store the fried pies for 2-3 days at room temperature, uncovered and not touching. The pies store best prior to adding the glaze, as it can make them a bit soggy.
The pre-fried pies can be flash frozen for 30 minutes, then placed in an airtight container and frozen for up to three months. Fry directly from frozen.
How to Reheat Fried Peach Pies
Reheat the pre-glazed fried hand pies in a 350℉/180℃ oven for 10 minutes until hot. Allow the pies to cool, then glaze. Alternatively, reheat them in an air fryer at the same temperature for about 5-7 minutes, then cool and glaze.
More Pie Recipes You'll Love

Did you make this recipe? Share it with us! Tag @thecozyplum on Instagram & Facebook and leave a star rating ⭐️ below!
📖Recipe

Fried Peach Pies
Equipment
- Food processor or pastry cutter
- Bowl or lid to cut out dough rounds
- Wire rack
- Paper towels
- Spider, slotted spoon, slotted spatula metal
Ingredients
Sweet Pie Crust
- 1 cup unsalted butter cold (2 sticks)
- ½ cup ice water very cold
- 3 cups all-purpose flour
- ½ cup granulated sugar
- ¼ teaspoon kosher salt
Peach Pie Filling
- 5 peaches peeled and diced into 1cm pieces
- ½ cup light brown sugar
- 1 teaspoon ground cinnamon
- ½ teaspoon ground cardamom optional
- 2 tablespoons cornstarch
- ½ cup water
- 2 teaspoons vanilla paste or extract
Frying & Glaze
- 48 fl oz vegetable oil
- 2 cups powdered sugar
- 1 teaspoon ground cinnamon
- ¼-½ cup water
Instructions
Pie Crust
- Cut the cold butter into ½” cubes and place in the freezer for about 15 minutes while you prepare the other ingredients.1 cup unsalted butter
- In a bowl, add about a cup of water and a handful of ice cubes and set aside. Add the flour, sugar, and salt to a food processor and pulse once to incorporate the salt.½ cup ice water, 3 cups all-purpose flour, ¼ teaspoon kosher salt, ½ cup granulated sugar
- Disperse the cold butter cubes around the flour in the food processor, then pulse the mixture until the butter reaches pea-sized pieces and looks slightly textured, almost like wet sand.
- Measure out ⅔ cup ice cold water (sans ice cubes) and drizzle about half of it around the bowl. Continue pulsing until the dough just starts to form crumbles, adding more water as needed.
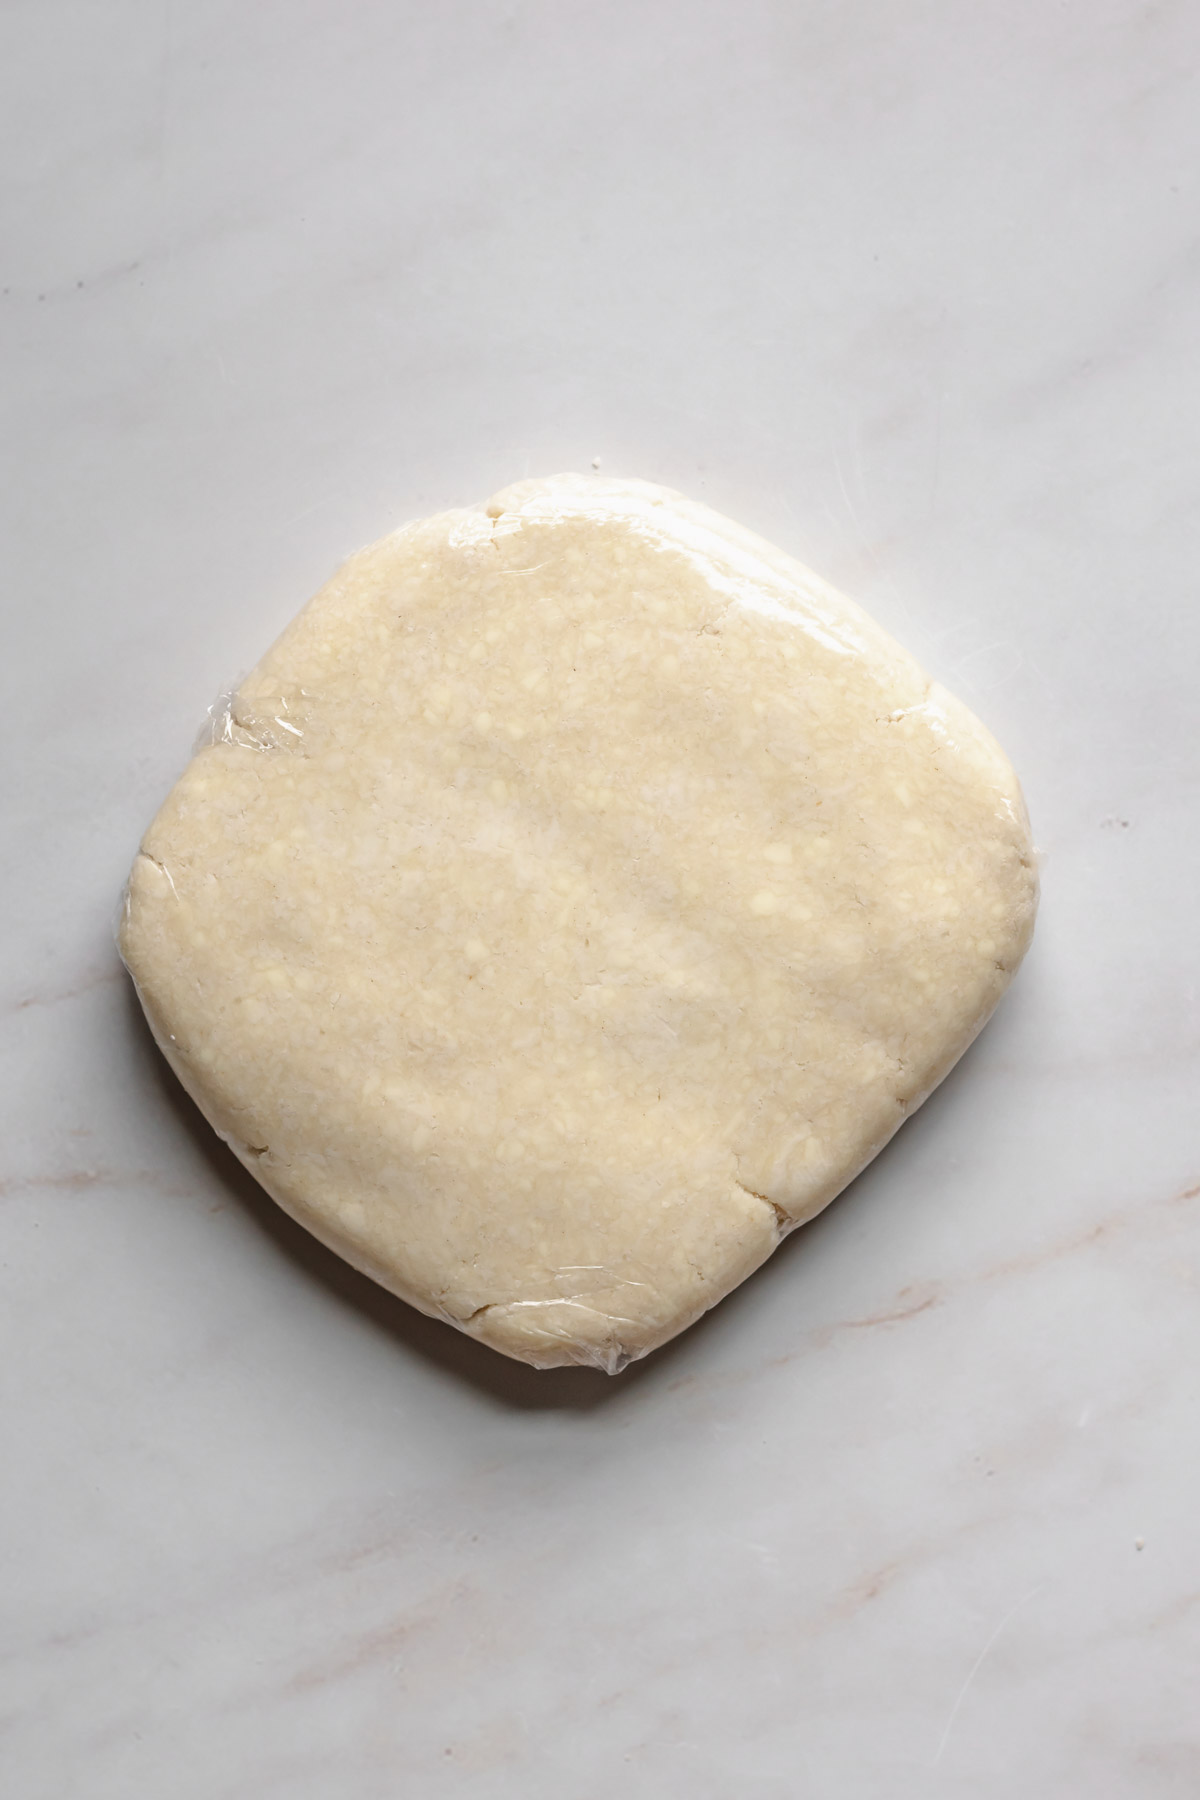
- The dough will easily press together in between your fingers, but should not feel wet. Remove the dough, separate into two even pieces, then wrap separately in plastic wrap and flatten into a 1” thick disc.
- Place in the fridge for 1-2 hours until firm and hydrated. Freeze the other disc of dough if not using (after the chill time).
Peach Pie Filling
- Peel, pit, and dice the peaches into 1 cm pieces. Then, add them to a large pan with the sugar, cinnamon, and cardamom. Cook over medium heat until the sugar dissolves and the peach juices being to release.5 peaches, ½ cup light brown sugar, 1 teaspoon ground cinnamon, ½ teaspoon ground cardamom
- Mix together the cornstarch and cold water, then add to the peaches and stir immediately, continuing stirring until thickened. Add the vanilla at the end. A rubber spatula dragged across the pan will leave a clean streak.2 tablespoons cornstarch, ½ cup water, 2 teaspoons vanilla paste or extract
- Remove the peaches from the pan and cool completely at room temperature or in the fridge.
Assembly
- Lightly flour your rolling pin and work surface, then roll out the dough, turning a quarter turn every few rolls to keep it round and even. Roll the dough until it’s about ⅛” thick.
- Use a 6" bowl and the tip of a paring knife to cut out as many rounds as possible. Stack the scraps on top of each other, then roll out the dough again and repeat until there are 6 rounds of dough.
- Scoop out ⅓-½ cup of peach pie filling and add to the center of each piece of dough.
- Pull the sides up, then lift the entire pie so the filling is toward the bottom and press the edges together at the top into a half moon. Remove as much air as possible.
- Place the half moon on the counter and use your fingers to firmly press the dough together. Use the tines of a fork to press the dough together for a second time all around the edges.
- Add the hand pies to a sheet pan with parchment paper and refrigerate while you prepare the oil and frying station.
Frying & Glazing
- Add the oil to a large heavy bottomed pot and place it over medium heat until it reaches a steady 350-375℉.48 fl oz vegetable oil
- Carefully lower 1-3 hand pies into the hot oil and fry for 6-9 minutes until deeply golden brown. Use a spider or metal slotted spoon to remove the pies to paper towels.
- Note: lift the pies (with a metal spatula) a few times within the first minute to two of frying to keep them from falling to the bottom and burning.
- Transfer the pies to a wire rack to cool completely. Once cool, mix together the powdered sugar, cinnamon, and water until a relatively runny glaze forms. Start with the lowest amount of water and add more as needed.2 cups powdered sugar, 1 teaspoon ground cinnamon, ¼-½ cup water
- Add a hand pie to the glaze, turn it over, and use two forks to lift it and allow the glaze to fall. Place back on to the wire rack.
- Once the glaze has set and hardened, bite in and enjoy!
Notes
- Prepare the dough and peach filling a day in advance, or at least 2 hours prior to assembly.
- Remove as much air as possible from the hand pies when folding them together.
- Trim off the tiniest bit of edges after crimping for clean-looking half moons.
- check the oil temperature during frying, and especially between batches to ensure the correct temperature. Keep it between 350-375℉ at all times, adjusting the heat as necessary.
- Allow the hand pies to cool completely at room temperature before glazing for best results. About 30 minutes.
Tricia says
The crust was excellent - it was sturdy enough to hold together through the frying but flaky and tasty. I made mine in a dutch oven & burned the bottom of the first two. After that I let the rest on a metal spatula so they wouldn't sit on the pan. The rest turned out great. Not too experienced at deep frying but I would make these again.
Callan Wenner says
Hi Tricia, so happy to hear you took the jump at these! That's a really good point on the sinking, so I'm going to add a note about the sinking to the recipe card so other's don't run into this issue! Thanks a bunch for reporting back.
Cornethia says
If using frozen peaches, what amount?
Callan Wenner says
Use about 2 heaping cups!
Wanda Fincher says
It's peach season here so I am making these today. I haven't formed the pies yet, but I will this evening. I tasted the peach filling and it's perfect. I really like the way you post your recipes. Your instructions and clear and give useful tips, like holding the pies up so the filling is in the bottom of the shell. Didn't think of that, till you mentioned it. Thanks so much!
Callan Wenner says
Hey Wanda, thanks so much for the message! I appreciate you sharing these tid bits, and I hope you love them!
Elizabeth says
Can these be baked I nstead of fying
Callan Wenner says
Hi Elizabeth, yes you can bake these! Allow the formed pies to chill in the fridge for about 30 minutes, then bake on a parchment-lined baking sheet at 375F for 25-35 minutes until very golden!
Vicki says
Thank you for this recipe. It was easy to follow and I've wanted to fry peach and or apple hand pies. Someone said the dough is a bit different than actual pie crust. Are the crust a little different? I can make pie crust good. My crust turns out easy to move uncooked. When baked it's very flaky. So, the only way to find out is to get started and compare. Thanks for your instruction.
Vicki Bommelyn
The Cozy Plum says
Hi Vicki, this is the all-butter pie crust I use for pretty much all of my pastry and is my go-to, however, you can totally make this with your own pie crust that you love and makes you most comfortable! Or a store-bought. Just note that you may have to layer some scraps and re-roll them to get all six pies. And you'll need two or three store-bought crusts to the mark since they're a bit smaller. You could also just make the pastry rounds a bit smaller to get all the ones you need, too. I'd say, go with whatever you're comfortable with!