
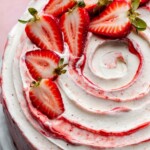
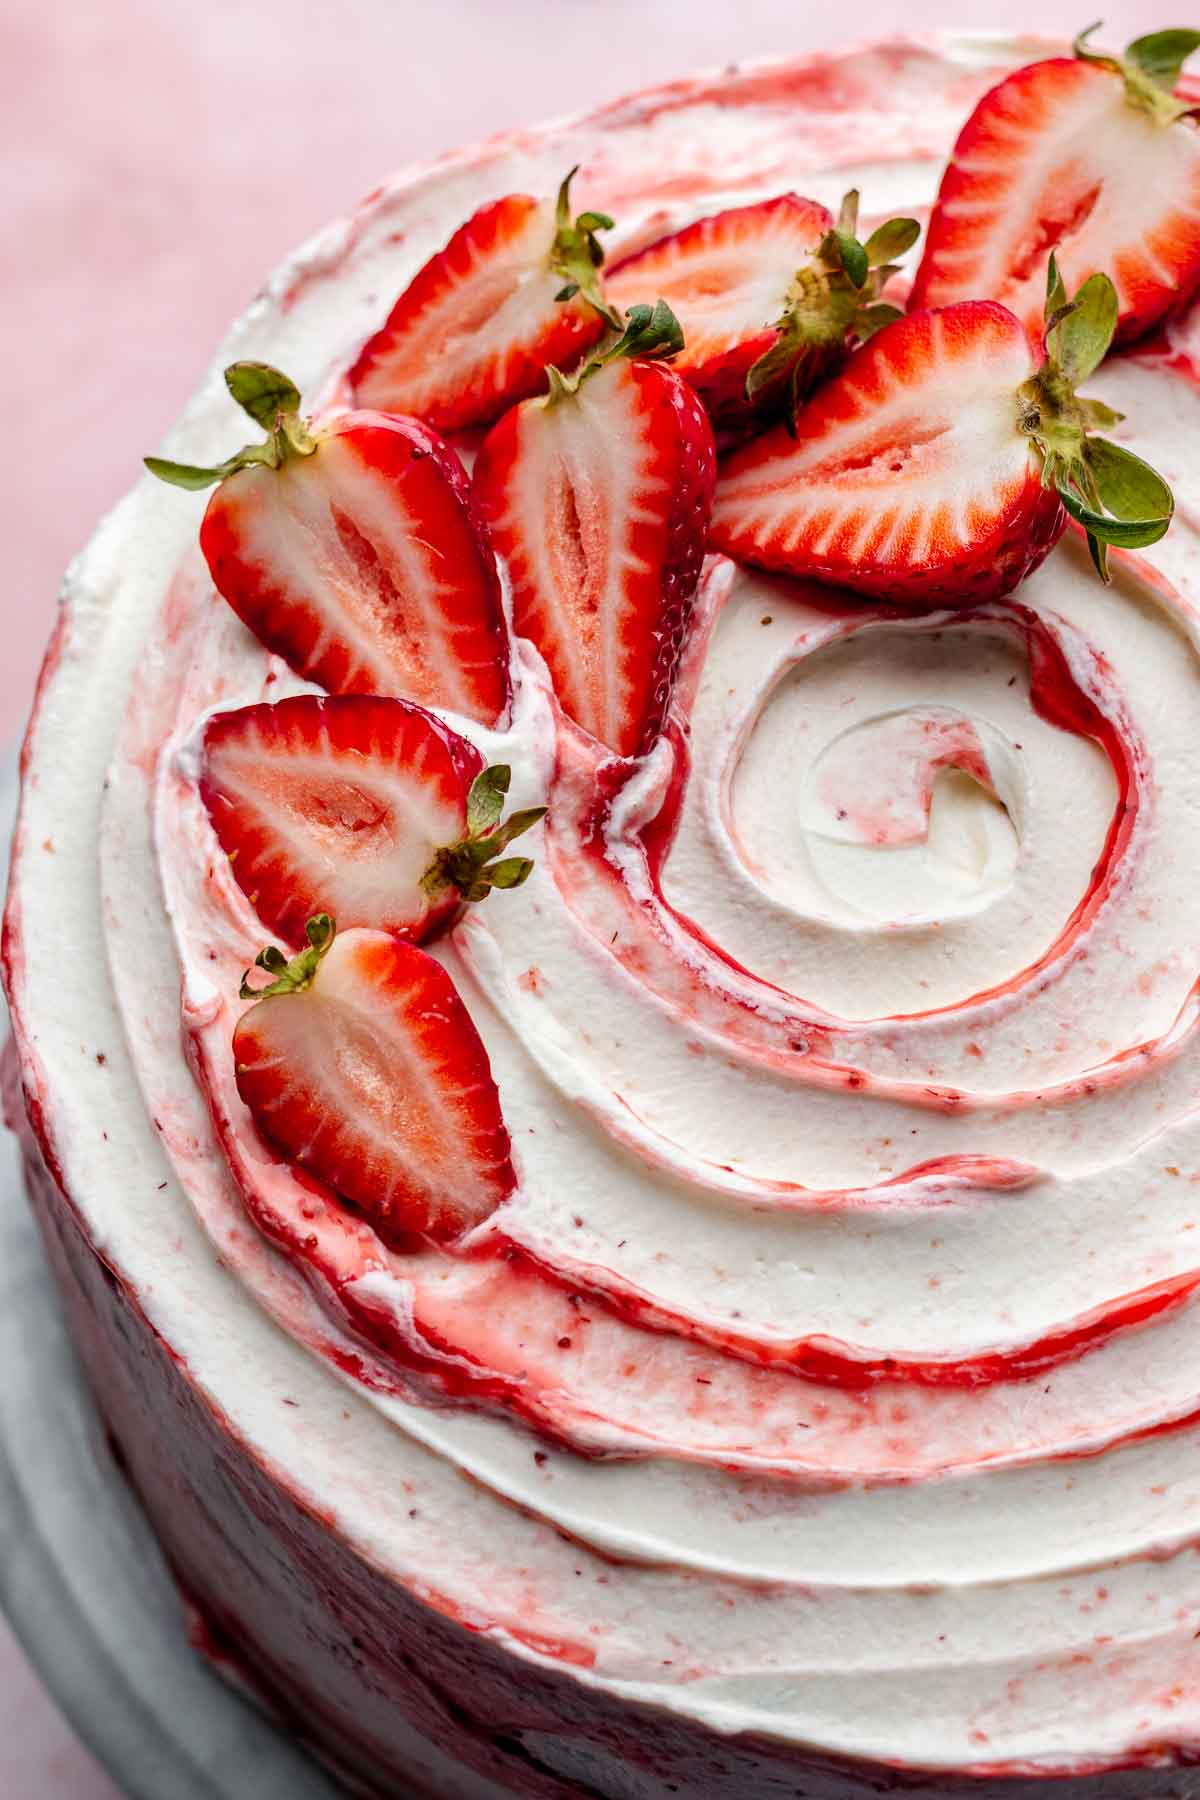
This strawberry shortcake cake is made with a light, fluffy vanilla sponge cake soaked in strawberry simple syrup, fresh strawberries, and lightly sweetened whipped cream. It’s all layered together to make an upscale version of the summertime classic.
Make this into a 2-layer or 3-layer strawberry shortcake cake for the perfect summer birthday cake and serve it alongside homemade strawberry ice cream for extra strawberry flavor, or rip up the cake and serve it as a summer trifle.
Unlike traditional strawberry shortcake, for this layered strawberry shortcake, I chose not to macerate the strawberries so they kept their texture. Instead, I went with a strawberry simple syrup to get the strawberry juice into the cake layers and make them extra moist.
Between the fresh strawberries and the strawberry simple syrup, this cake is bursting with berry flavor! For more strawberry bakes, try your hand at these strawberry whoopie pies, strawberry banana cake, strawberry cupcakes, or mini strawberry cheesecakes.
Jump to:
- Why You'll Love This Recipe
- Ingredients
- Substitutions and Variations
- Stabilizing Whipped Cream with Gelatin
- How to Make This Recipe
- Cake Recipe for Strawberry Shortcake
- Strawberry Shortcake Assembly
- Tips for the Best Strawberry Shortcake
- Recipe FAQs
- Storage
- More Cake Recipes You'll Love
- 📖Recipe
- Come Bake With Us!
Why You'll Love This Recipe
A twist on a classic - This layered strawberry shortcake has all of the deliciousness of the traditional version but morphed into a more elevated version perfect for a party.
Major strawberry flavor - This recipe uses fresh strawberries and soaks the sponge cake in strawberry syrup, so you get double strawberry flavor in every bite.
Simple layer cake - Even though it is visually impressive, this strawberry shortcake is a simple layer cake. You can make it rustic with whipped cream in between layer and on top, or go for the swirled effect.
Ingredients
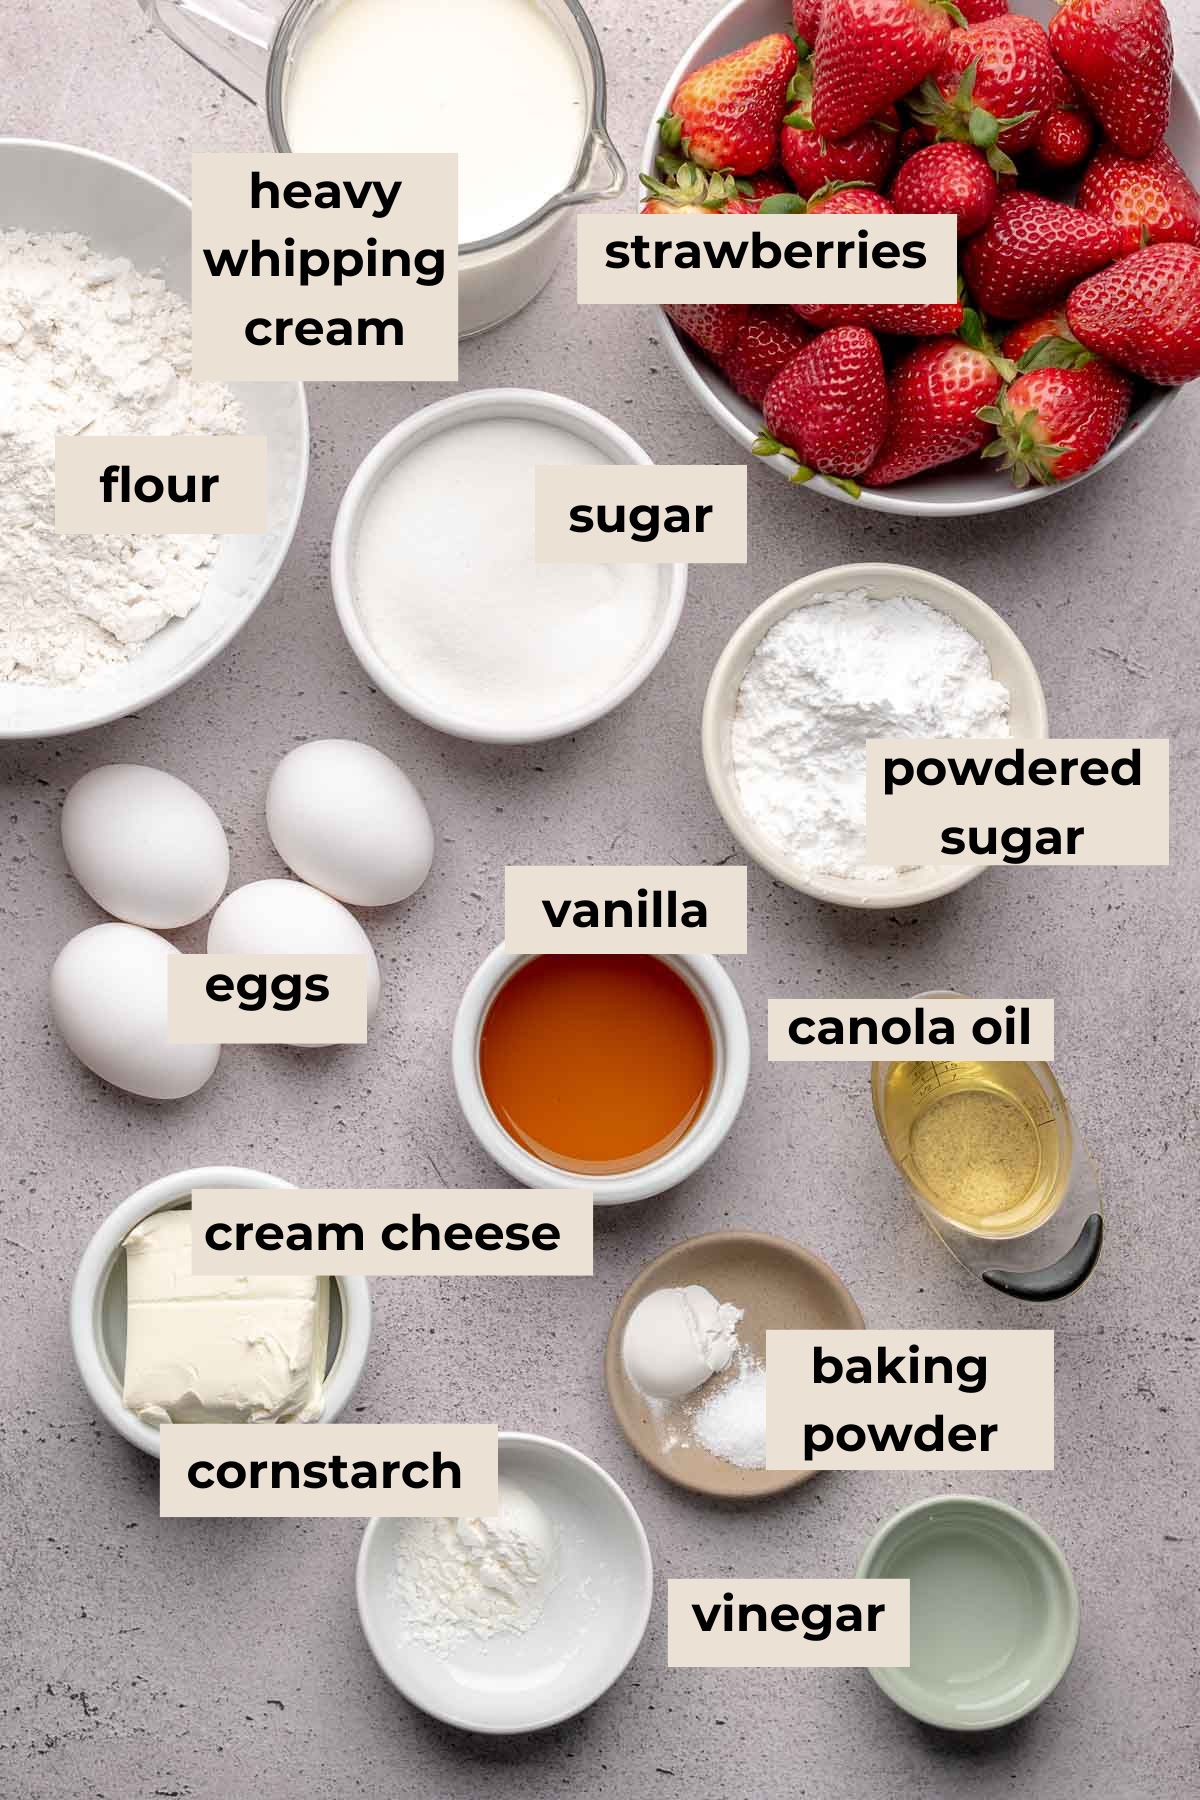
- Strawberries. Find the freshest, sweetest strawberries you can find!
- Baking powder. This ingredient gives a bit more lift to the sponge cake.
- Neutral oil. Canola oil, vegetable oil, or grapeseed oil can be used.
- Vinegar. This helps to stabilize the egg whites in the cake.
- Eggs. The egg yolks and whites get separated, beaten until fluffy, and folded together to create a light, airy cake.
- Cornstarch. Used to thicken the strawberry puree to decorate the outside of the cake.
- Cream cheese. This is used to stabilize the whipped cream so the cake can last a few days. Gelatin can also be used - see below on how to make this swap.
- Heavy whipping cream. Cold cream (at least 36% milk fat) gets whipped up to create a fluffy, lightly sweet frosting.
See recipe card for full ingredients list and quantities.
Substitutions and Variations
- Swap out the strawberries for raspberries, blackberries, or blueberries.
- Skip making your own cake and use store bought sponge or angel food cake.
- Use strawberry jam in place of the strawberry simple syrup or strawberry puree.
- Split the cake into 2 layers instead of three for an even easier version.
- Rub 1 tablespoon of lemon zest into the sugar that goes into the cake batter to brighten the flavor.
- Add 1-2 tablespoons of your favorite liqueur to the simple syrup after cooking for extra flavor.
- Stabilize the whipped cream with gelatin instead of cream cheese. See below.
Stabilizing Whipped Cream with Gelatin
If you'd prefer to stabilize the whipped cream without the cream cheese, you can do so with unflavored gelatin.
Add ¼ cup of cold water to a small saucepan. Sprinkle 4 teaspoons of gelatin over top and let it sit for a few minutes until thickened. Turn the heat to low and swirl the mixture a few times until the gelatin is dissolved. Remove from the heat.
Whip the whipped cream until soft peaks form. With the mixer on low speed, drizzle in the gelatin, then increase the speed and continue whipping until stiff peaks form.
Frost the cake, then refrigerate for a minimum of 6 hours to set the gelatin and let the cake flavors merry.
How to Make This Recipe
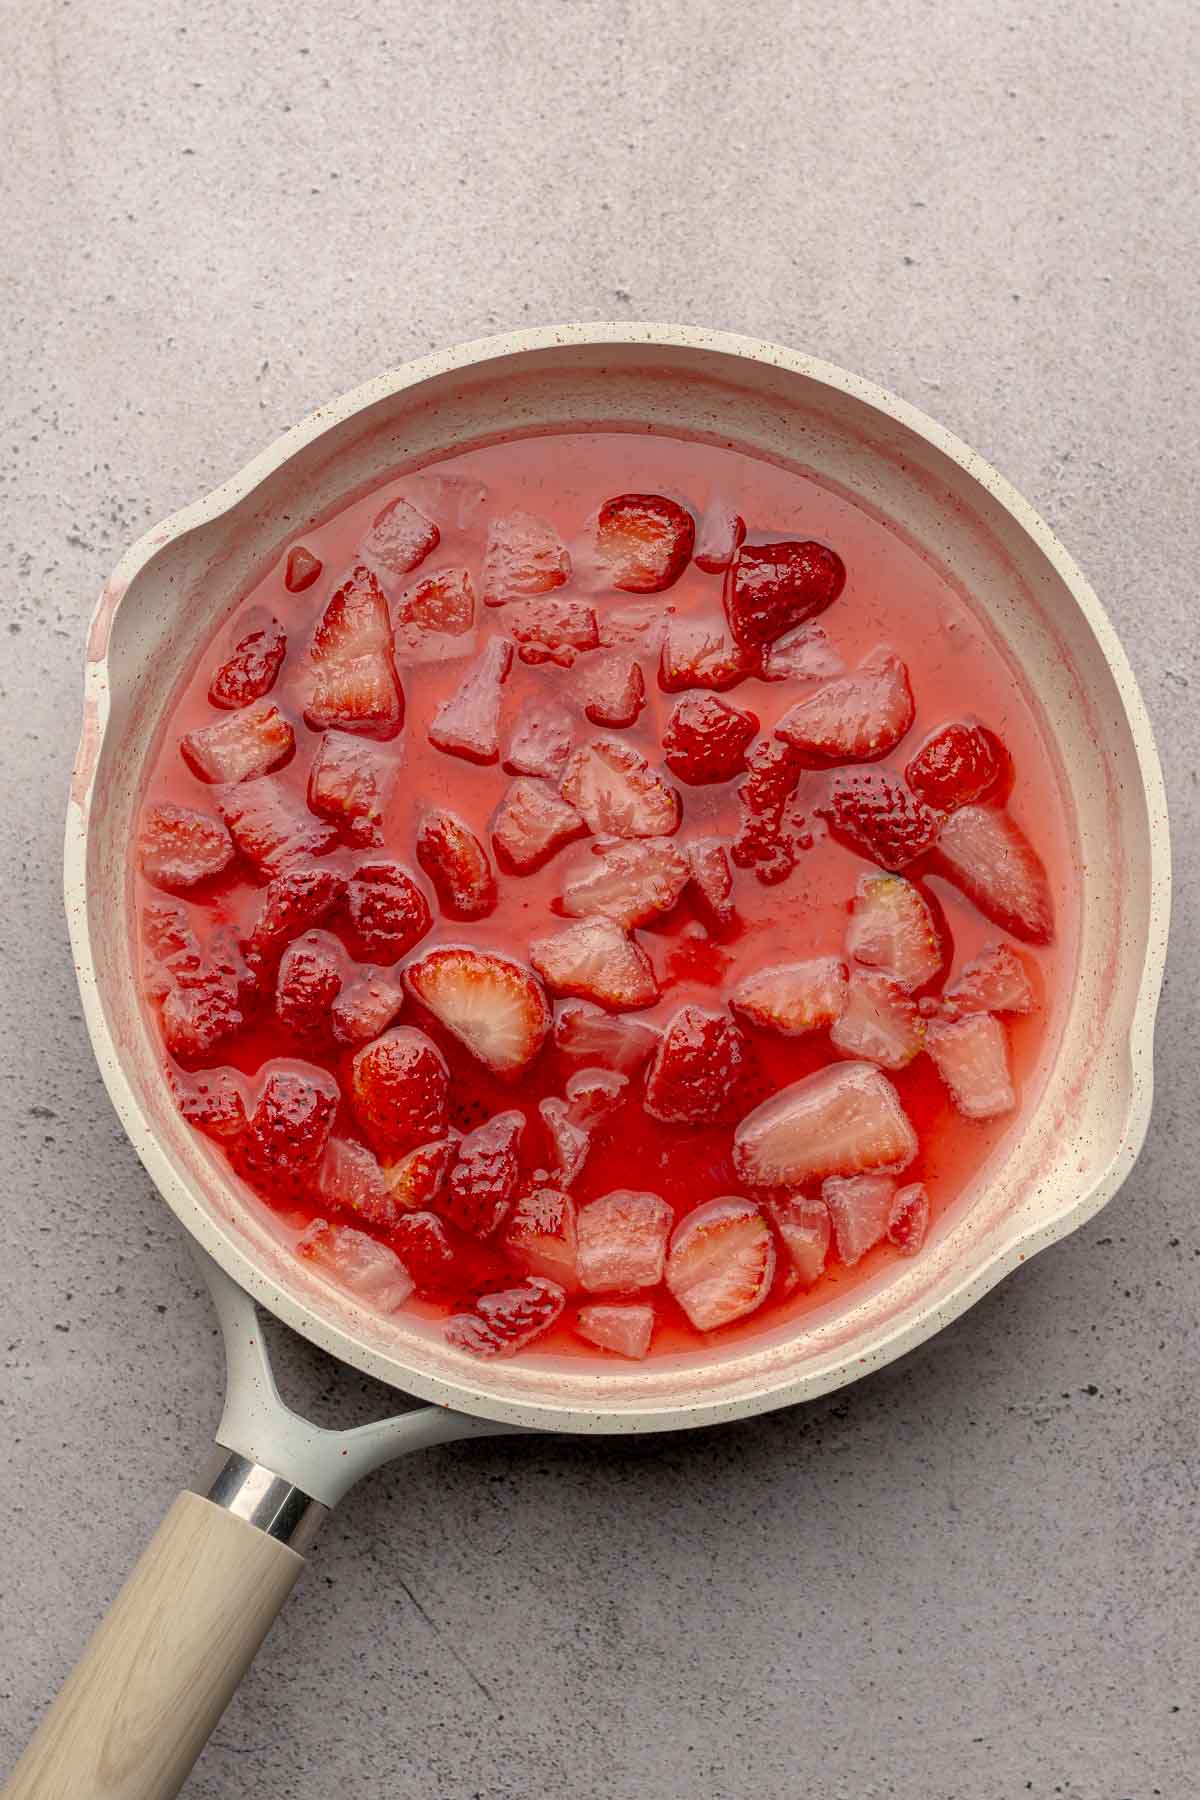
One: Heat strawberries, water, and sugar and set aside. This is the simple syrup.
Two: Heat more strawberries, sugar, water, and cornstarch until thickened.

Three: Blend the thickened strawberries until smooth and cool completely. This is to decorate the outside of the cake.
Four: Beat the egg whites until stiff peaks form.
Cake Recipe for Strawberry Shortcake
Five: Beat the egg yolks and other cake ingredients until light in color then mix in the flour.
Six: Fold the egg whites into the batter in batches until light and fluffy.
Hot tip! To combine the egg whites, fold gently in a "J" motion going to the bottom of the bowl and coming up and over. Don't over mix, or else the cake won't rise well during baking.
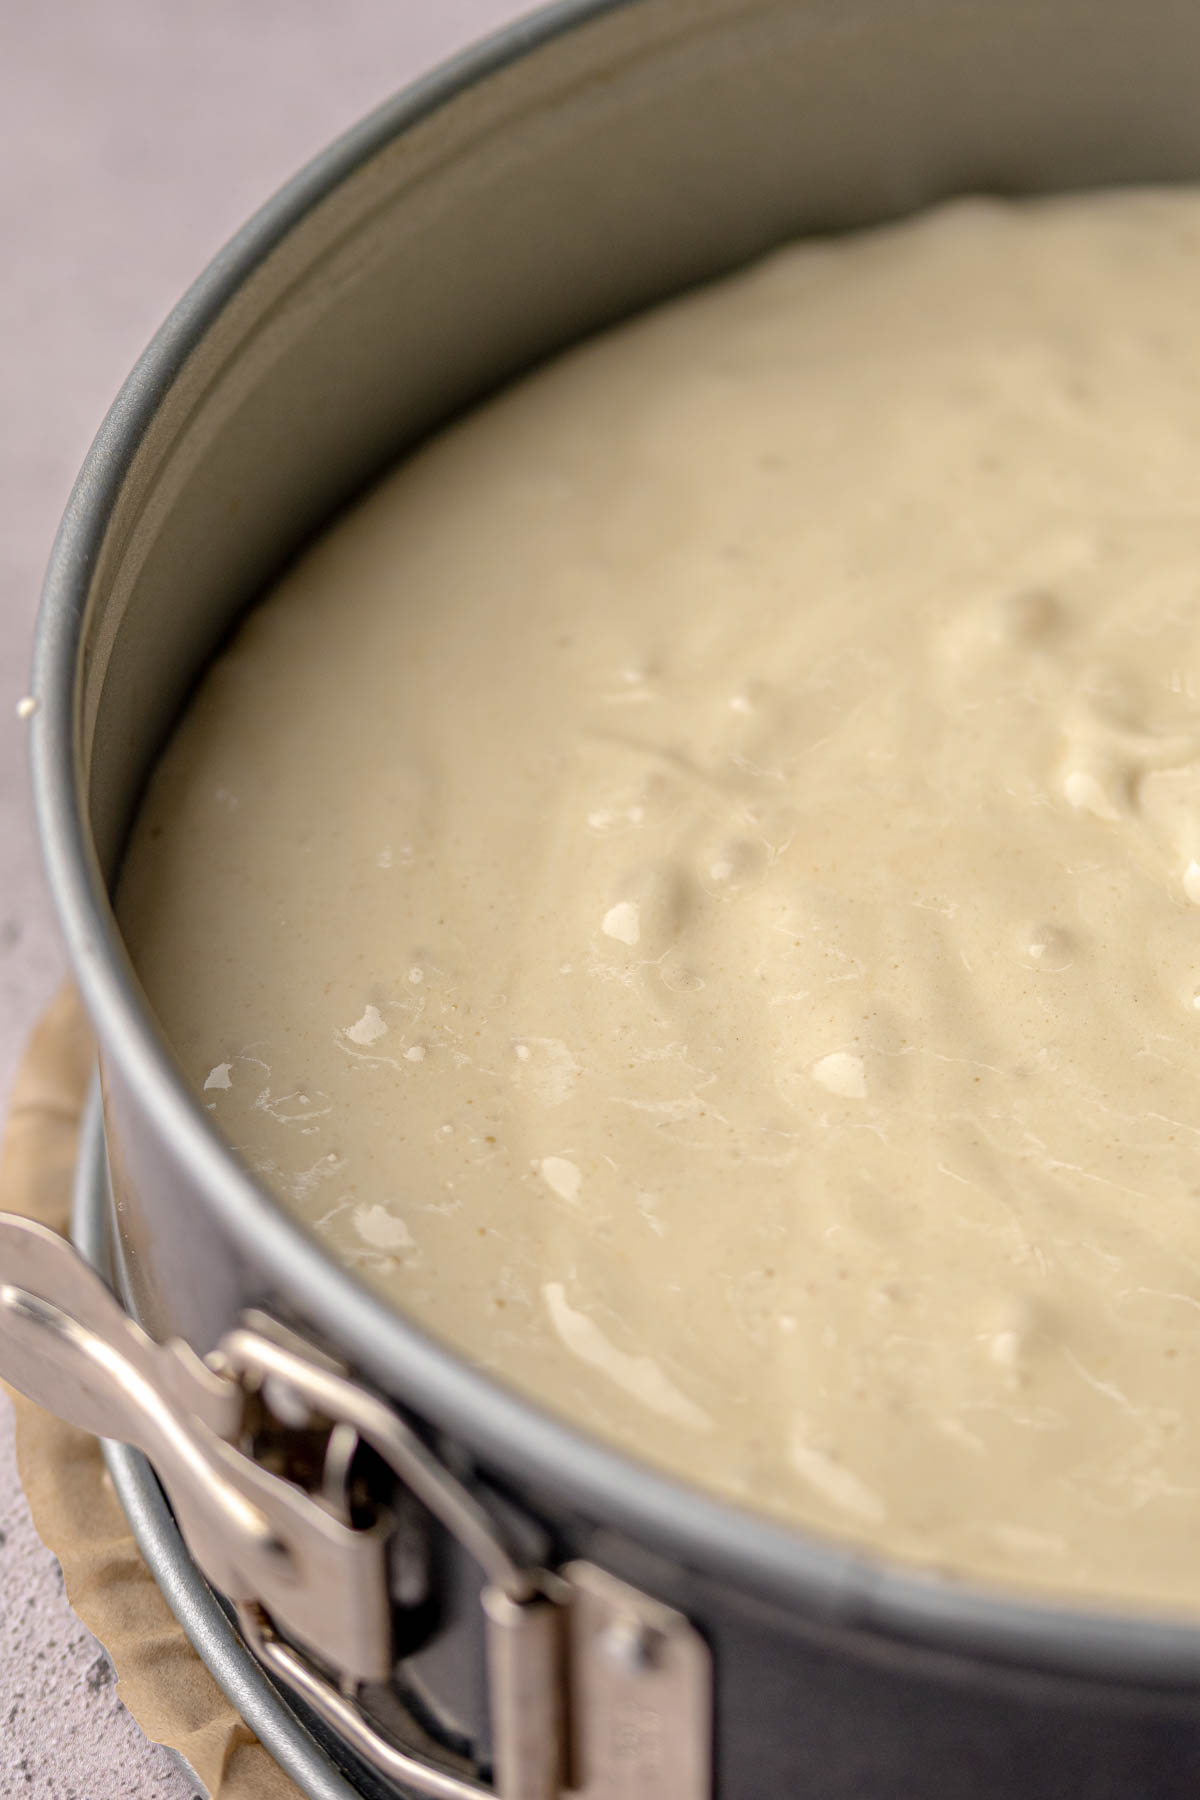
Seven: Add the batter to an un-greased springform pan, bake and cool.
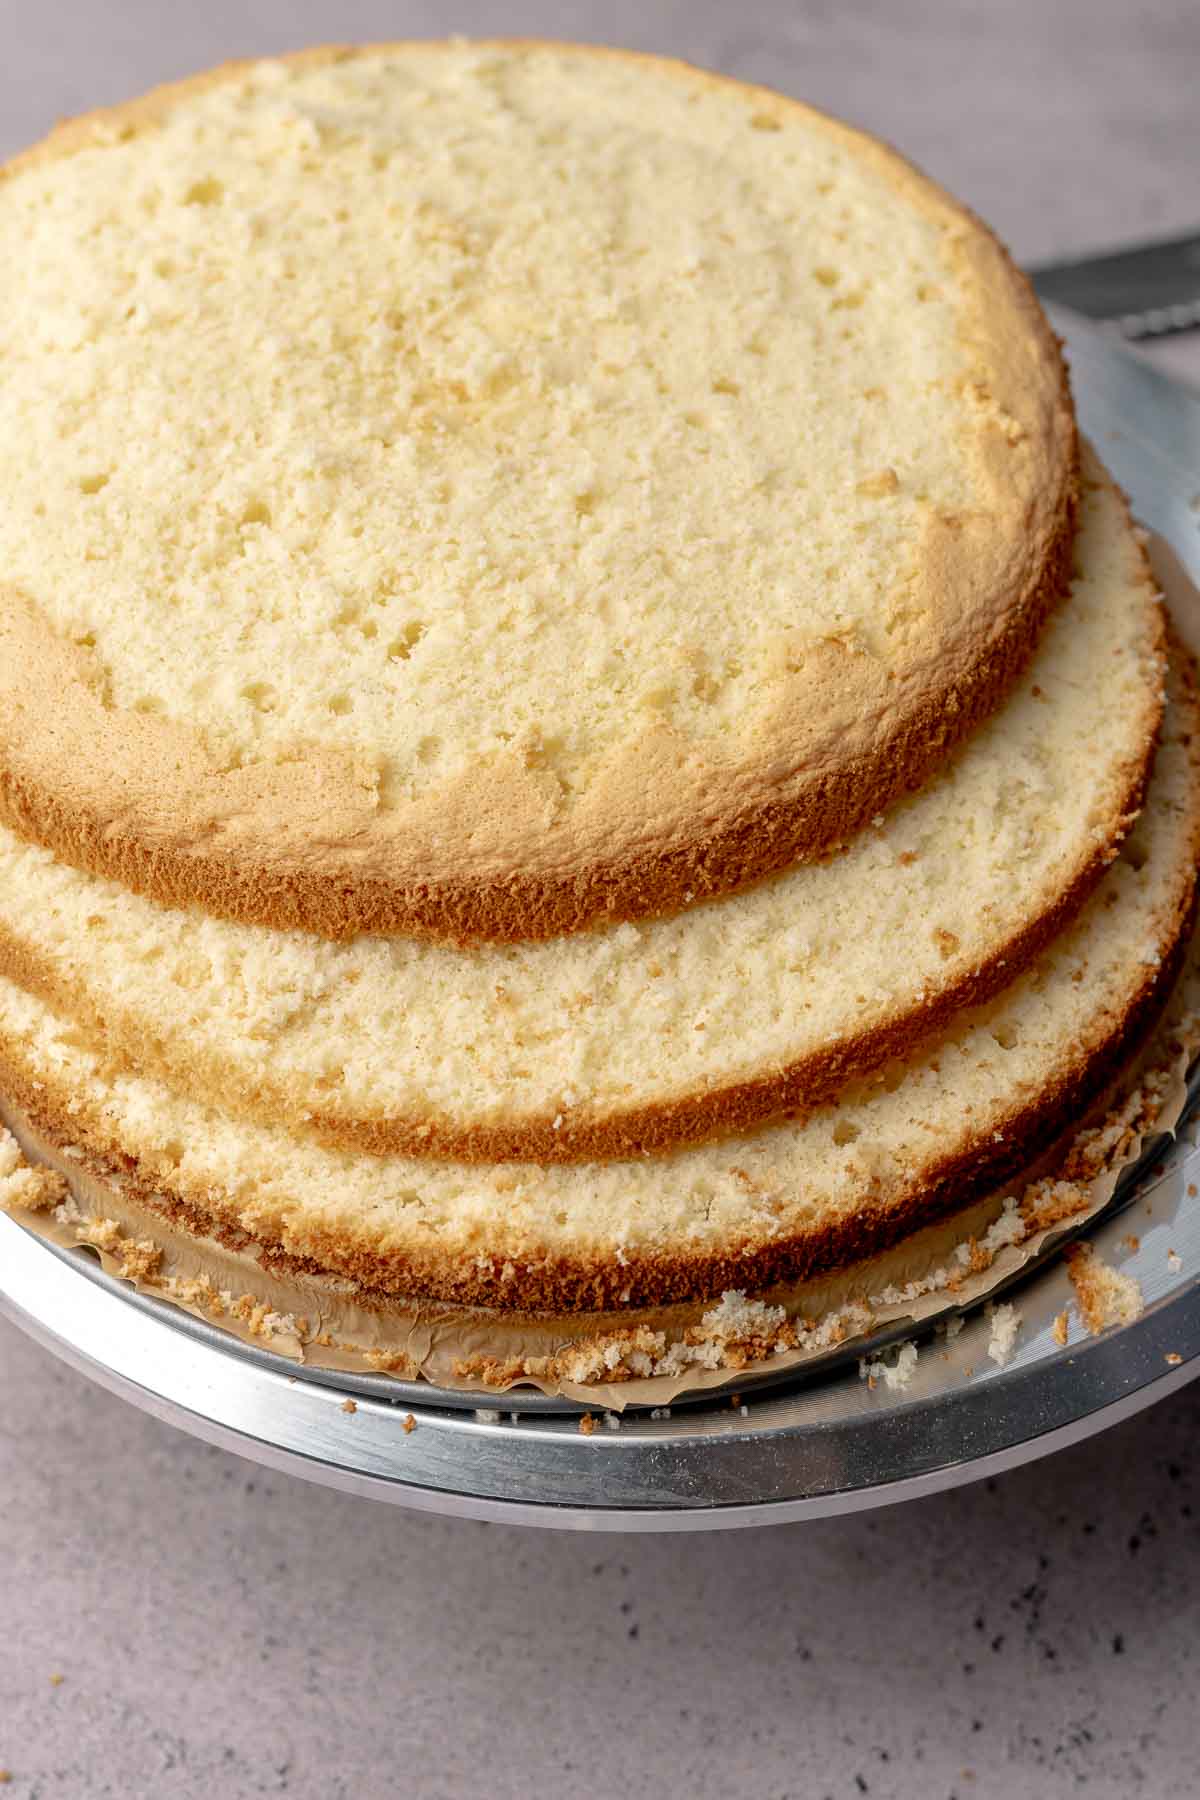
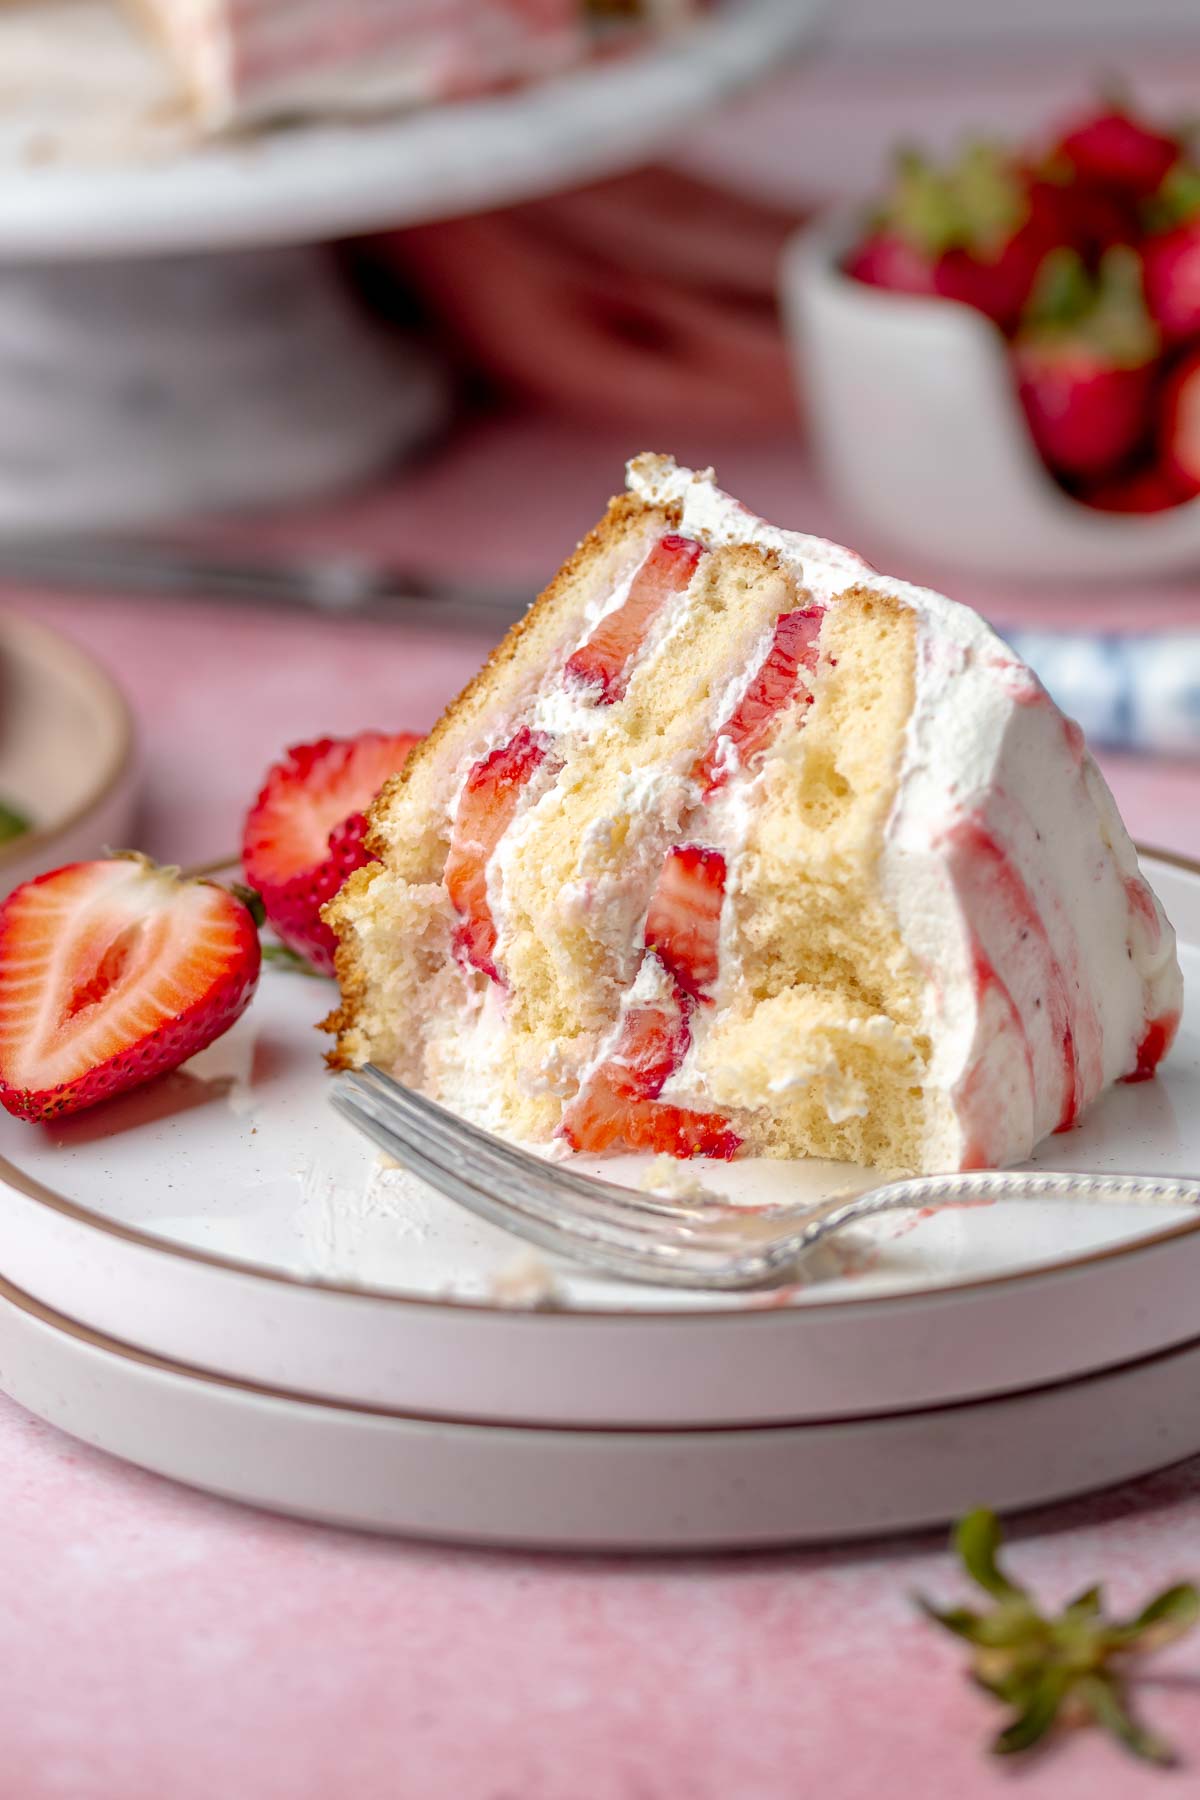
Eight: Use a serrated knife to slice the cake horizontally into three even layers.
Hot tip! Hold one hand on top of the cake and score two even lines around the cake. Then use a gentle sawing motion while moving around the cake and pulling inwards to separate the layers.
💌 Save This Recipe
Strawberry Shortcake Assembly
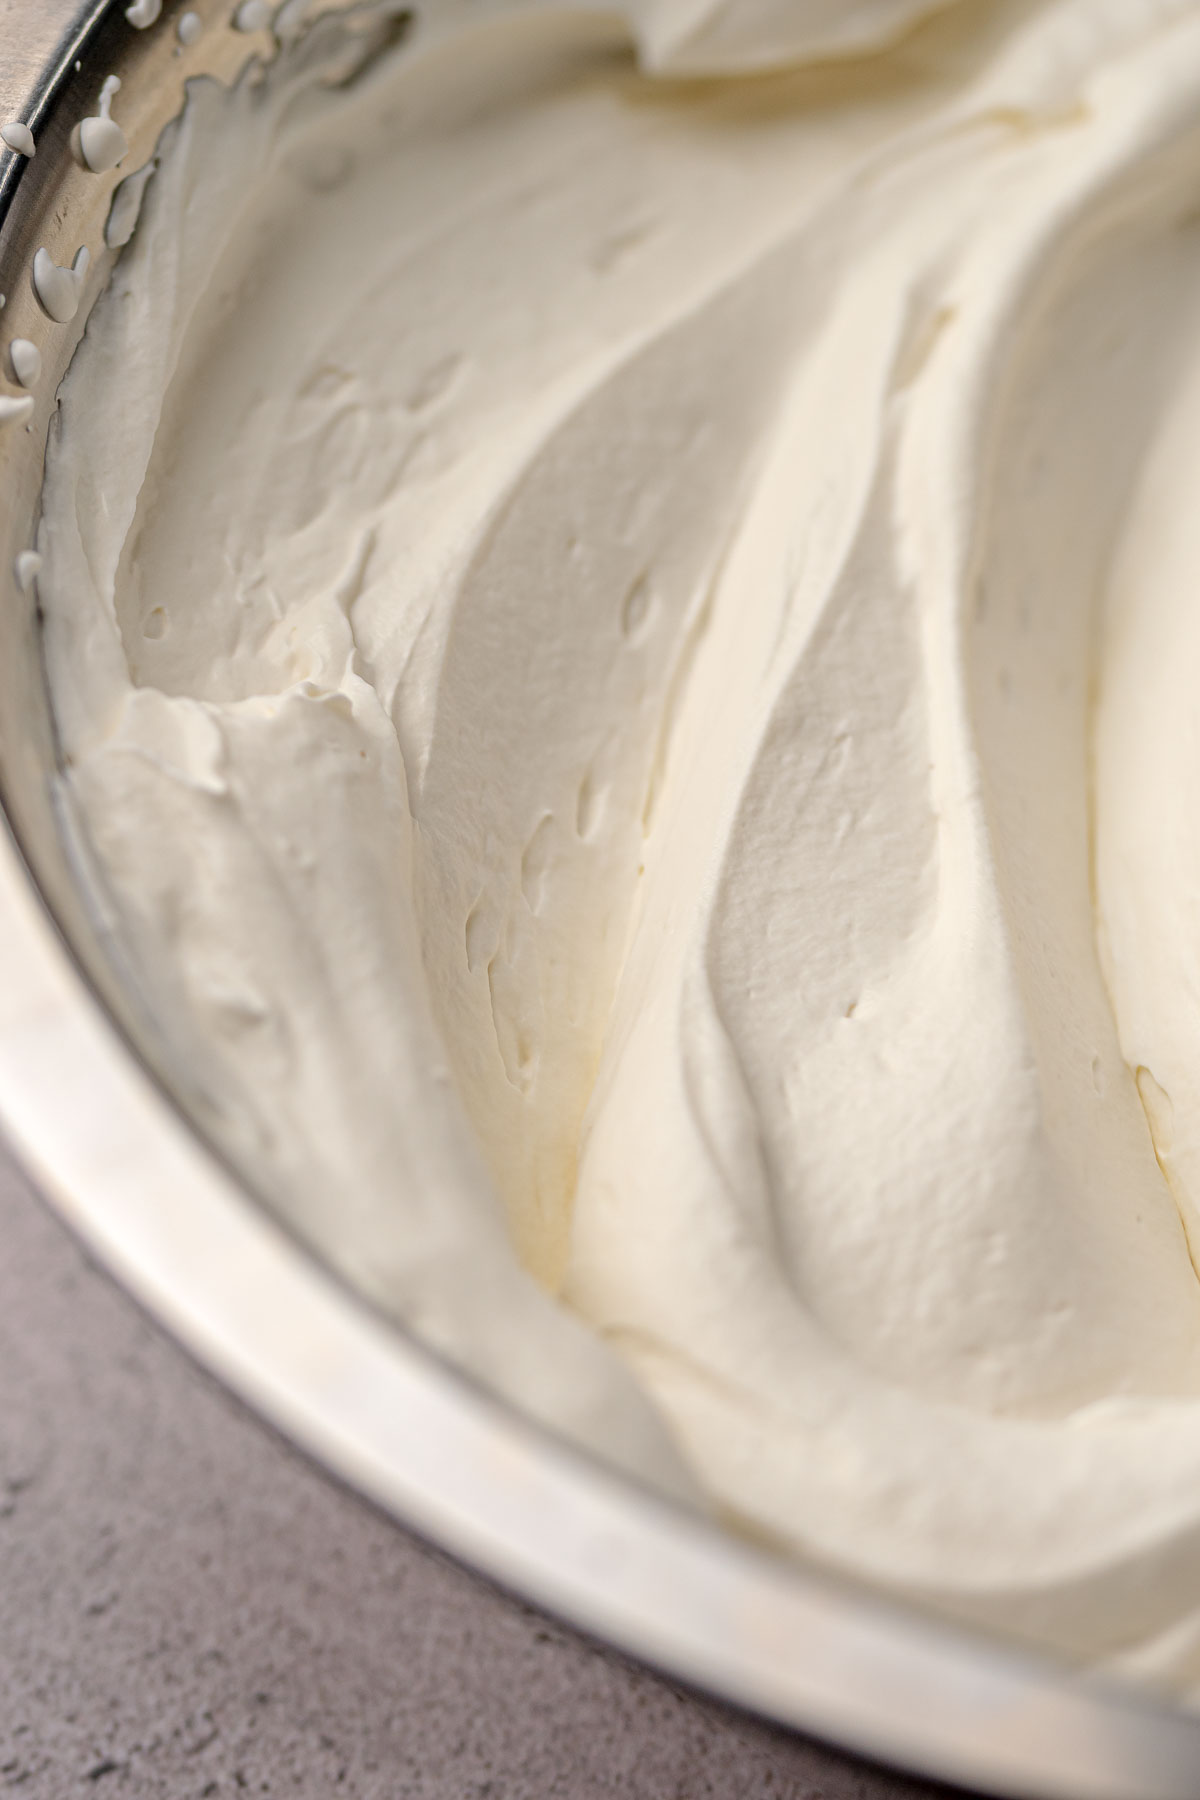
Nine: Make the stabilized whipped cream and whip until light and fluffy.
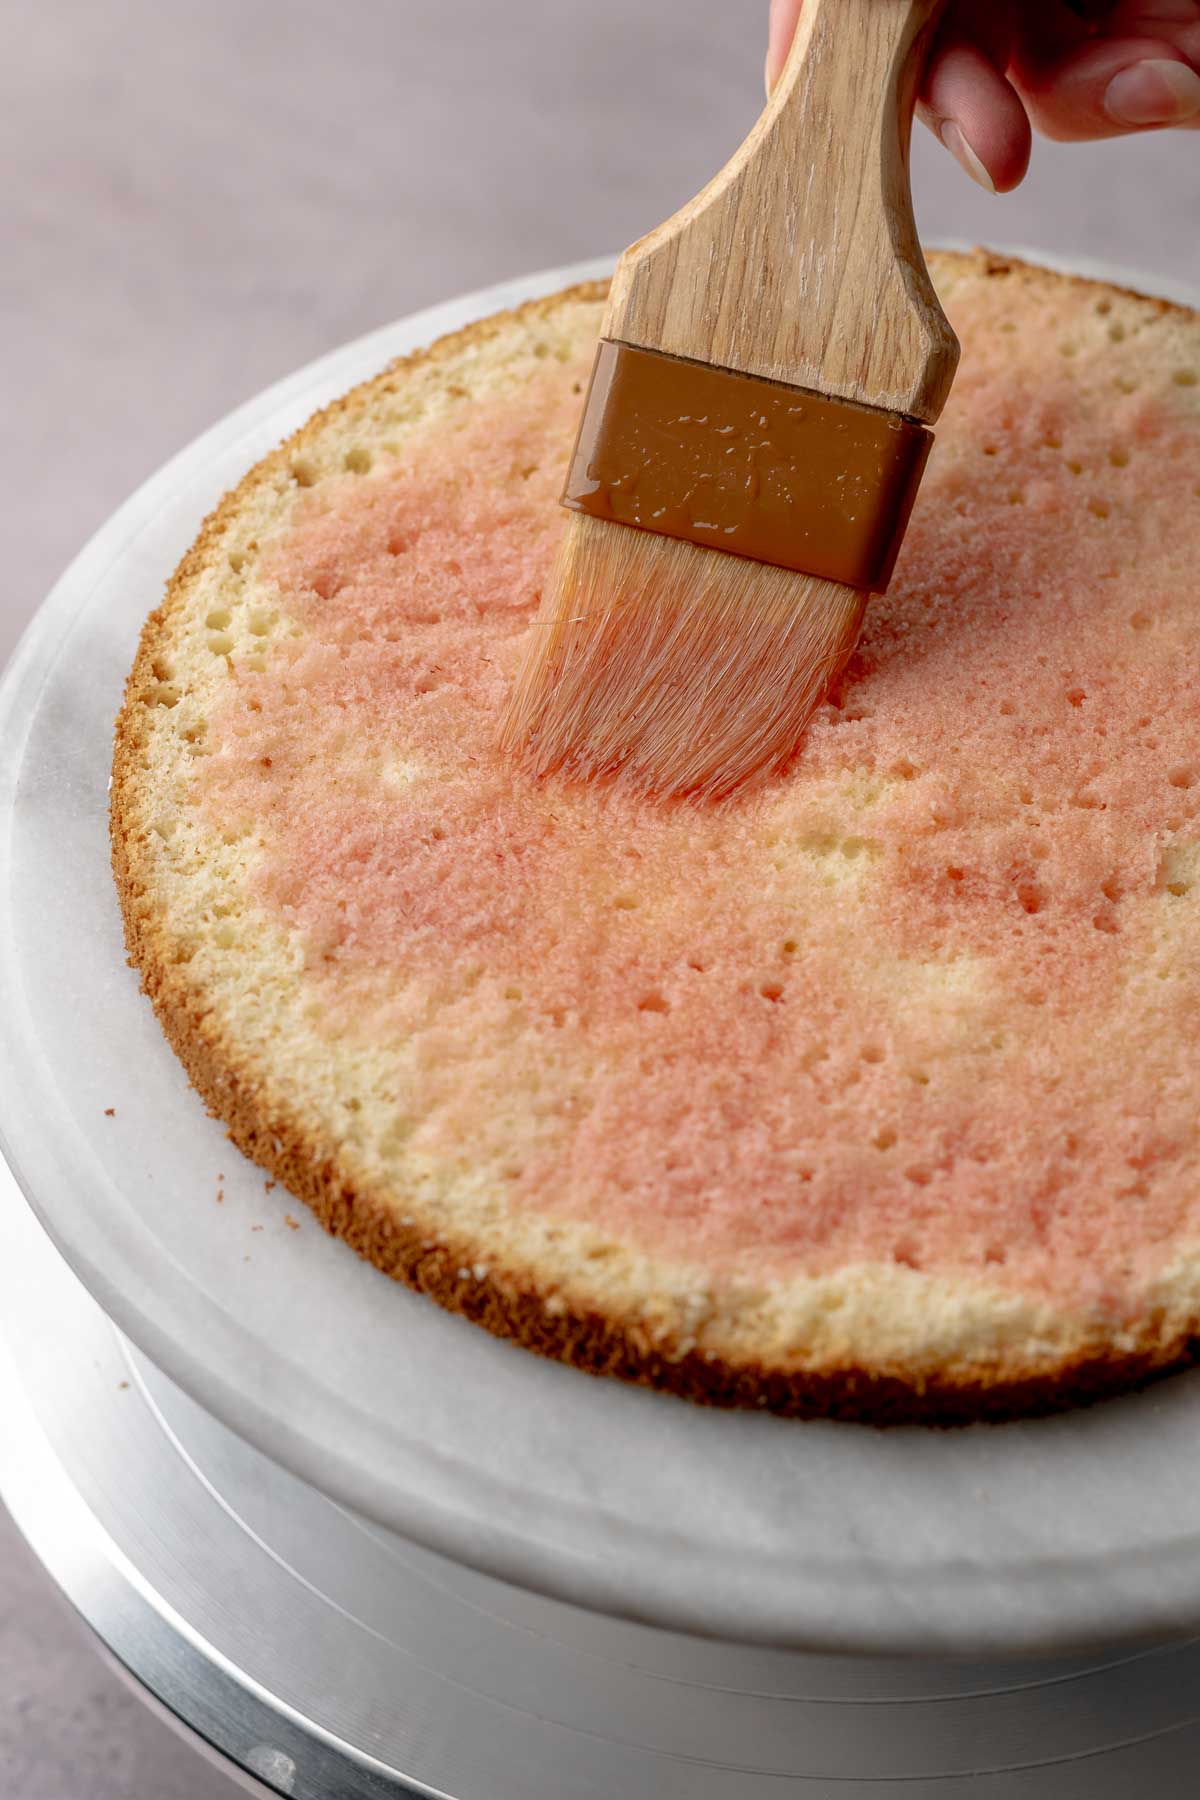
Ten: Add the cooled simple syrup all over the first cake layer.
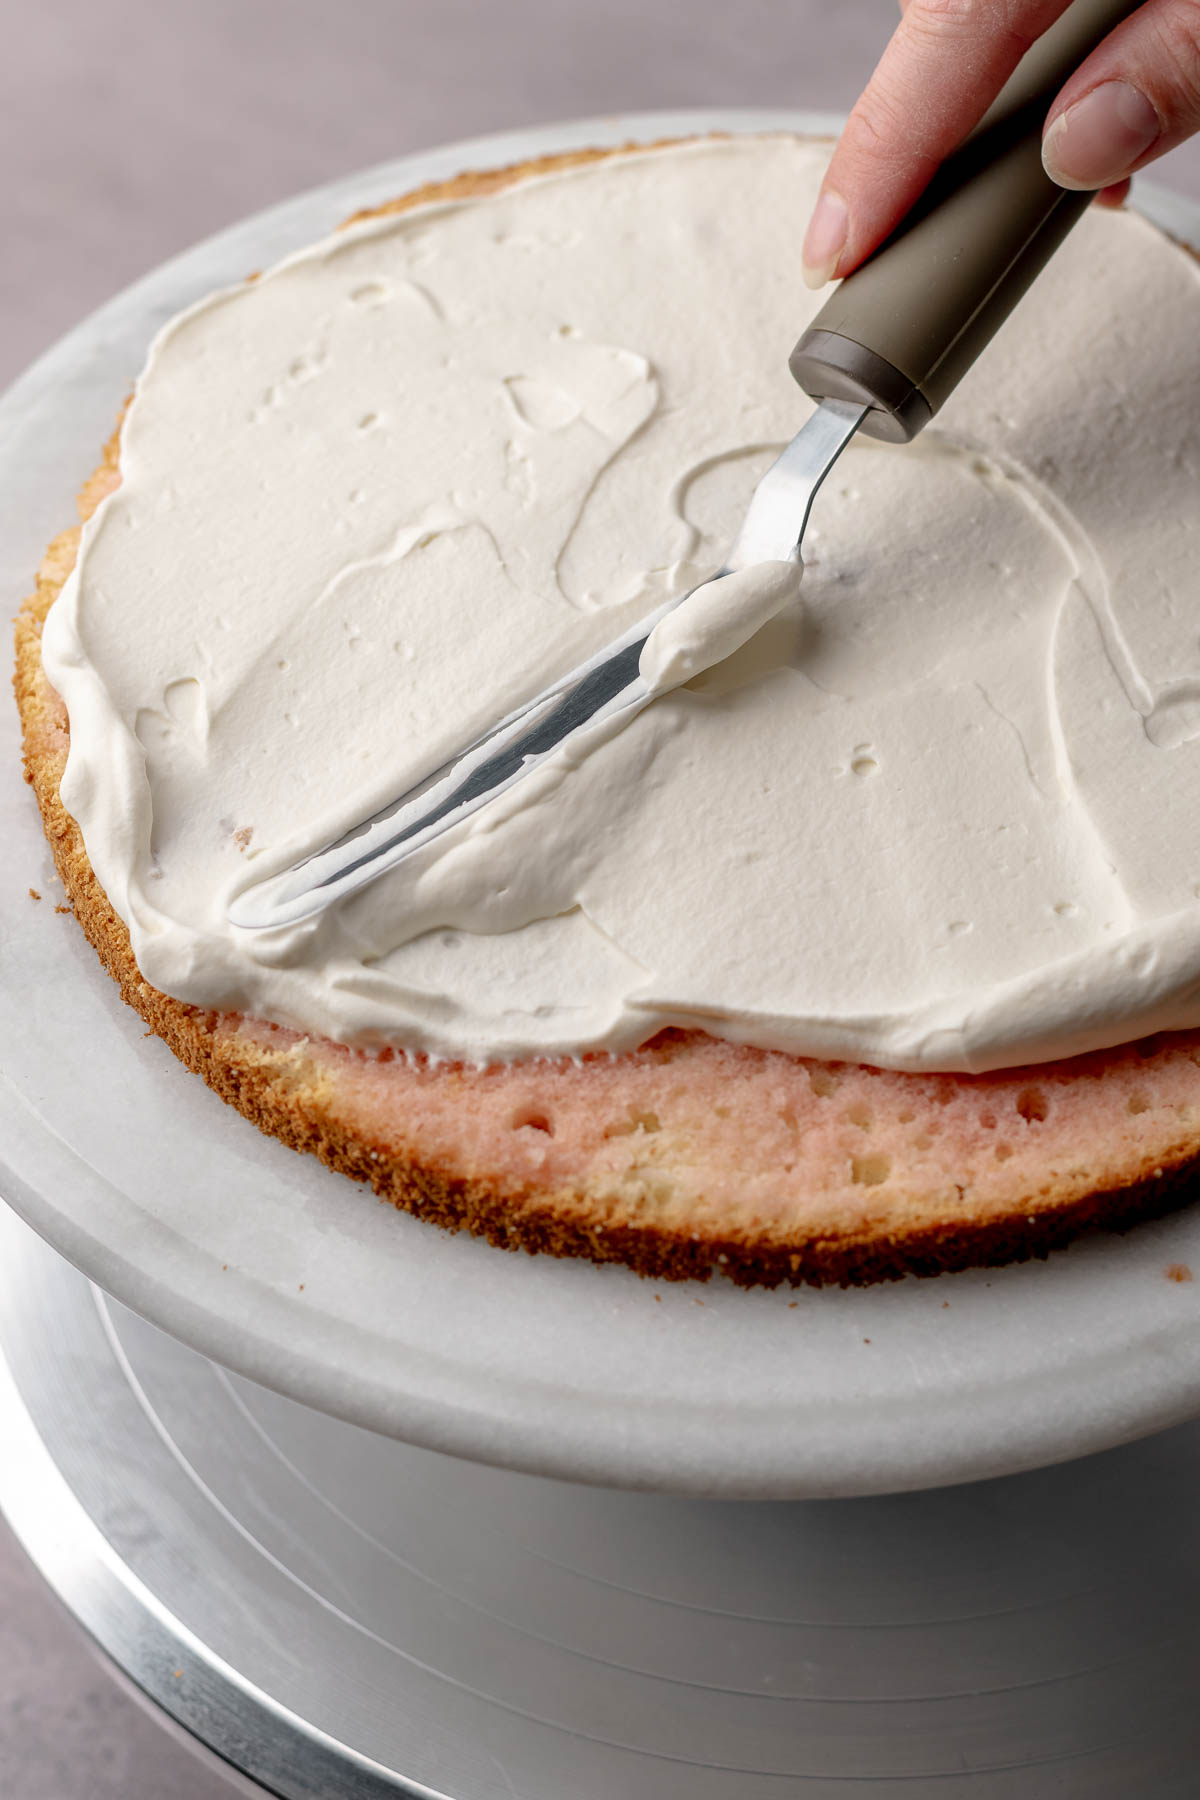
Eleven: Spread a thin layer of whipped cream (the whole ay to the edges).
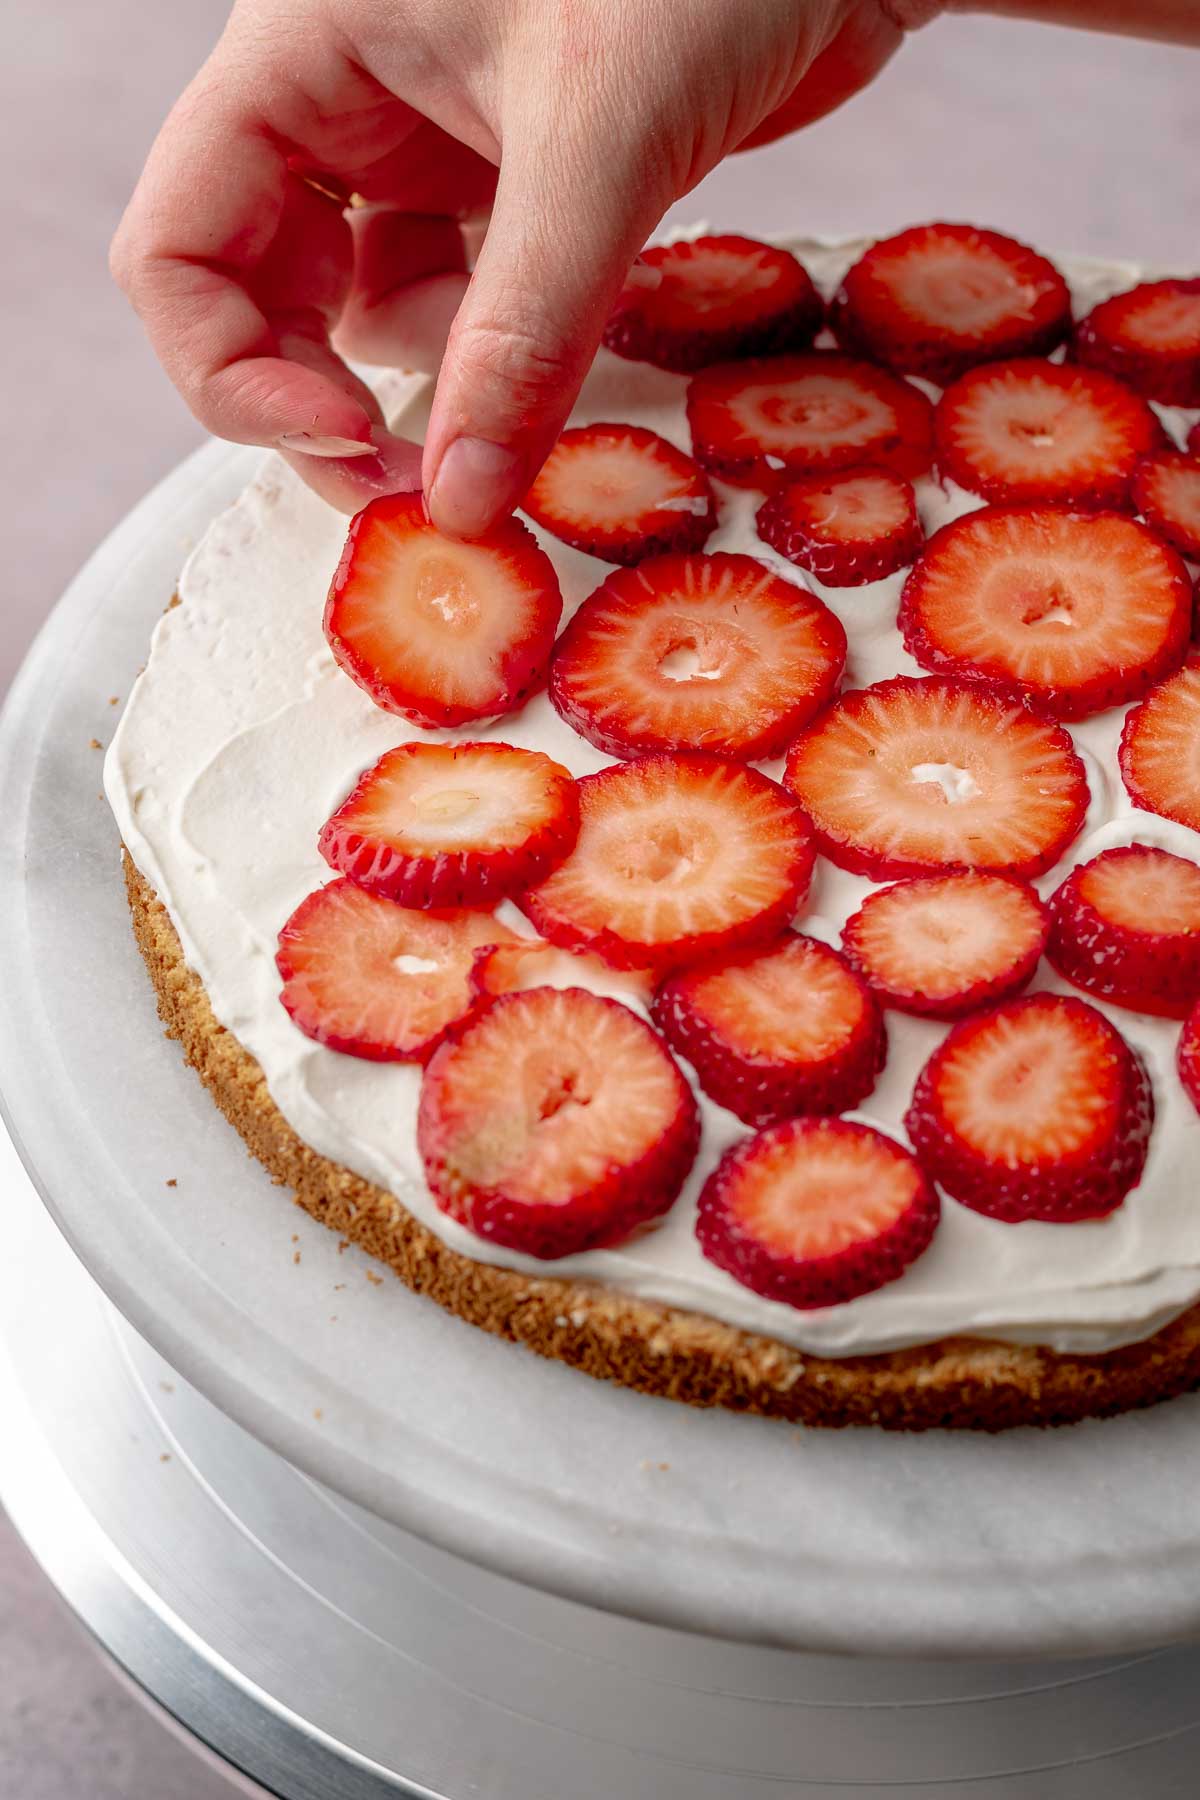
Twelve: Add the sliced strawberries all over the whipped cream.
Hot tip! Slice the strawberries into rounds for super even layers.
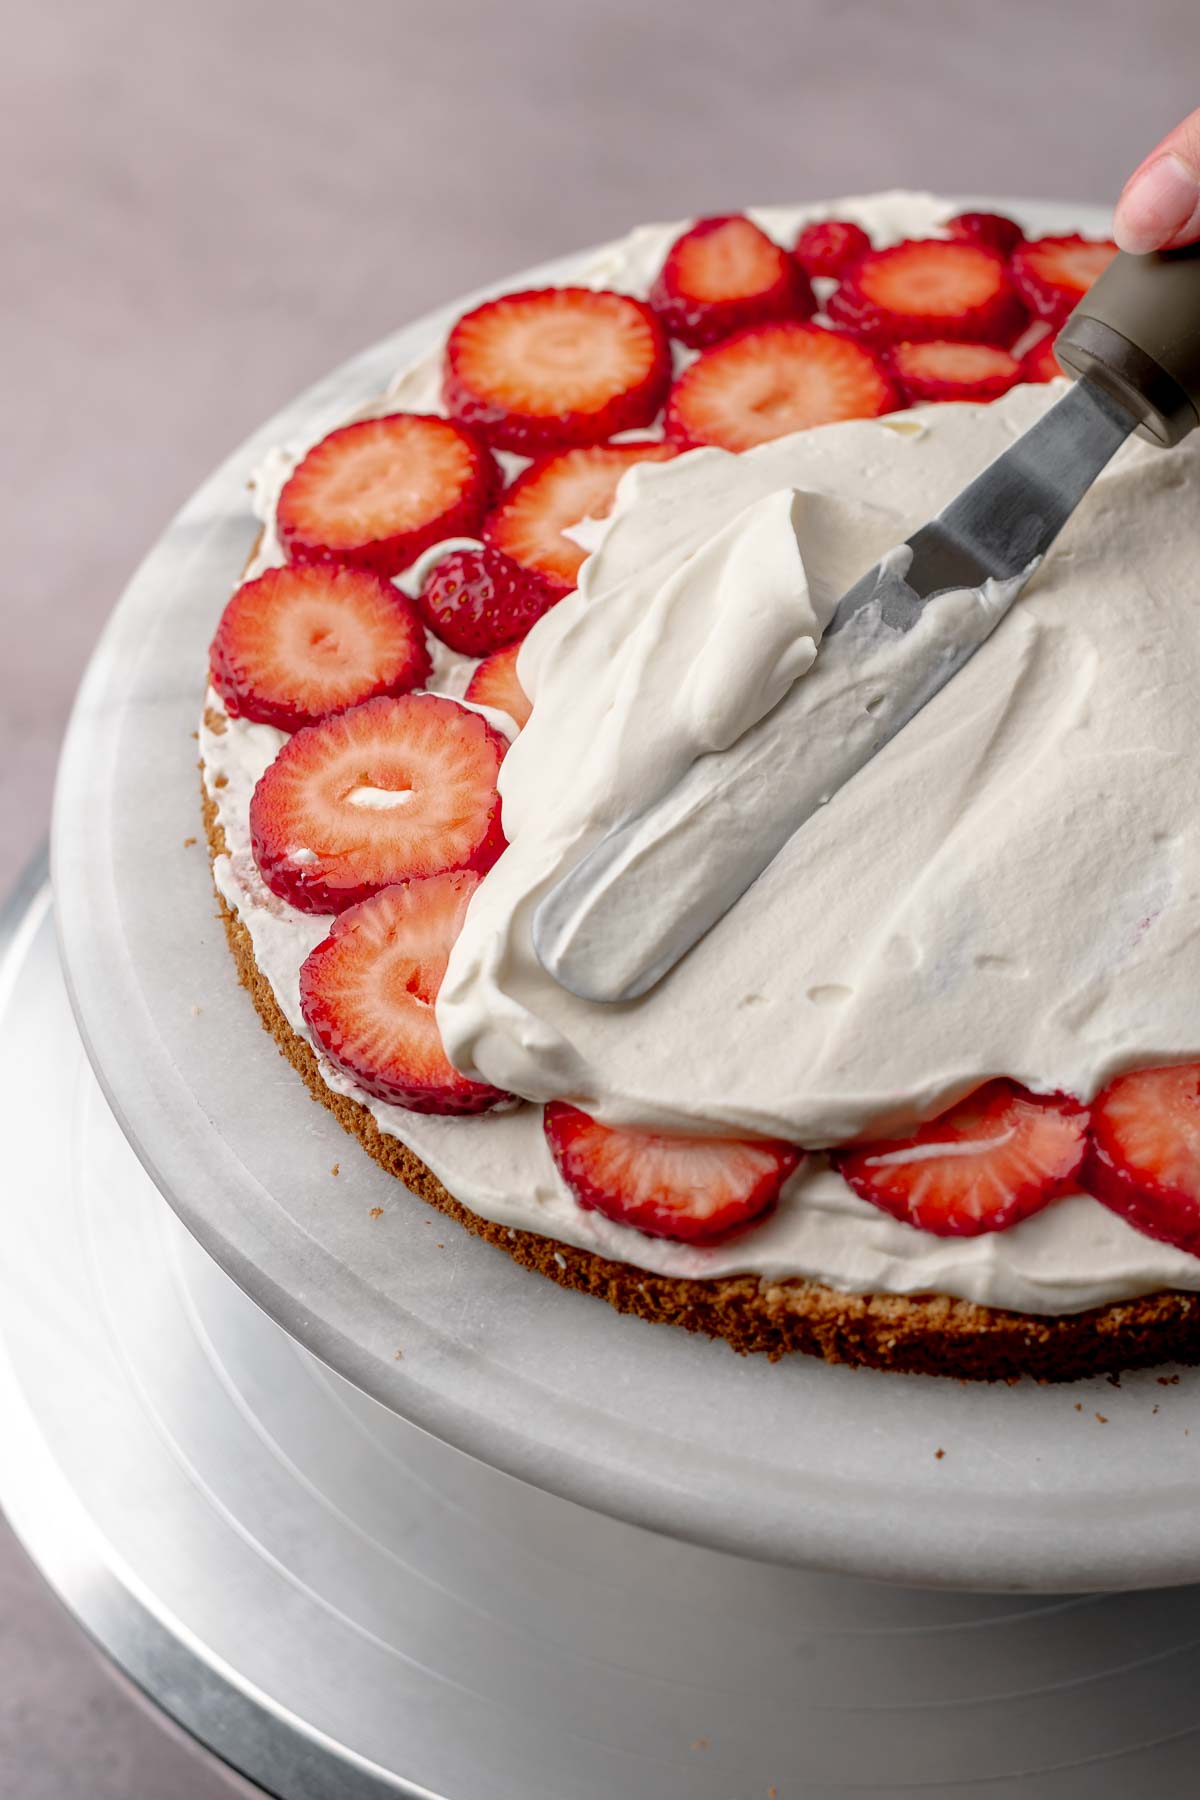
Thirteen: Cover in another layer of whipped cream. Add the next cake layer and repeat the steps.
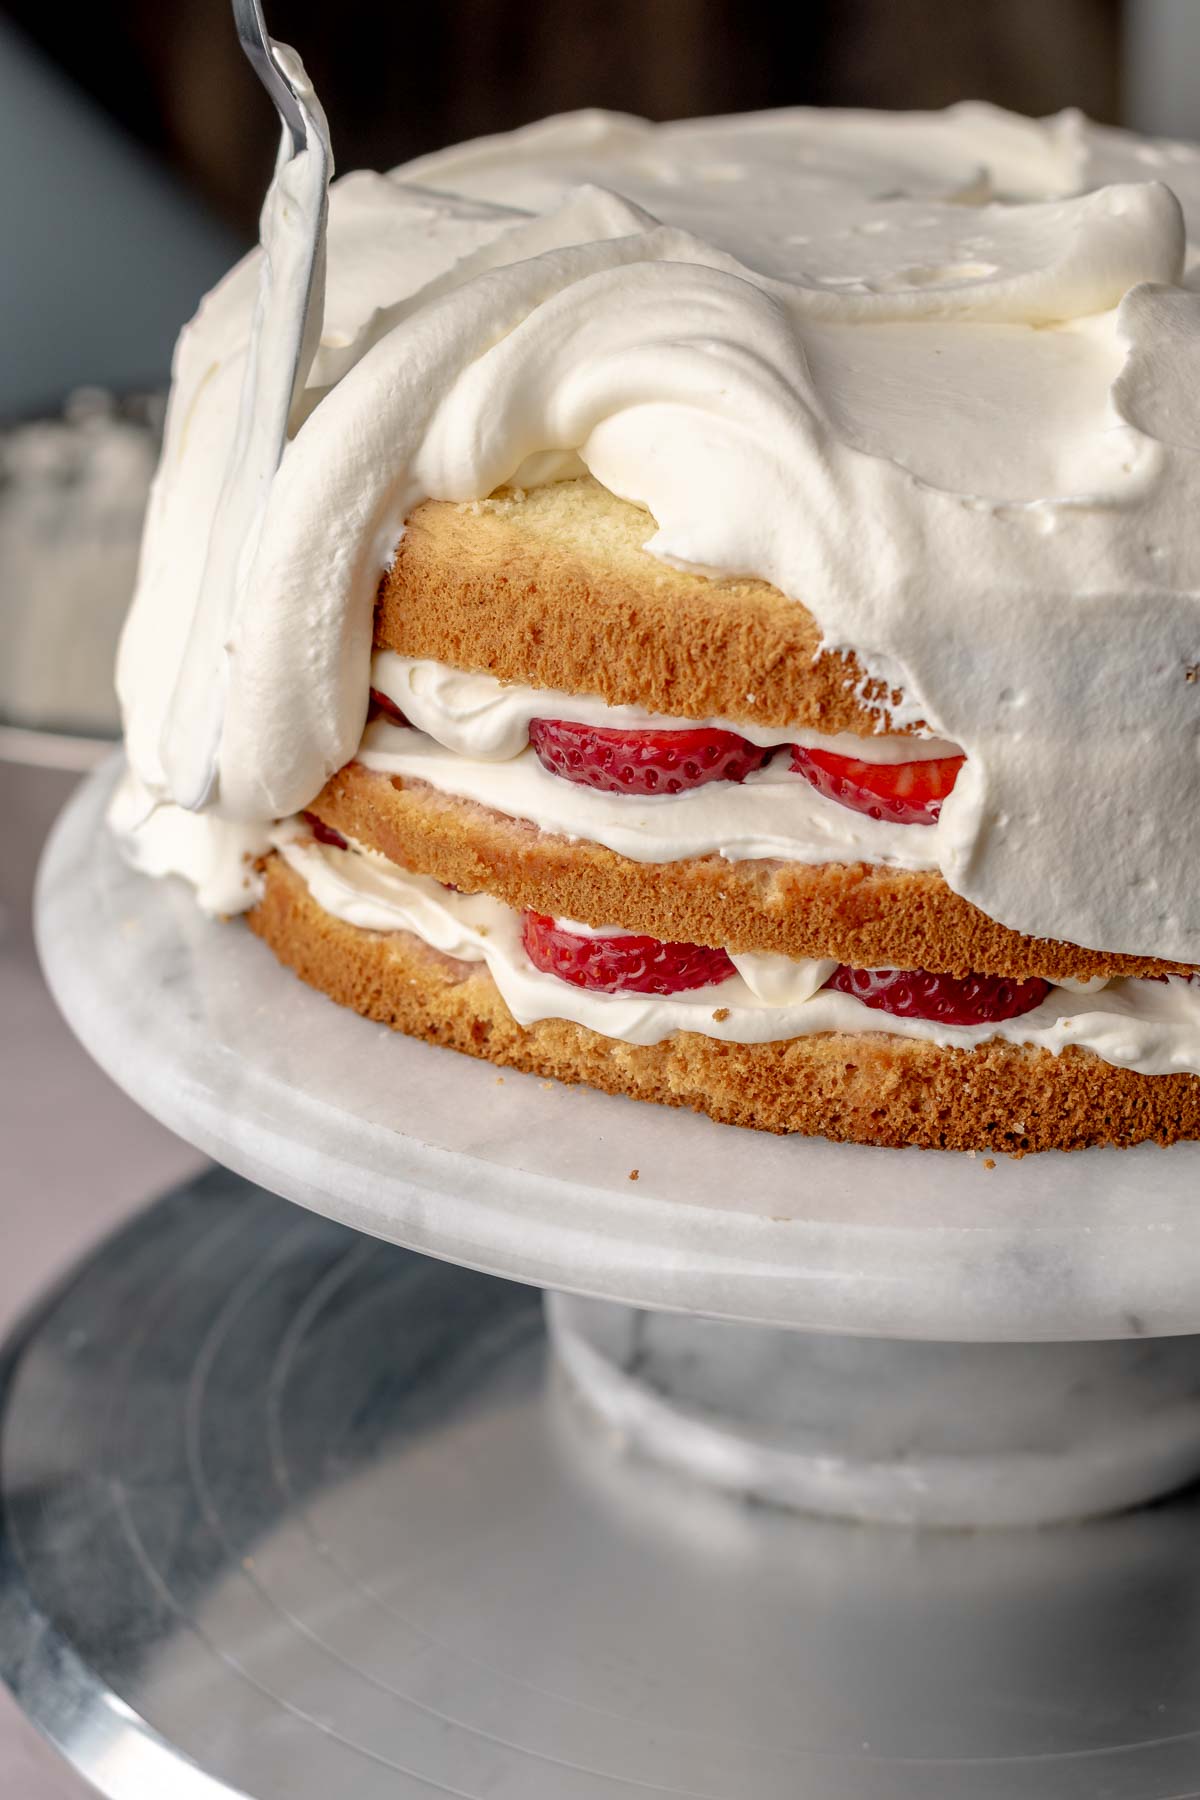
Fourteen: Add the top cake layer, then cover the entire cake in the remaining whipped cream.
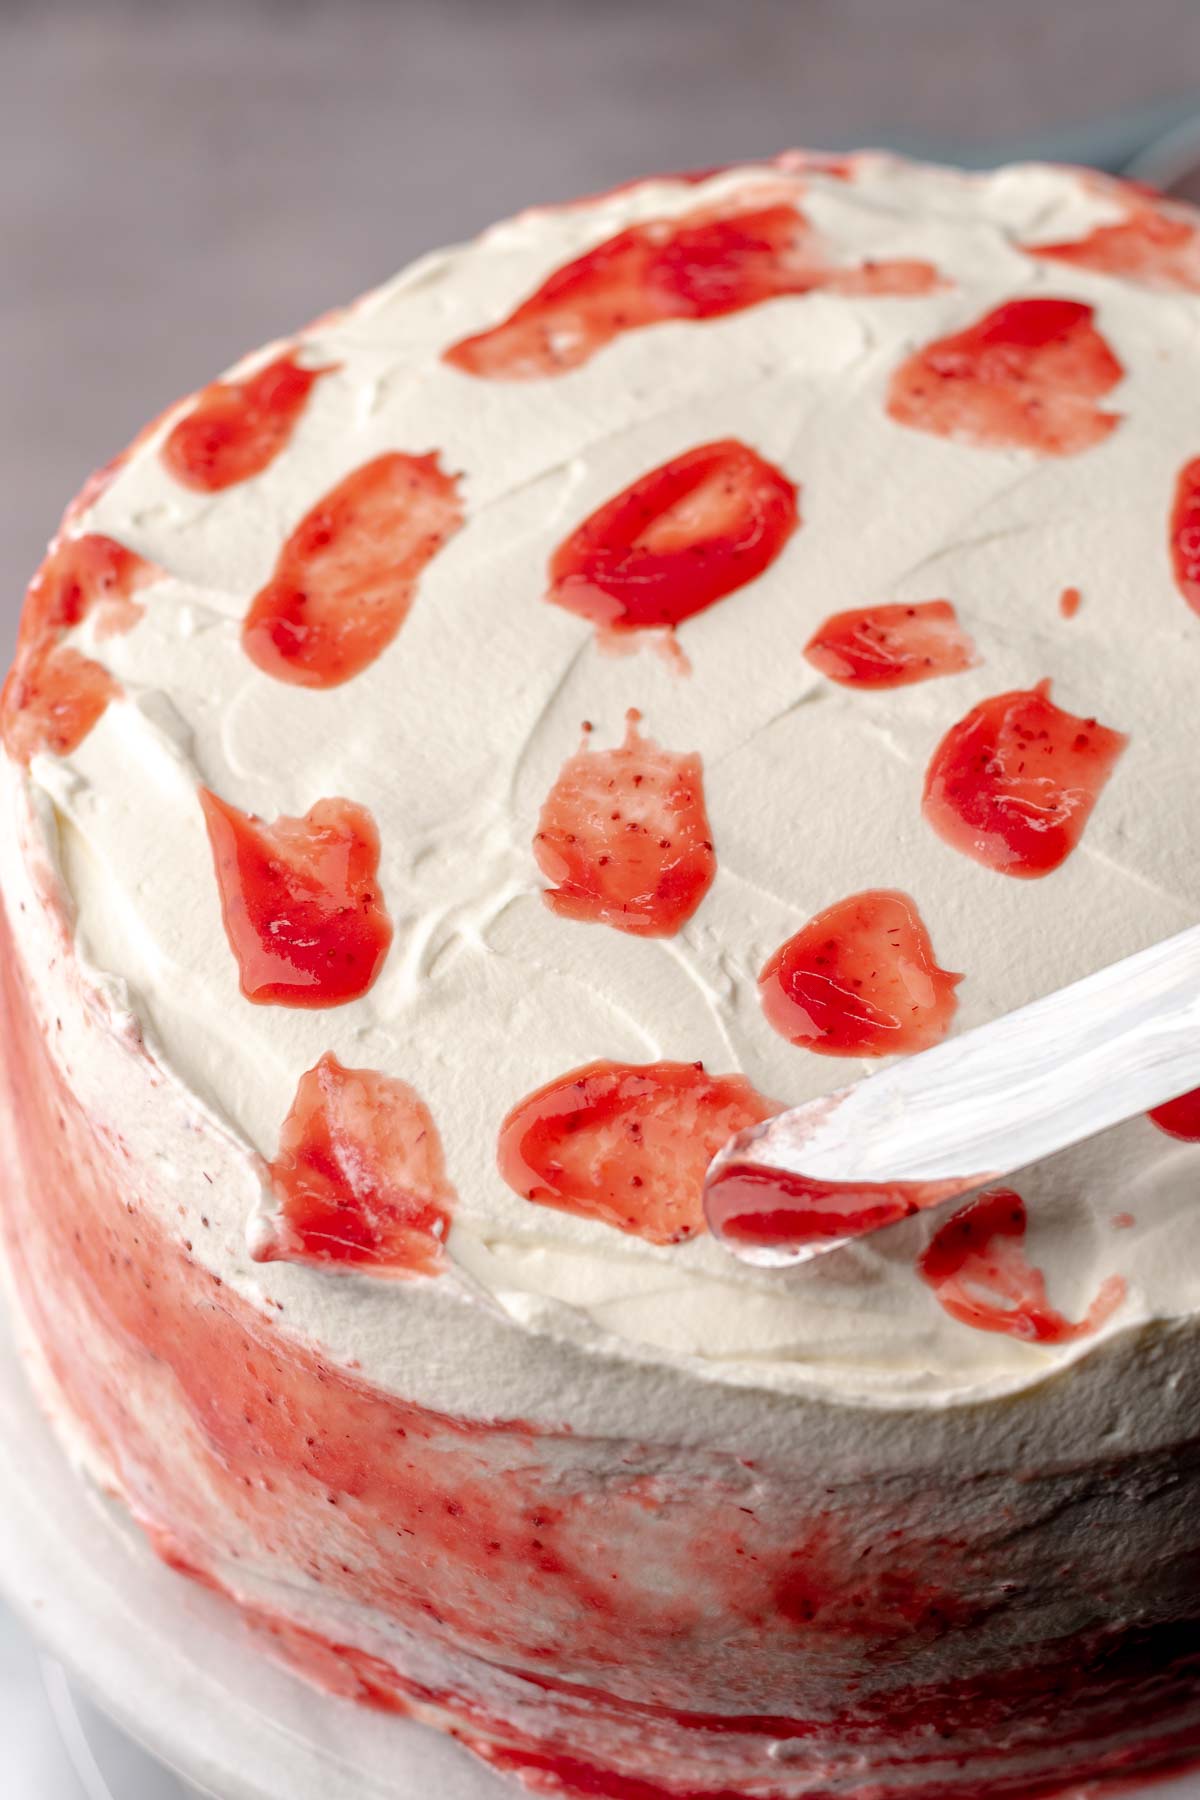
Fifteen: Add dollops of strawberry puree, then smooth or swirl it into the whipped cream.
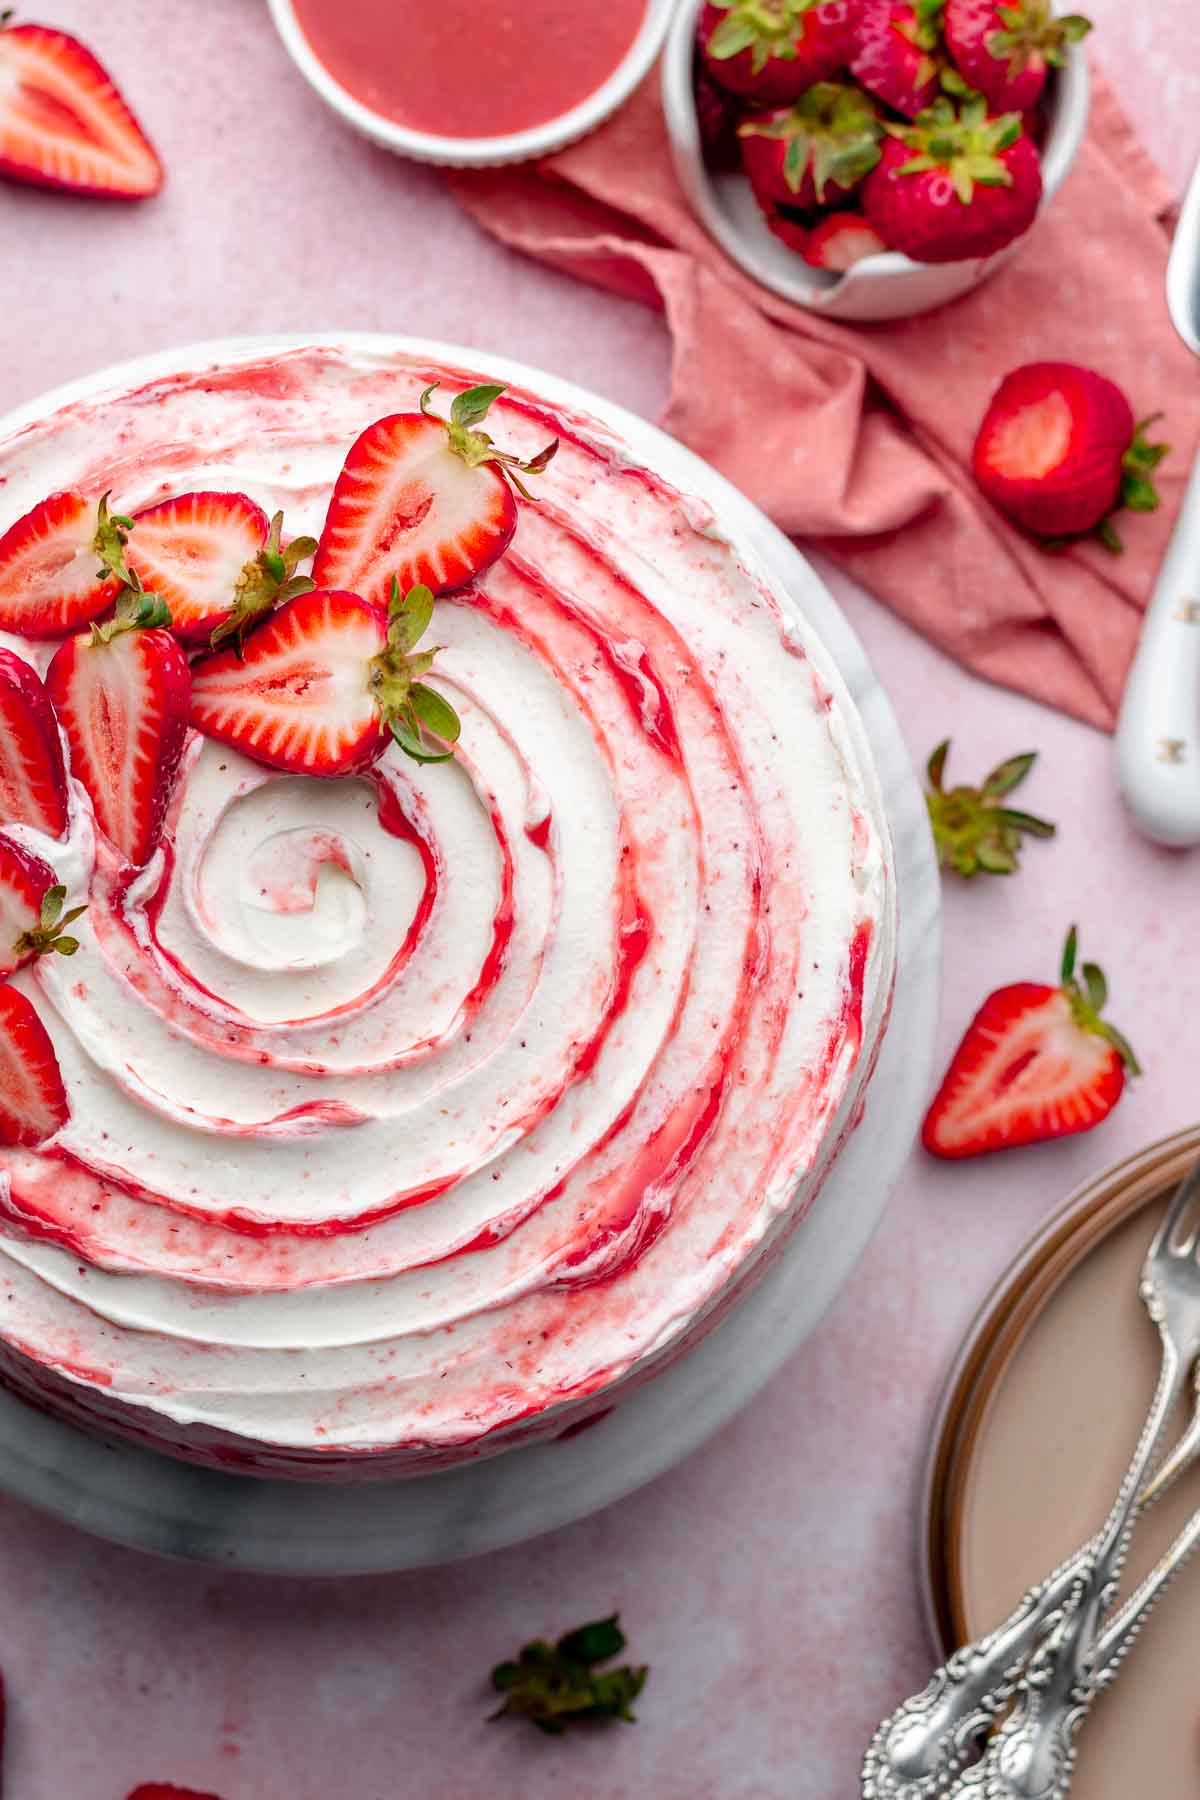
Sixteen: Top the cake with sliced strawberries and store in the fridge for 4-6 hours before slicing and serving.
This helps all the flavors delve and the sponge cake soften up!
Tips for the Best Strawberry Shortcake
- Make the cake over two days. On day one, bake the cake and make the simple syrup and strawberry puree. On day two, make the whipped cream and assemble the cake.
- Take care to scrape the bottom of the bowl while folding the sponge cake batter to get any fallen flour, but also be careful not to overmix and deflate the batter.
- Use a serrated knife to cut clean layers of the cake.
- Use super-ripe strawberries for the best flavor.
- The whipping cream must be very cold when whipping for the best volume.
- Allow the cake to rest for about 6 hours before serving and eating so the cake can soften and let the flavors develop.
Recipe FAQs
Typically, it’s made with a biscuit base, pound cake, or sponge cake.
The best way to do this is to not add the strawberries directly onto the cake layers. In this cake, the strawberries are nestled into the whipped cream so they keep their texture.
This could be because the egg whites were over or under whipped, the batter was mixed too vigorously and deflated, or the baked cake went from hot to cold too quickly.
This means the cream was overwhipped. Fold in some heavy whipping cream in liquid form and it will become smoother.
The cream was over whipped. Add the bowl to the fridge for about 10 minutes, then continue whipping until stiff peaks form.
Storage
Store the assembled cake in the fridge for up to three days. Cover any exposed pieces of cake with a piece of plastic wrap. The rest of the cake can remain uncovered.
I do not recommend freezing this cake. However, the sponge cake (prior to assembly) can be tightly wrapped in plastic wrap, placed into a zip top bag, and frozen for two to three months. Unwrap completely and thaw at room temperature.


What to Know When Cooking with The Cozy Plum
- All recipes are created with Diamond Crystal kosher salt, the least salty variety of kosher salt. If using Morton's, you'll need to cut the amount of salt in half as it's 2x as salty. This will be the same for sea salt. Please do not use table salt.
- Switch between Cups vs Metric using the toggle on the recipe card. Baking by weight using a digital scale will always produce the most accurate results.
- Scale the recipe using the '1X' '2X' '3X' buttons on the recipe card. Note that this does not make an adjustment for baking times, only quantities.
- If you'd like to make the recipe in a different pan, use the pan size converter.
Did you make this recipe? Share it with us! Tag @thecozyplum on Instagram & Facebook and leave a star rating ⭐️ below!
📖Recipe

Strawberry Shortcake Cake
Equipment
- 9-inch spring form pan or cake pan
Ingredients
Sponge Cake
- 1⅔ cups all-purpose flour
- 1 teaspoon baking powder
- ¼ teaspoon kosher salt
- 4 large eggs separated, at room temperature
- ½ teaspoon lemon juice or white vinegar
- 1 cup granulated sugar divide
- ¼ cup vegetable oil
- ¼ cup water warm
- 1 teaspoon vanilla paste or extract
Strawberry Simple Syrup
- ¾ cup water
- ¾ cup granulated sugar
- ½ cup sliced strawberries
Strawberry Puree (optional for decorating)
- ½ lb strawberries
- 3 tablespoons sugar
- ½ tablespoon cornstarch
- 1 tablespoon water
Whipped Cream Frosting
- 4 oz cream cheese
- ¾ cup powdered sugar
- 1 teaspoon vanilla paste or extract
- 4 cups heavy whipping cream cold
Strawberries for Filling
- 1 lb fresh strawberries sliced
Instructions
Sponge Cake
- Preheat the oven to 350℉/180℃ and line the bottom of 9" cake or springform pan with parchment paper.
- In a bowl, whisk together the flour, baking powder, and salt and set aside.1⅔ cups all-purpose flour, 1 teaspoon baking powder, ¼ teaspoon kosher salt
- In the bowl of a stand mixer fitted with the whisk attachment, add the egg whites and lemon juice (or vinegar) and whisk on medium speed until foamy.4 large eggs, ½ teaspoon lemon juice or white vinegar
- With the mixer running, slowly pour in half of the sugar (½ cup, 100g) and increase the speed to medium high speed until stiff, glossy peaks form. The meringue will stand up as a stiff peak on the tip of the whisk.1 cup granulated sugar
- Use a rubber spatula to scrape out the meringue into a separate bowl.
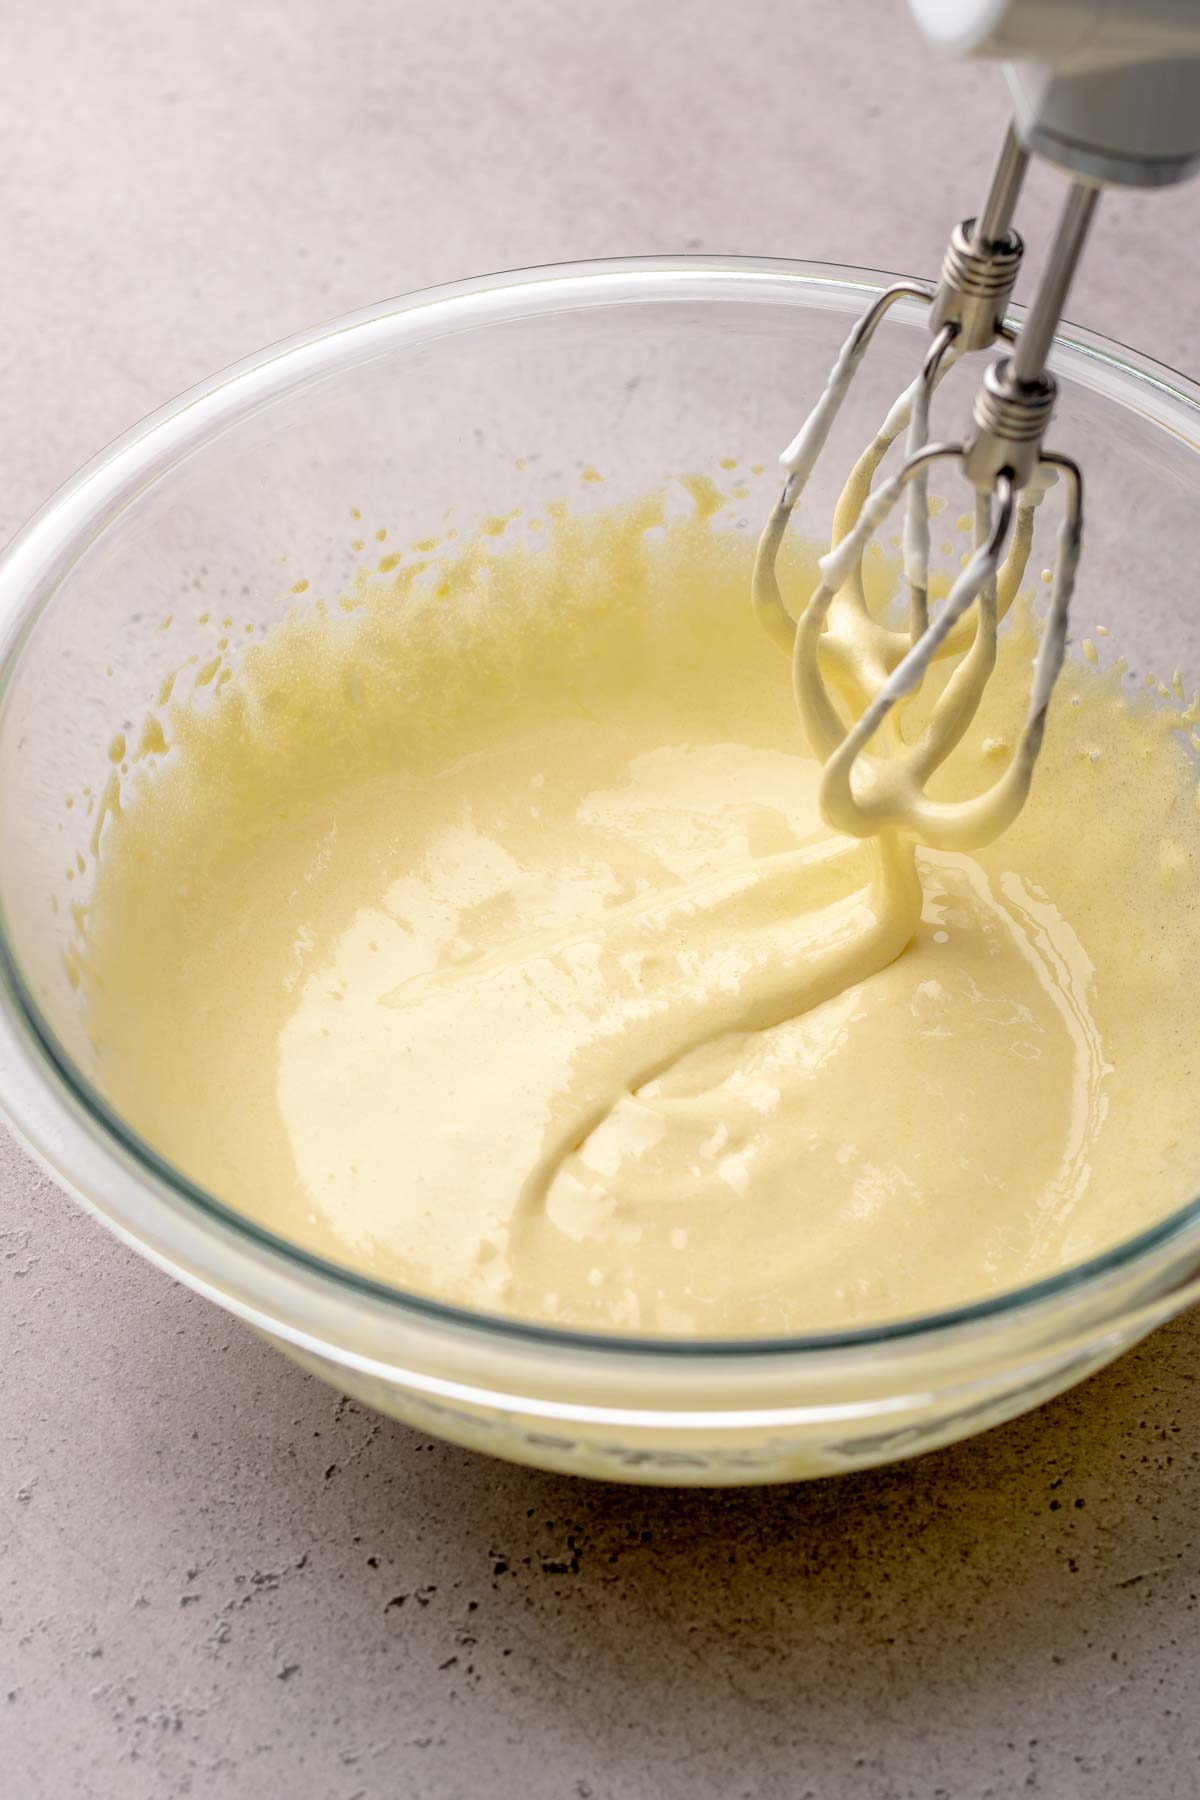
- Add the egg yolks and remaining sugar (½ cup, 100g) to the bowl of the stand mixer and mix on medium speed with the whisk attachment until pale in color, fluffy and doubled in volume, and ribbons form.
- With the mixer running on medium speed, slowly pour in oil then scrape down the sides. Turn the mixer back on to medium and slowly pour in the water and vanilla. Mix for another minute.¼ cup vegetable oil, ¼ cup water, 1 teaspoon vanilla paste or extract
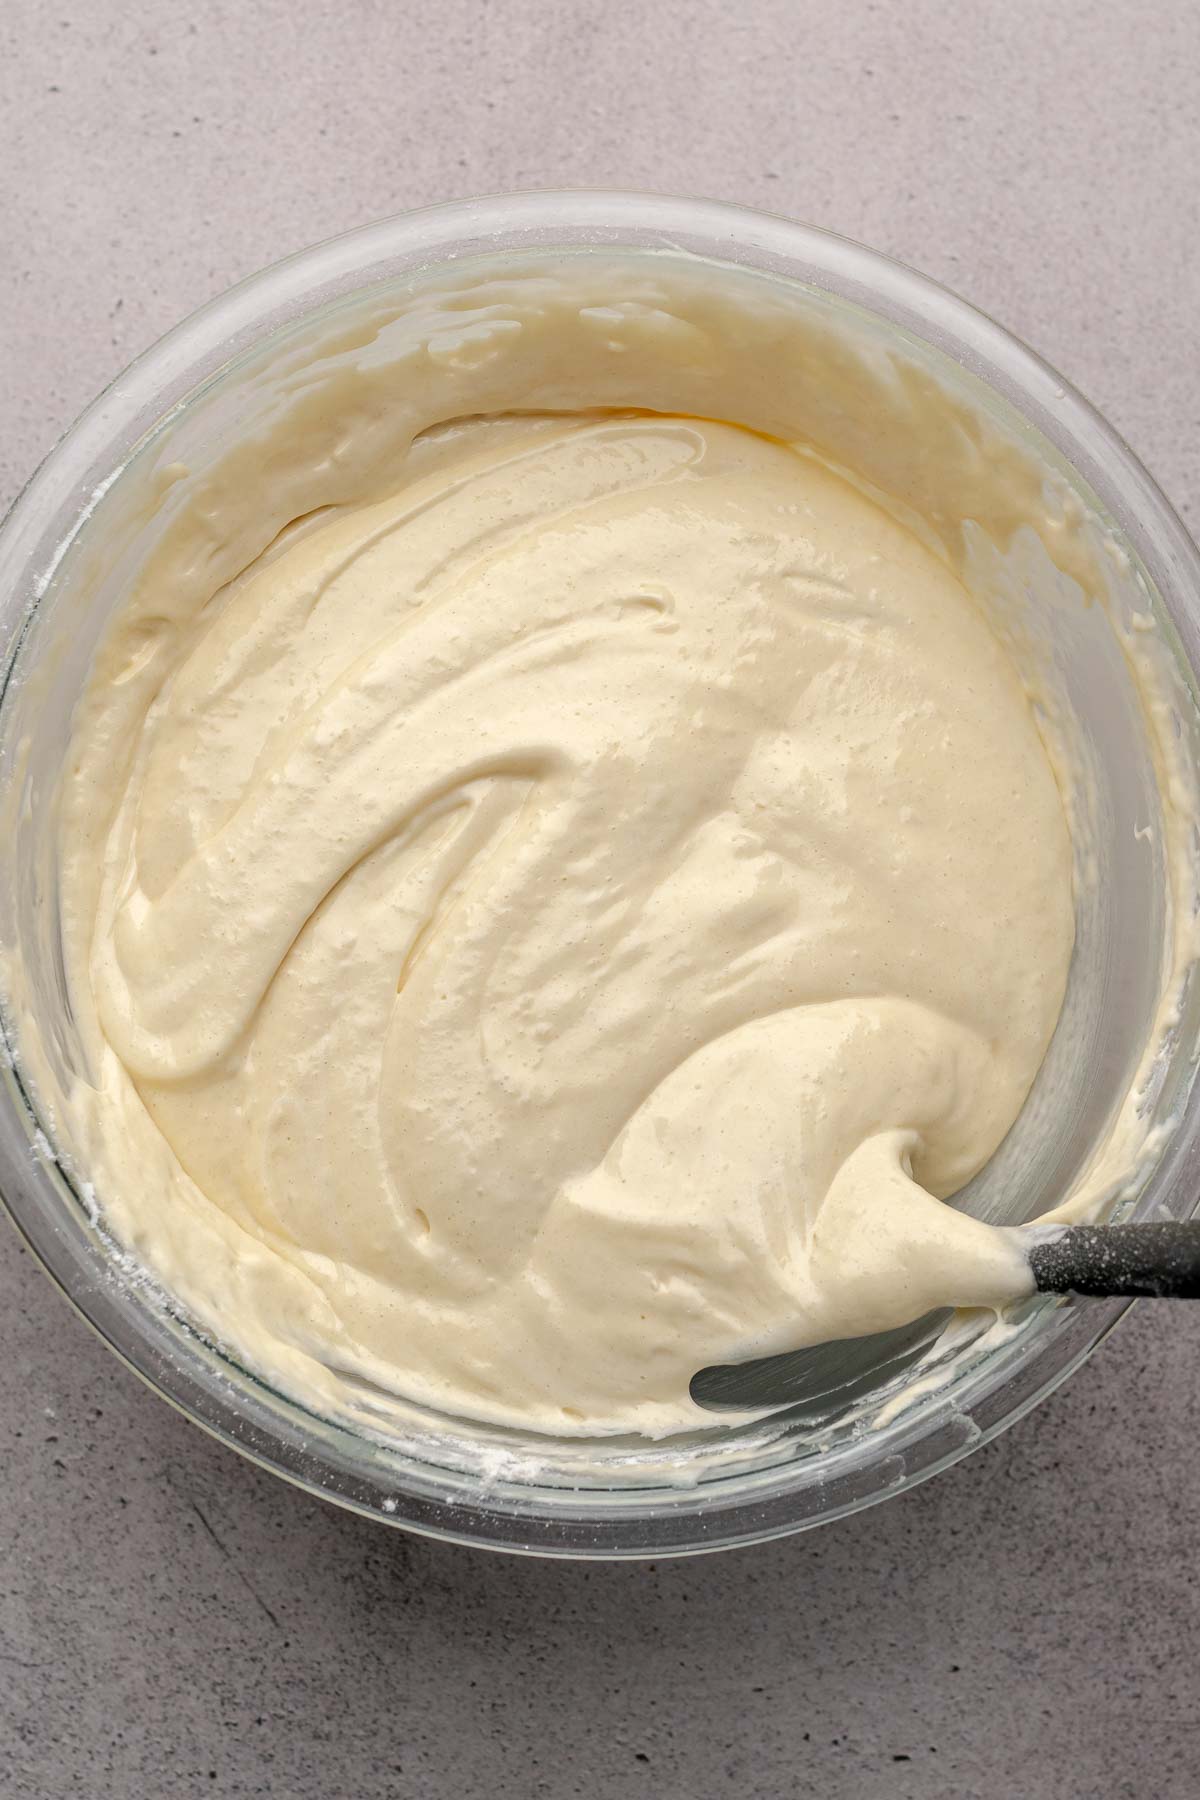
- Use a fine mesh sieve to sift ⅓ of the flour mixture into the egg yolk mixture and fold it in with a rubber spatula. Then, add ⅓ of the egg whites and fold it in until no streaks remain.
- Repeat the process with the remaining flour mixture and egg whites, taking care to get the spatula to the very bottom of the bowl (the flour will sink to the bottom and get stuck). Take care not to over mix, but very gently fold.
- Pour the batter into the prepared pan, and bake for 25-30 minutes until golden and a toothpick inserted into the center comes out clean. Cool on a wire rack for 5 minutes, then run an offset spatula or knife around the sides and remove the cake from the pan to finish cooling.
Strawberry Simple Syrup
- While the cake is cooling, combine the water, sugar and strawberries in a saucepan over medium heat. Stir until hot and the sugar has dissolved. Pour into a bowl or glass jar and let cool. This can also be done a day in advance and stored in the fridge.¾ cup water, ¾ cup granulated sugar, ½ cup sliced strawberries
Strawberry Puree (optional)
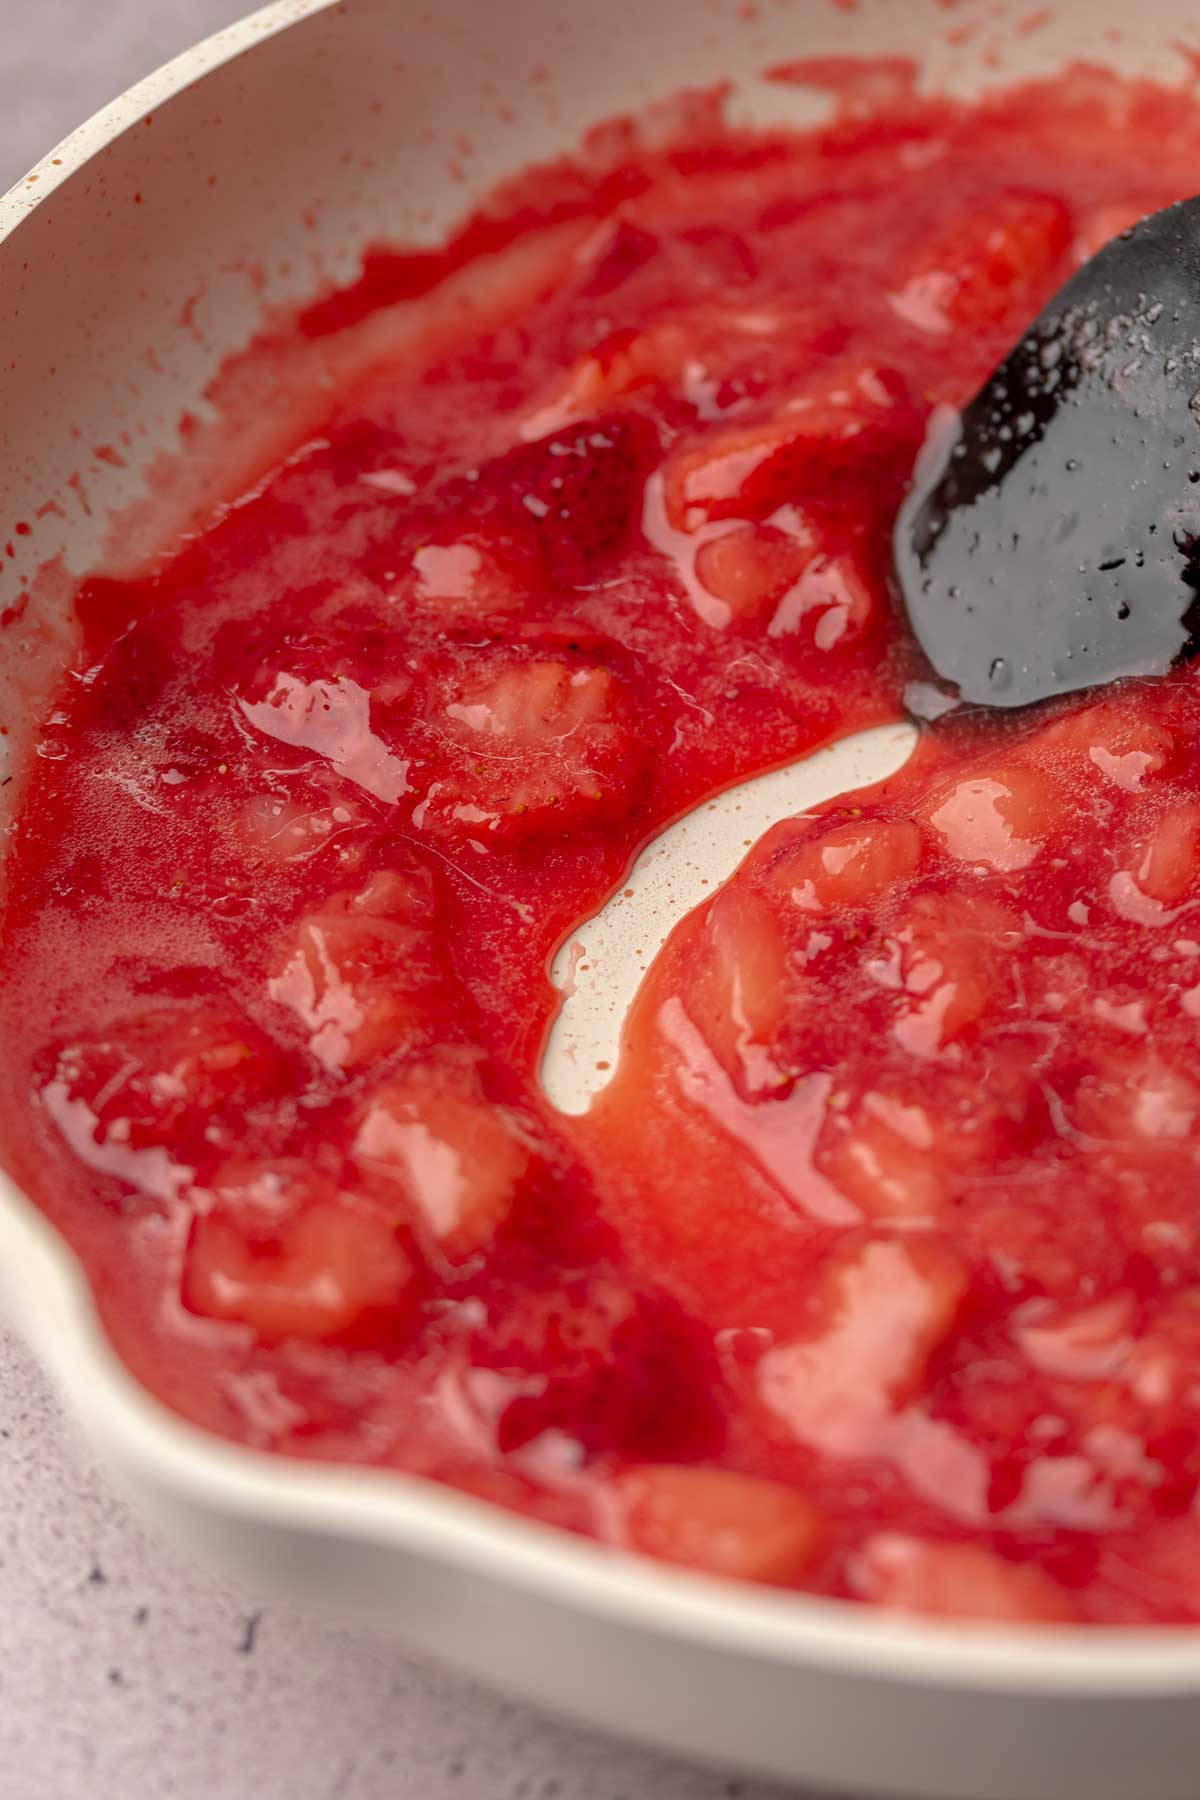
- In a saucepan, cook the strawberries and sugar over medium low heat until the strawberries are easily mashed down with a spatula and develop juices, about 5 - 7 minutes.½ lb strawberries, 3 tablespoons sugar
- In a small bowl, mix the corn starch and water, then add to the strawberries and turn to medium high just until it bubbles.½ tablespoon cornstarch, 1 tablespoon water
- Remove the mixture from the heat and blend with an immersion blender (or blender/food processor) and set aside to cool. This can also be done a day in advance and stored in the fridge.
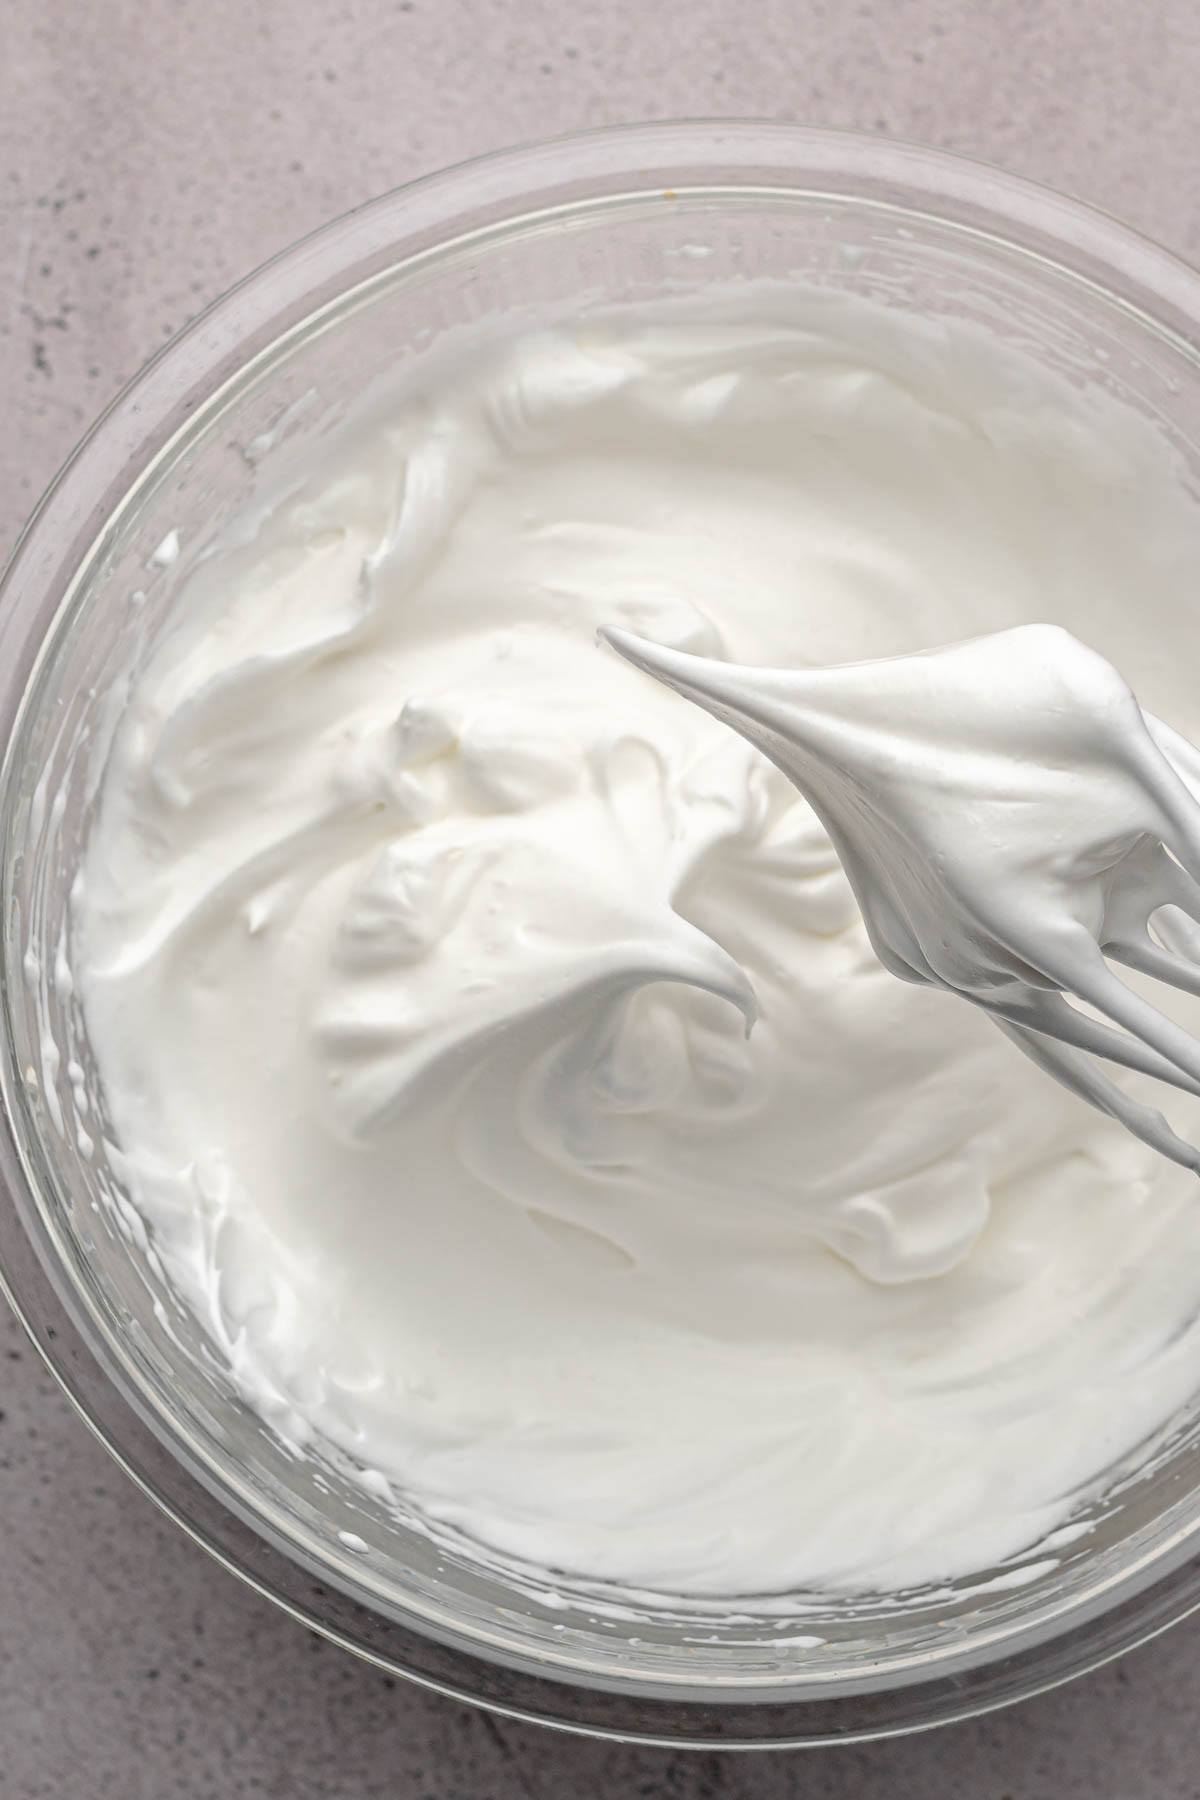
Whipped Cream Frosting
- Before mixing, place the bowl of stand mixer and the whisk attachment in the freezer or fridge for 15 minutes. This helps the cream whip up best.
- Add the cream cheese, powdered sugar, and vanilla and beat on low speed until combined and smooth.4 oz cream cheese, ¾ cup powdered sugar, 1 teaspoon vanilla paste or extract
- With the mixer on medium low speed, drizzle in the heavy cream. Whip for about one minute, then turn to high and whip until stiff peaks form.4 cups heavy whipping cream
- Place in the fridge until ready to use.
Cake Assembly
- Using a serrated knife, cut the cake into three horizontel even disc layers. Place the first layer onto a cake stand (or whatever you want to serve it on) and slide parchment paper under the cake to keep your stand clean.
- Using a pastry brush (or a spoon), fully coat the top of the first cake layer with the simple syrup.
- Add a dollop of whipped cream to the top and spread evenly over the cake layer, reaching the whole way to the sides. Layer half of the sliced strawberries evenly over the whipped cream, then add another dollop of whipped cream and spread it evenly to cover the strawberries.1 lb fresh strawberries
- Add the middle layer of cake and gently push down so you remove any gaps in the strawberries and whipped cream. Complete the same process with the simple syrup, whipped cream, strawberries, whipped cream.
- Before adding the final layer, add the simple syrup to the underside of the cake (the crumb side, not the browned side) then place the layer crumb-side down and lightly press down.
- Add the remaining whipped cream to the top and sides of the cake so it is fully covered. If using the strawberry puree, use a spatula to add small swipes of the puree to the tops and sides of the cake, then smooth it out to the desired texture.
Video
Notes
- Be sure to get the spatula to the very bottom of the bowl to incorporate all flour.
- Don't open the oven door until you're ready to check the cake.
- When closing the oven door, do not let it slam or the cake can fall.
- Don't cool the cake in an area that is overly cool or drafty or else the cake can fall.
Marisa says
Best strawberry shortcake ever!! It's definitely a hit on Easter and birthdays in our family!
Callan Wenner says
Ahh yay! I'm so happy to hear this. Thanks for bringing them into your family traditions 🙂
Lyndsay says
This is the best strawberry shortcake I've ever had. I don't typically like cream cheese frosting, but this frosting (which admittedly has a very small amount of cream cheese compared to the cream!) was perfect for this cake. We made the puree and simply spooned it onto the slices after plating them. The cake is a little bit extra work with the folding and what not, but so worth it! I'm so glad my daughter picked this for her birthday cake and I can't wait to have it again!!
Callan Wenner says
Oh I'm so happy to hear this! It's definitely a labor of love, but totally agree it's worth it. Appreciate you trying this and reporting back.
Ruwaida says
Hi. Beautiful cake. Can you do this cake with cake flour instead of regular flour? Thank you 😊
Callan Wenner says
Hi Ruwaida - that shouldn't be a problem!
Oliver says
Had trouble with making it look good but tasted awessome