

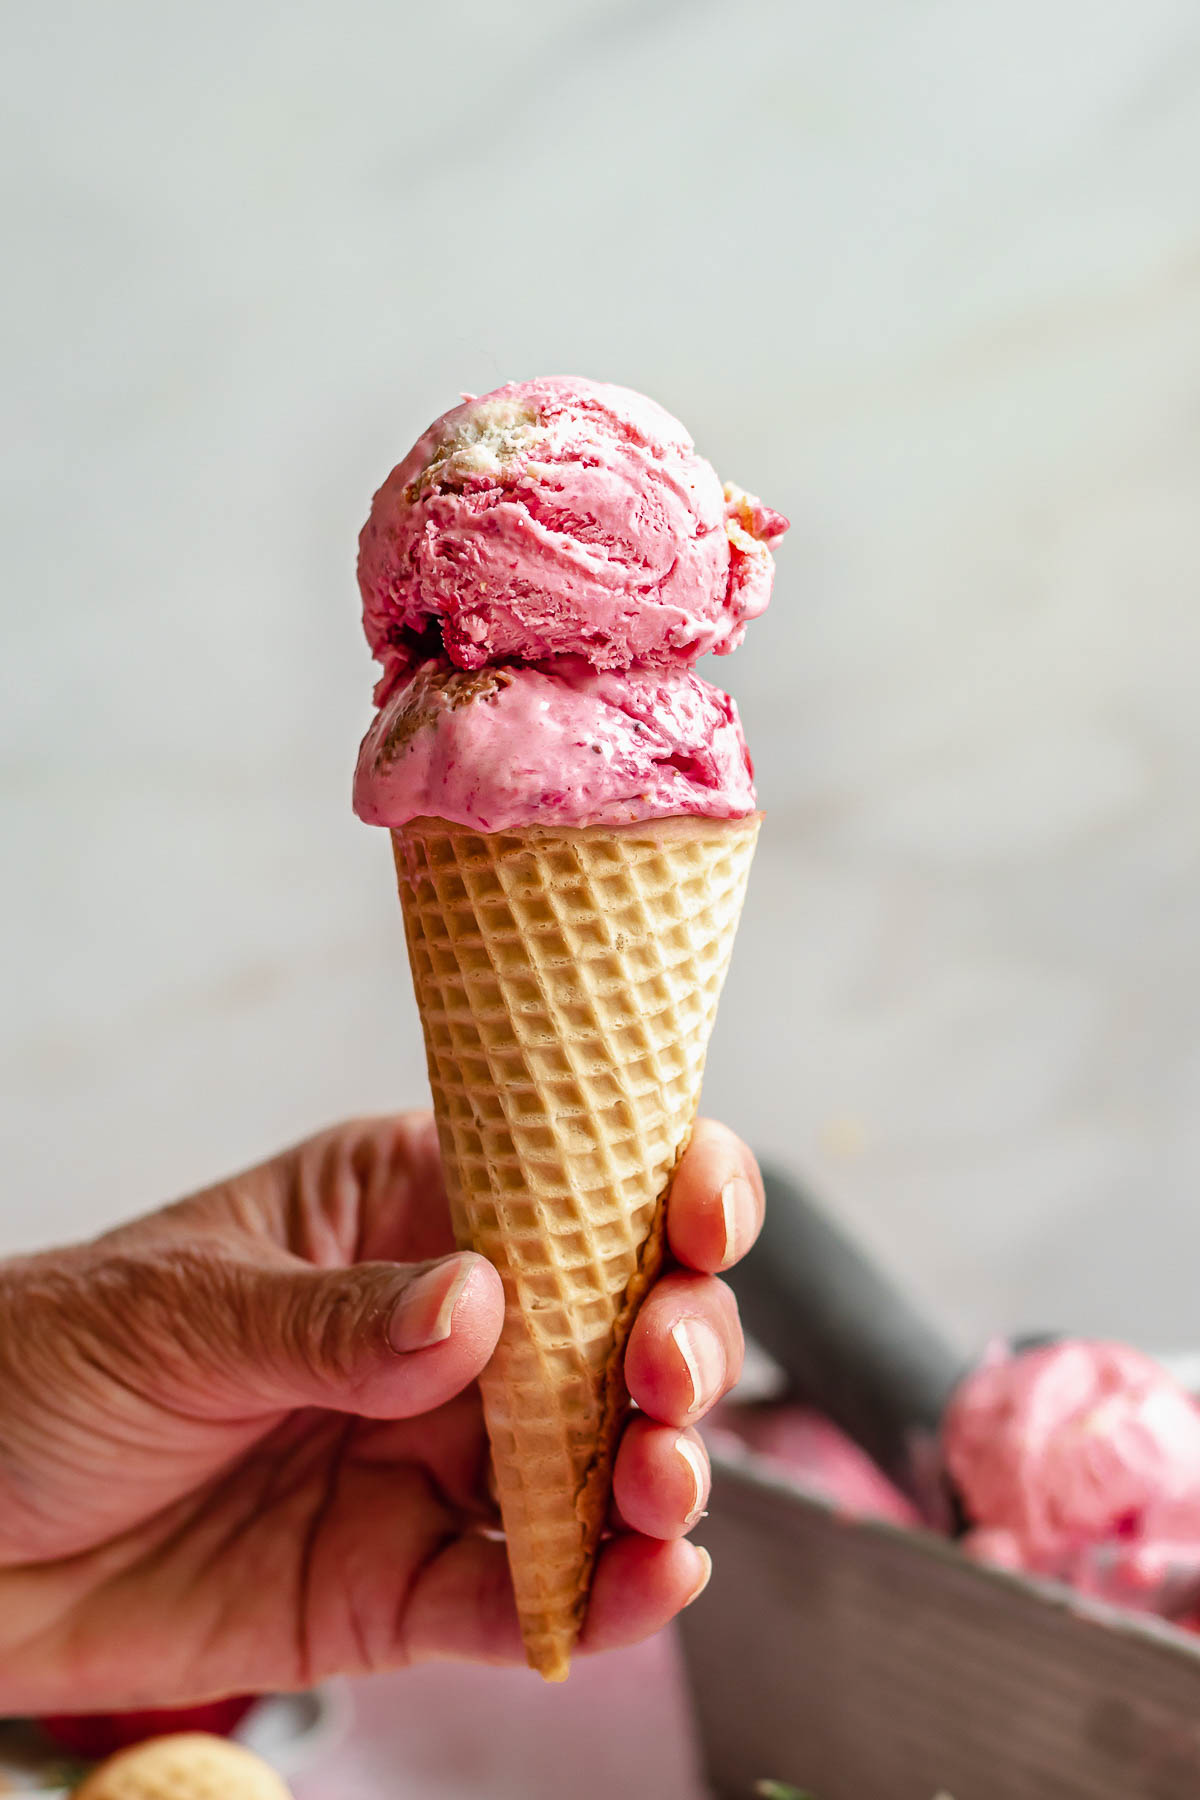
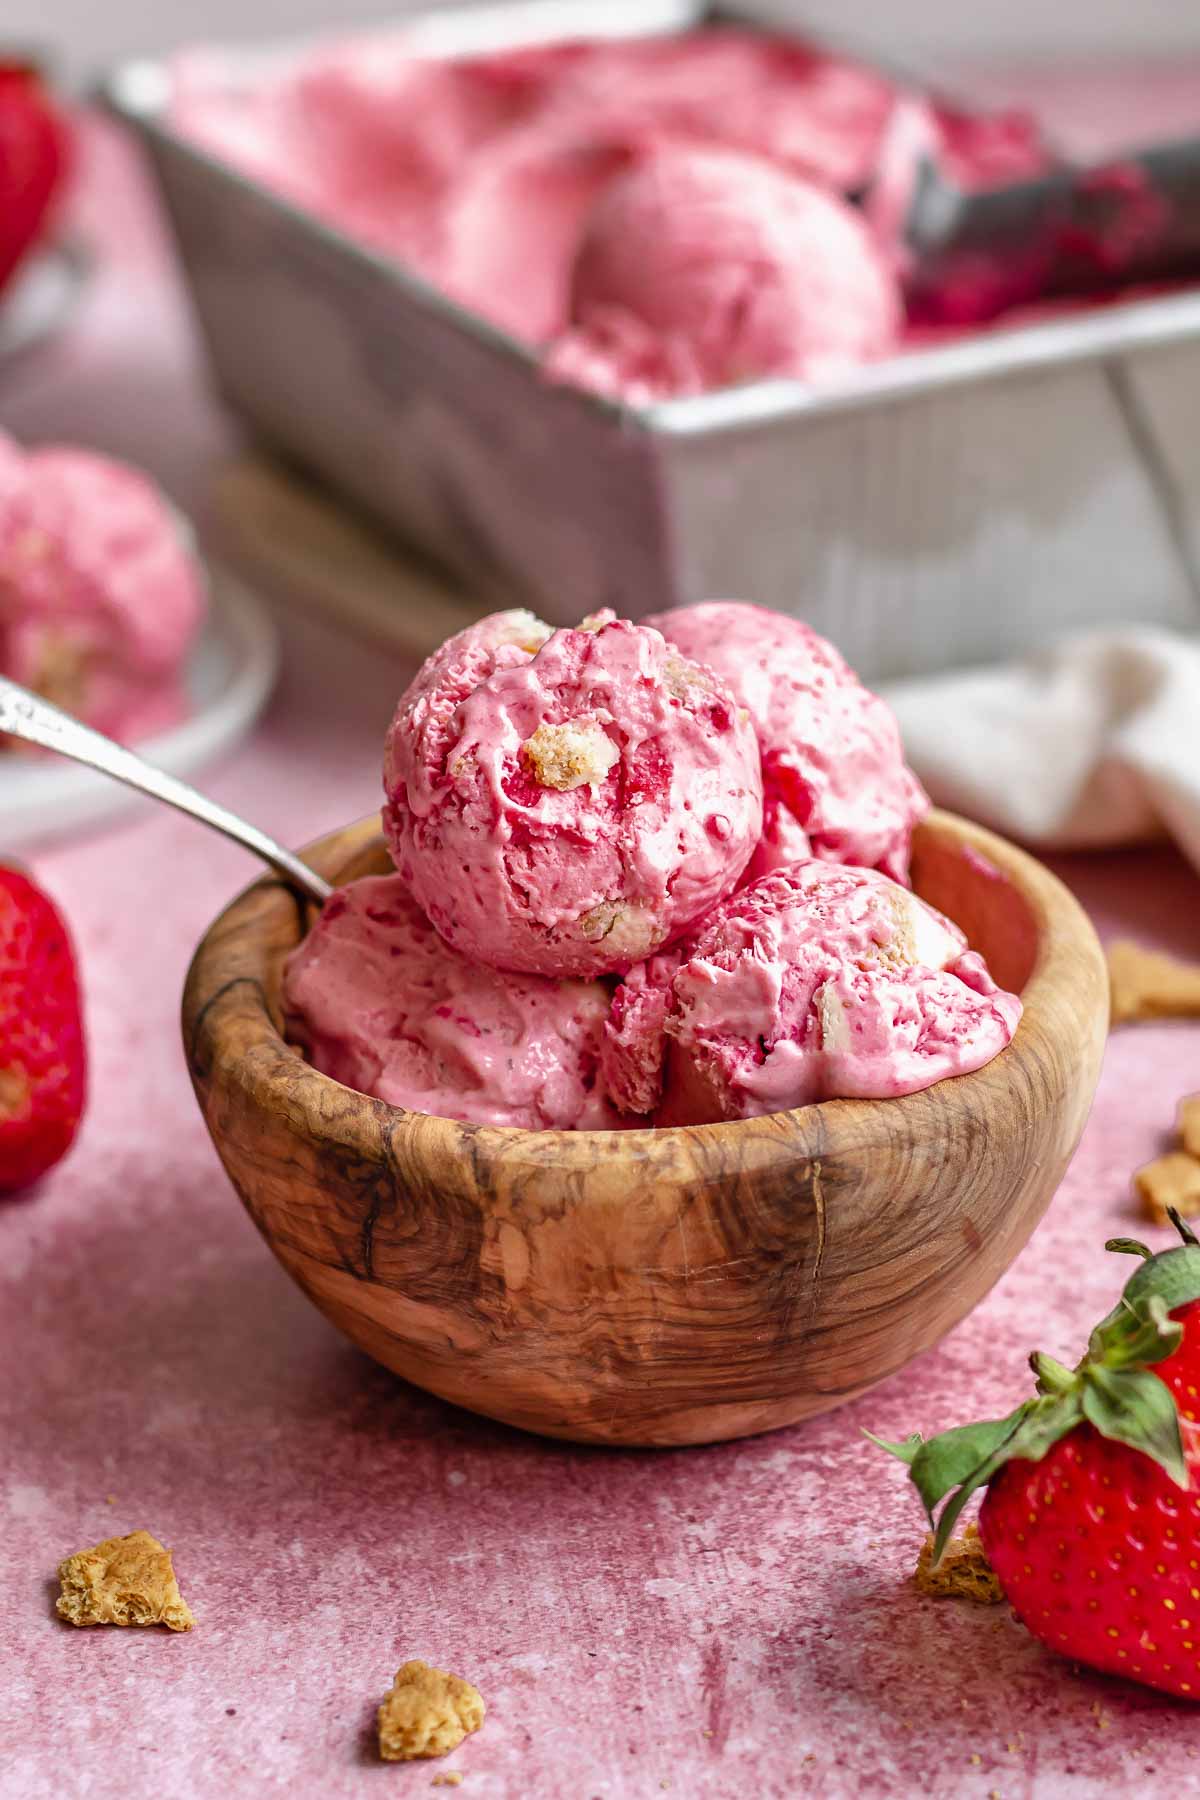
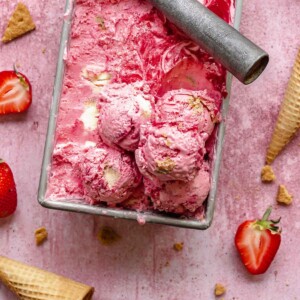
This easy, homemade no churn strawberry ice cream is made with sweet, fresh strawberries, sweetened condensed milk (helping to make it extra creamy), fluffy whipped cream, and the option to add cheesecake pieces for a strawberry cheesecake ice cream version!
This is an eggless ice cream made without an ice cream machine, so no specialty tools are needed. It’s the perfect way to use ultra-ripe, sweet strawberries throughout strawberry season and the entire summer!

Homemade ice cream is a special way to use seasonal ingredients and make your own combinations. Try this Homemade Blackberry Ice Cream with Chocolate Chips (no-churn) and Coconut Sorbet for other summer versions.
Jump to:
Why You'll Love This Recipe
Fresh strawberries – it’s always great to use ripe, in season fruit when it’s available. Luckily, you can find delicious strawberries all summer long to make this recipe.
No ice cream machine – this is a no churn ice cream recipe, so you don’t need an ice cream maker. The recipe is made with a stand mixer or hand mixer, and comes together very quickly!
Customizable – add chunks of store bought cheesecake to the strawberry ice cream, chocolate chips, fudge swirls, or any type of mix ins that speak to you.
Ingredients
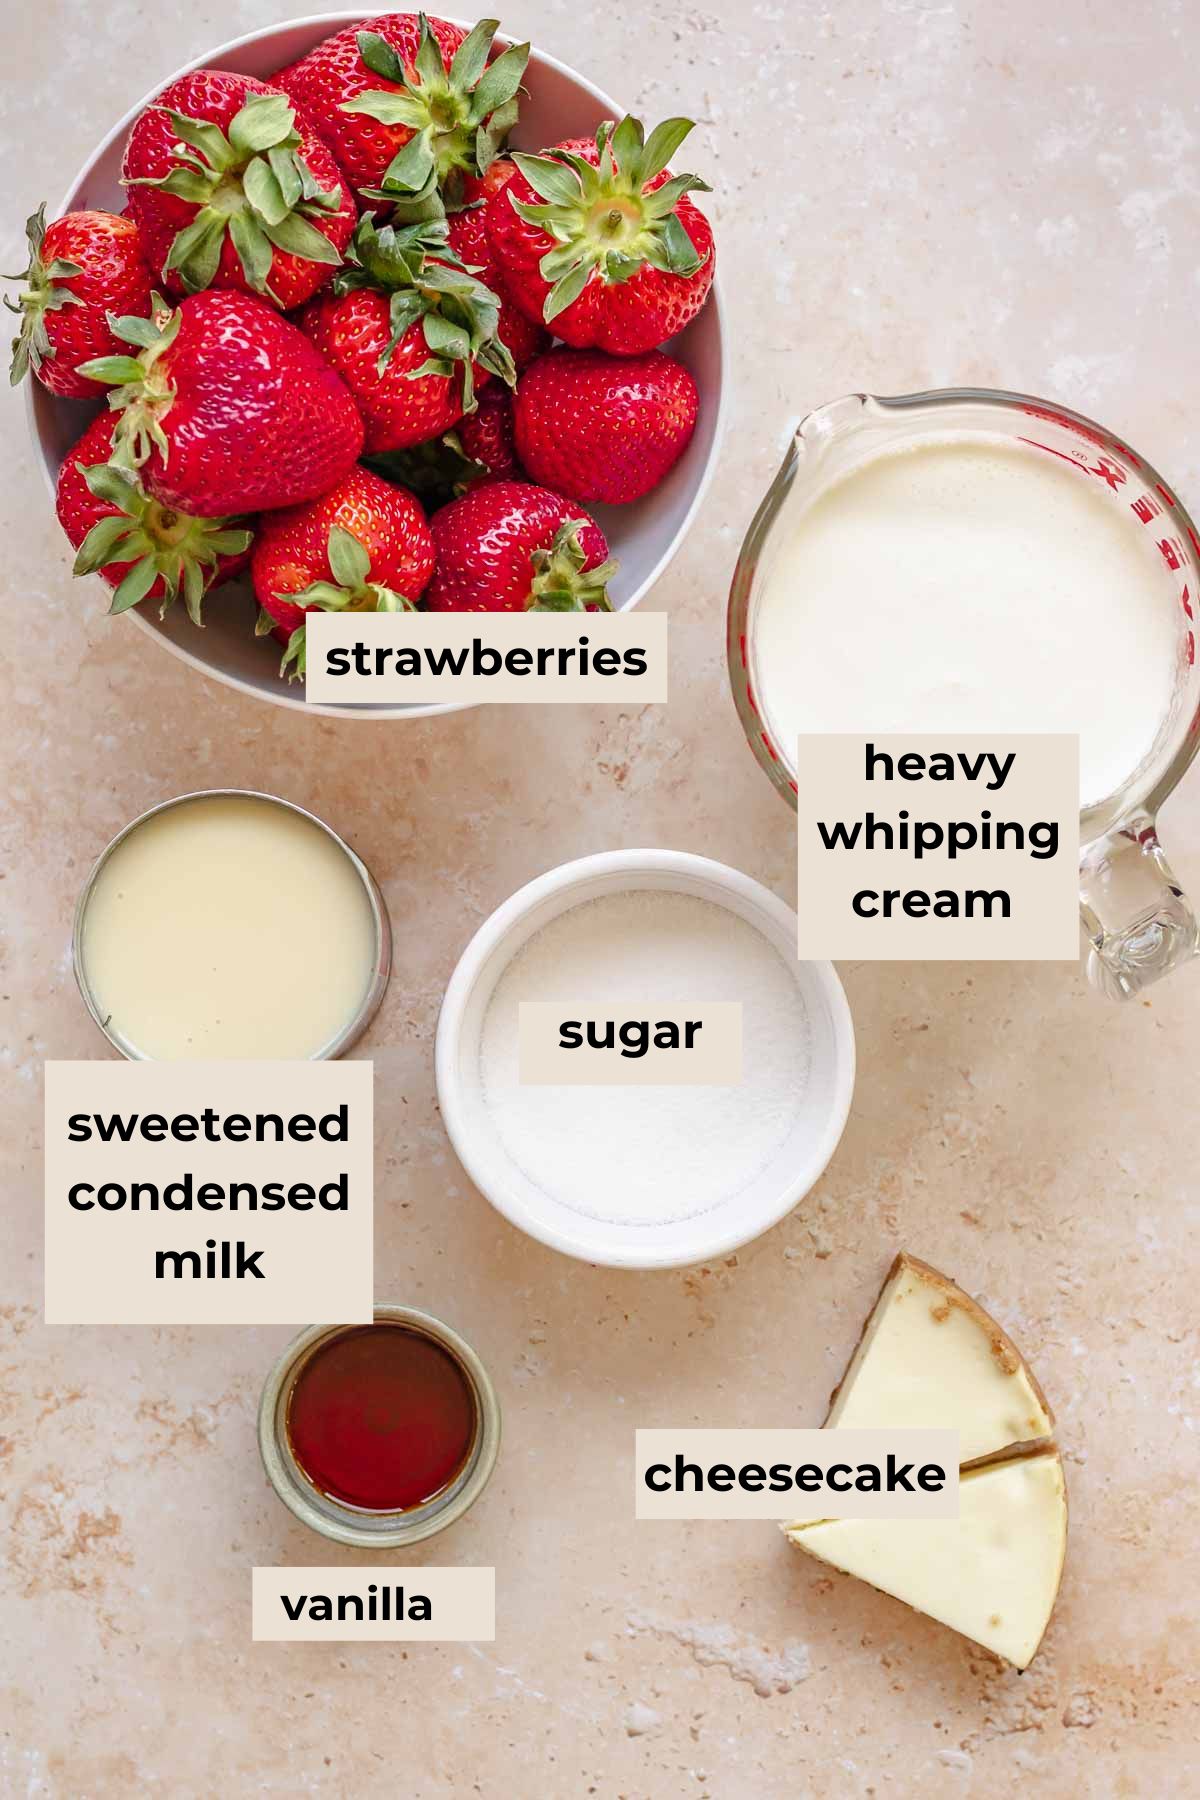
- Strawberries. Use fresh, very ripe strawberries for best flavor. Frozen strawberries can also be used out of season.
- Granulated sugar. Used to sweeten the strawberry puree.
- Sweetened condensed milk. This not only sweetens the ice cream, but this ingredient doesn’t freeze solid, helping to keep the ice cream ultra-creamy.
- Heavy whipping cream. This makes the ice cream light and airy. The heavy whipping cream should contain at least 36% milk fat.
- Cheesecake. This is an optional ingredient, but really levels up the strawberry ice cream! You can often find individual slices of cheesecake in the frozen aisle or the cold bakery section, which is perfect for this recipe.
See recipe card for full ingredients list and quantities.
Substitutions and Variations
- Amp up this dessert by adding chunks of cheesecake for a strawberry cheesecake ice cream version.
- Add chocolate chips, pieces of pound cake, or any mix-ins you’d like.
- Frozen strawberries can be used in place of fresh strawberries if needed.
- Use blueberries or raspberries in place of strawberries.
How to Make a No Churn Strawberry Ice Cream
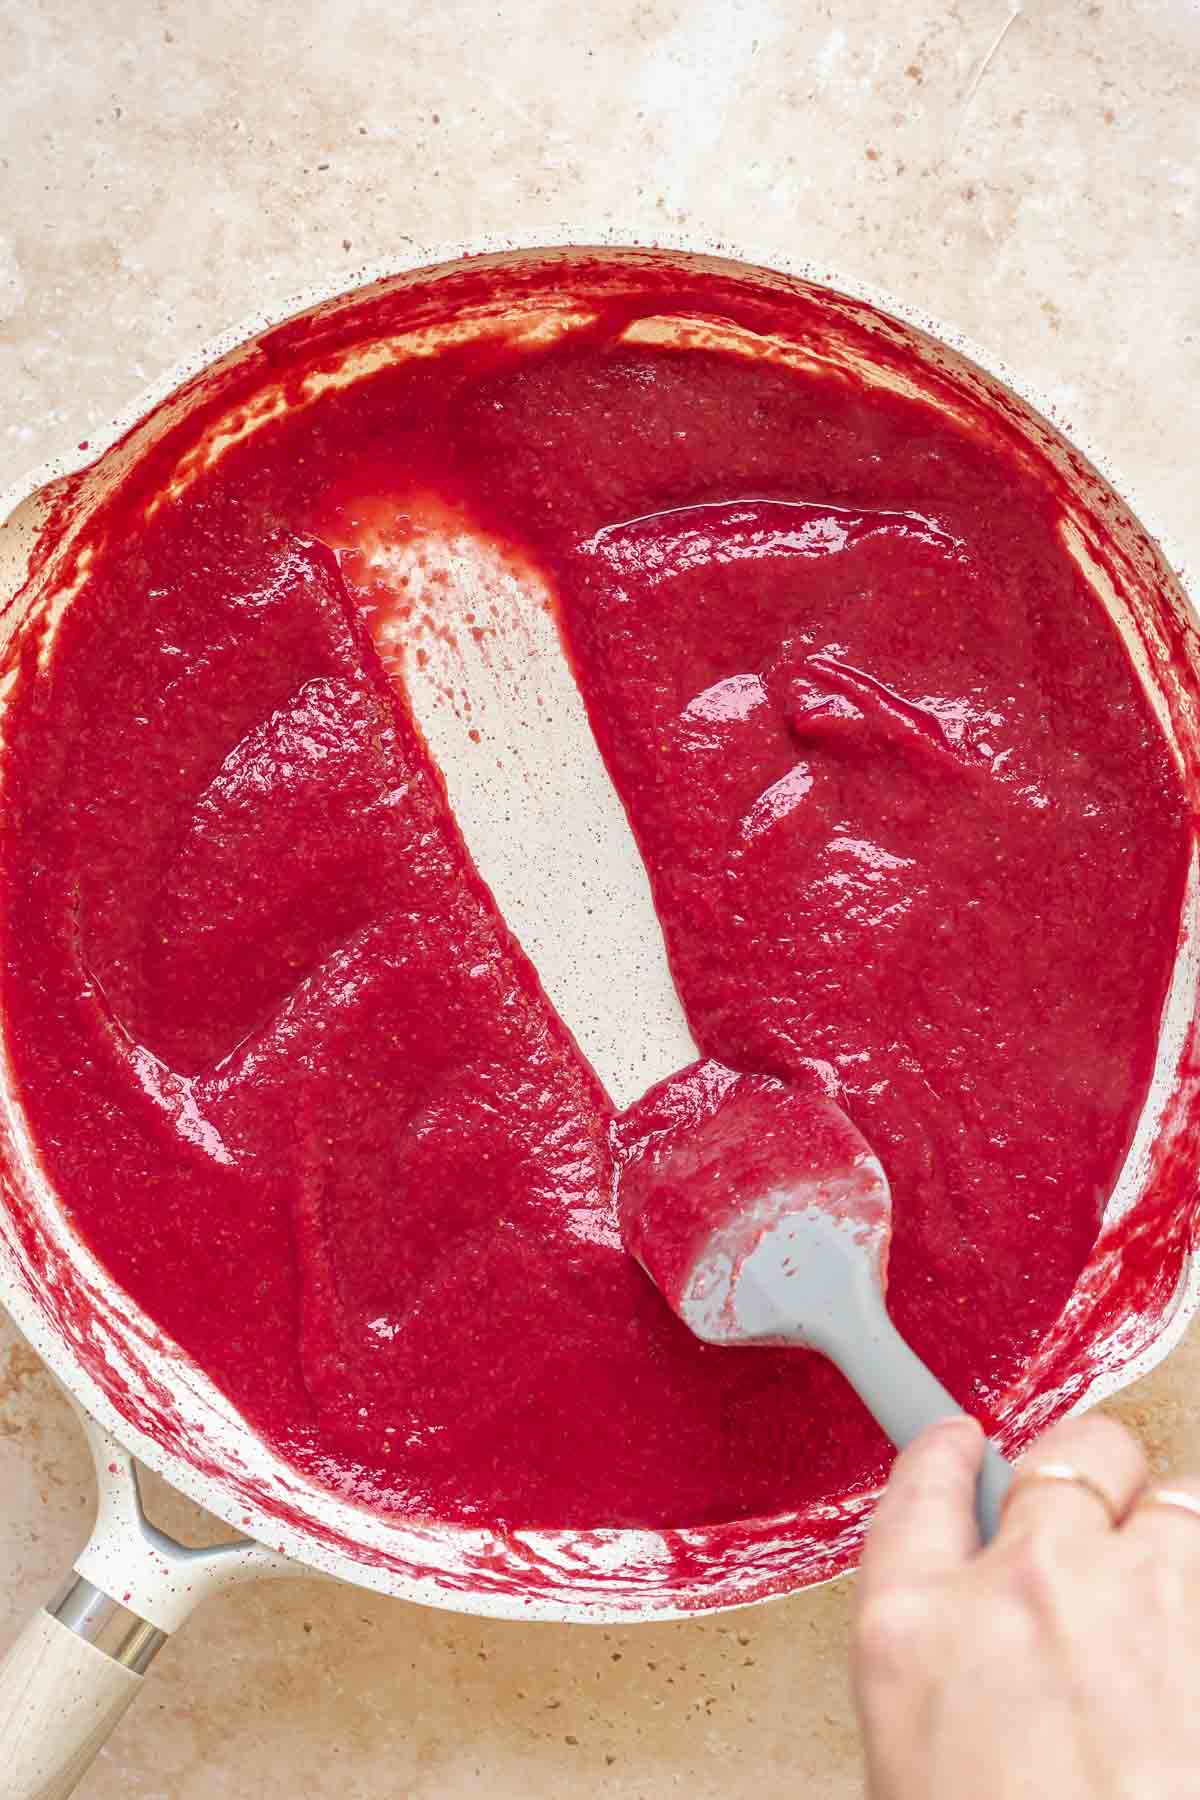
One: Blend the strawberries then add to a pan with sugar and cook until reduced by half and becomes thick and jammy. Cool the mixture.
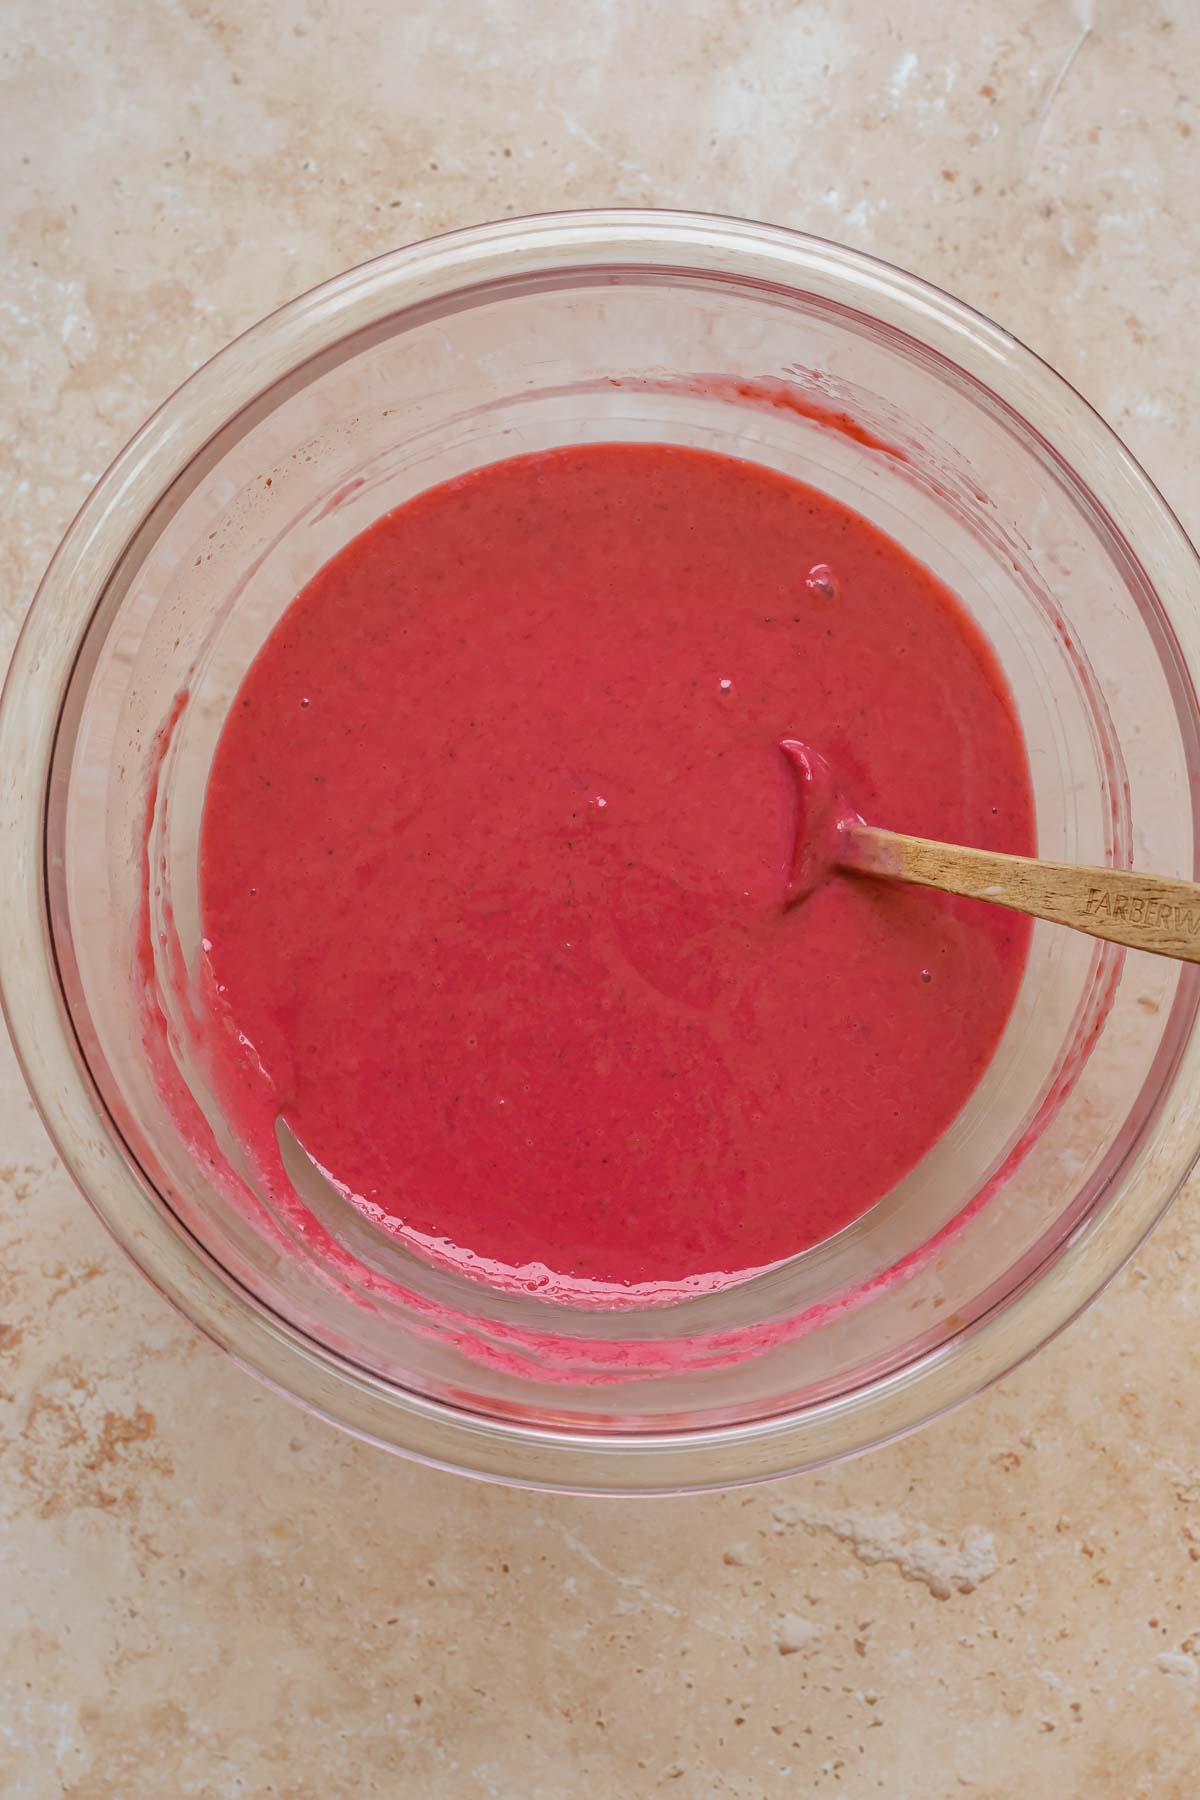
Two: Combine the ¾ of the strawberries with sweetened condensed milk and vanilla. Add a touch of red food coloring to brighten, if desired.
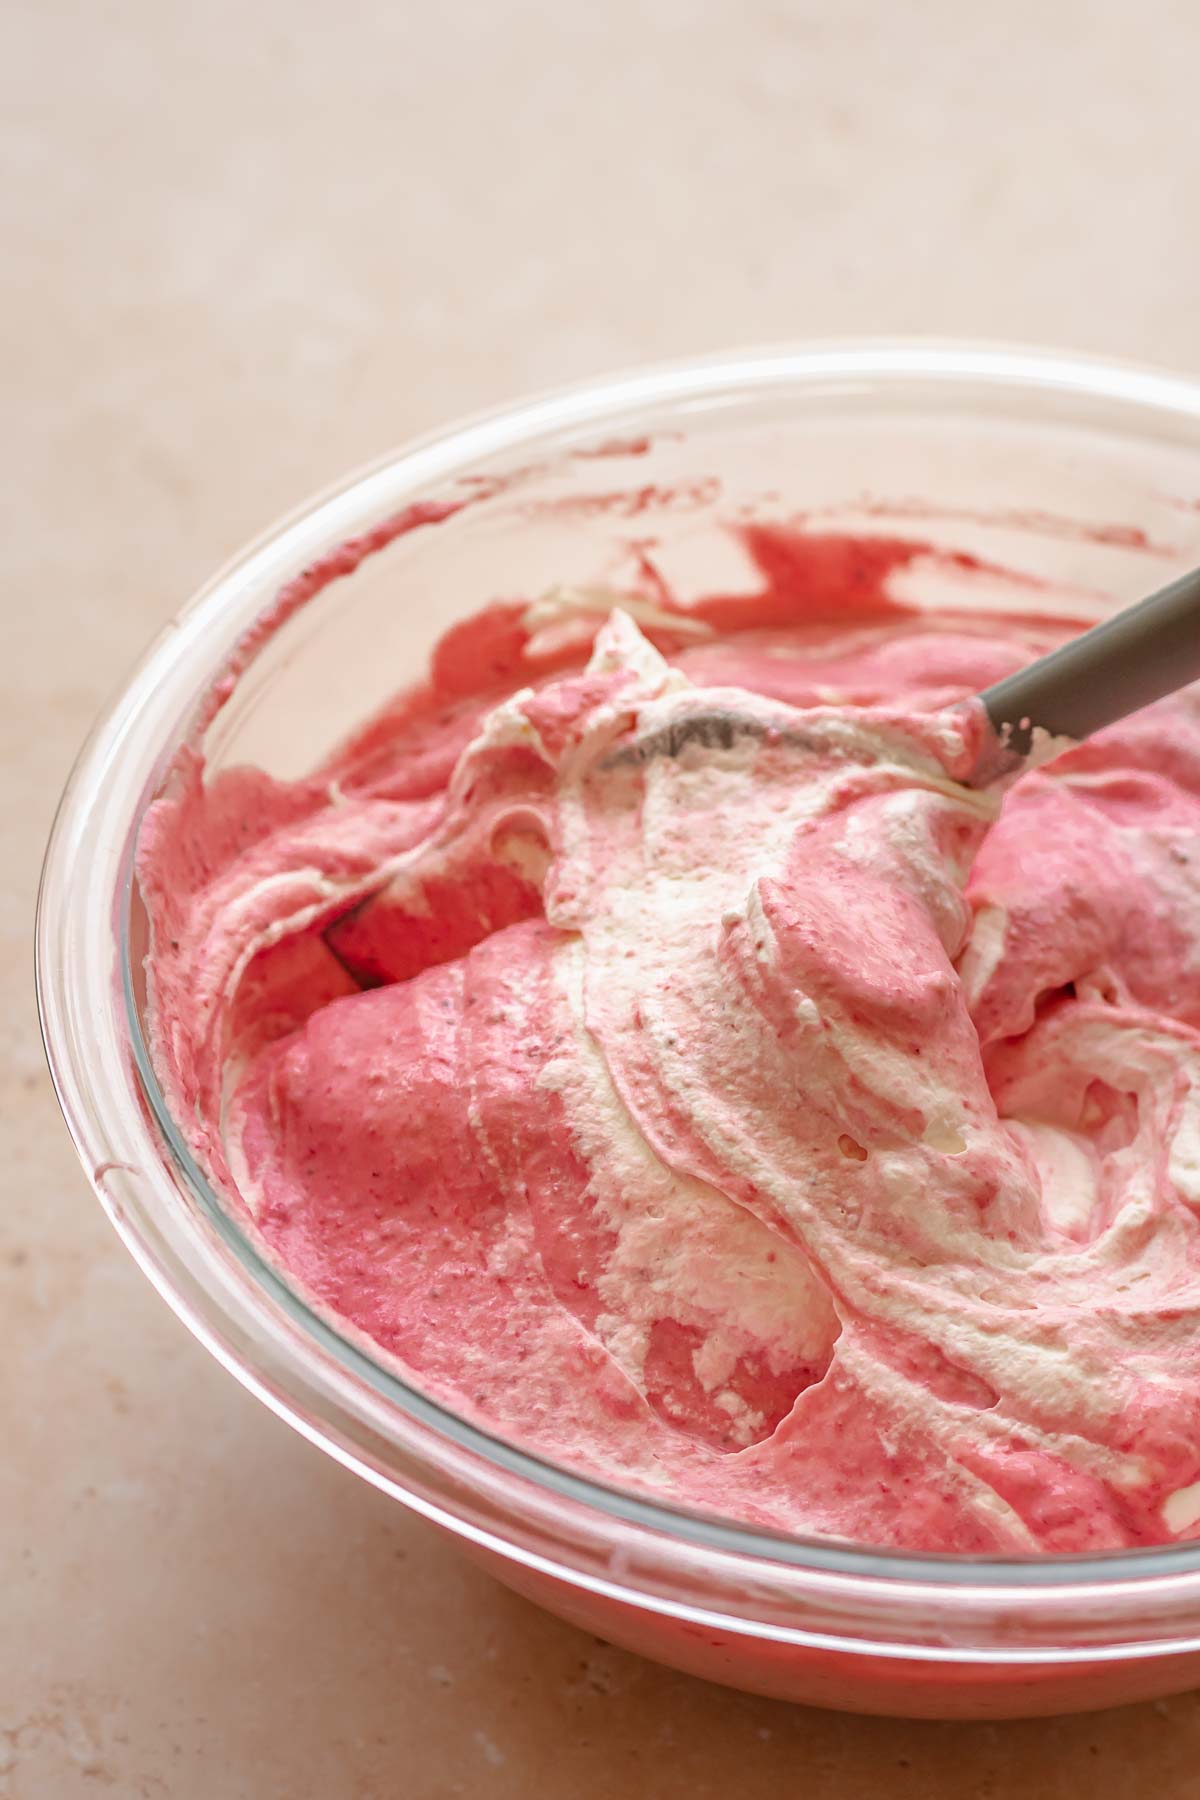
Three: Whip heavy cream to stiff peaks, then fold it into the strawberry mixture in two batches until totally incorporated.
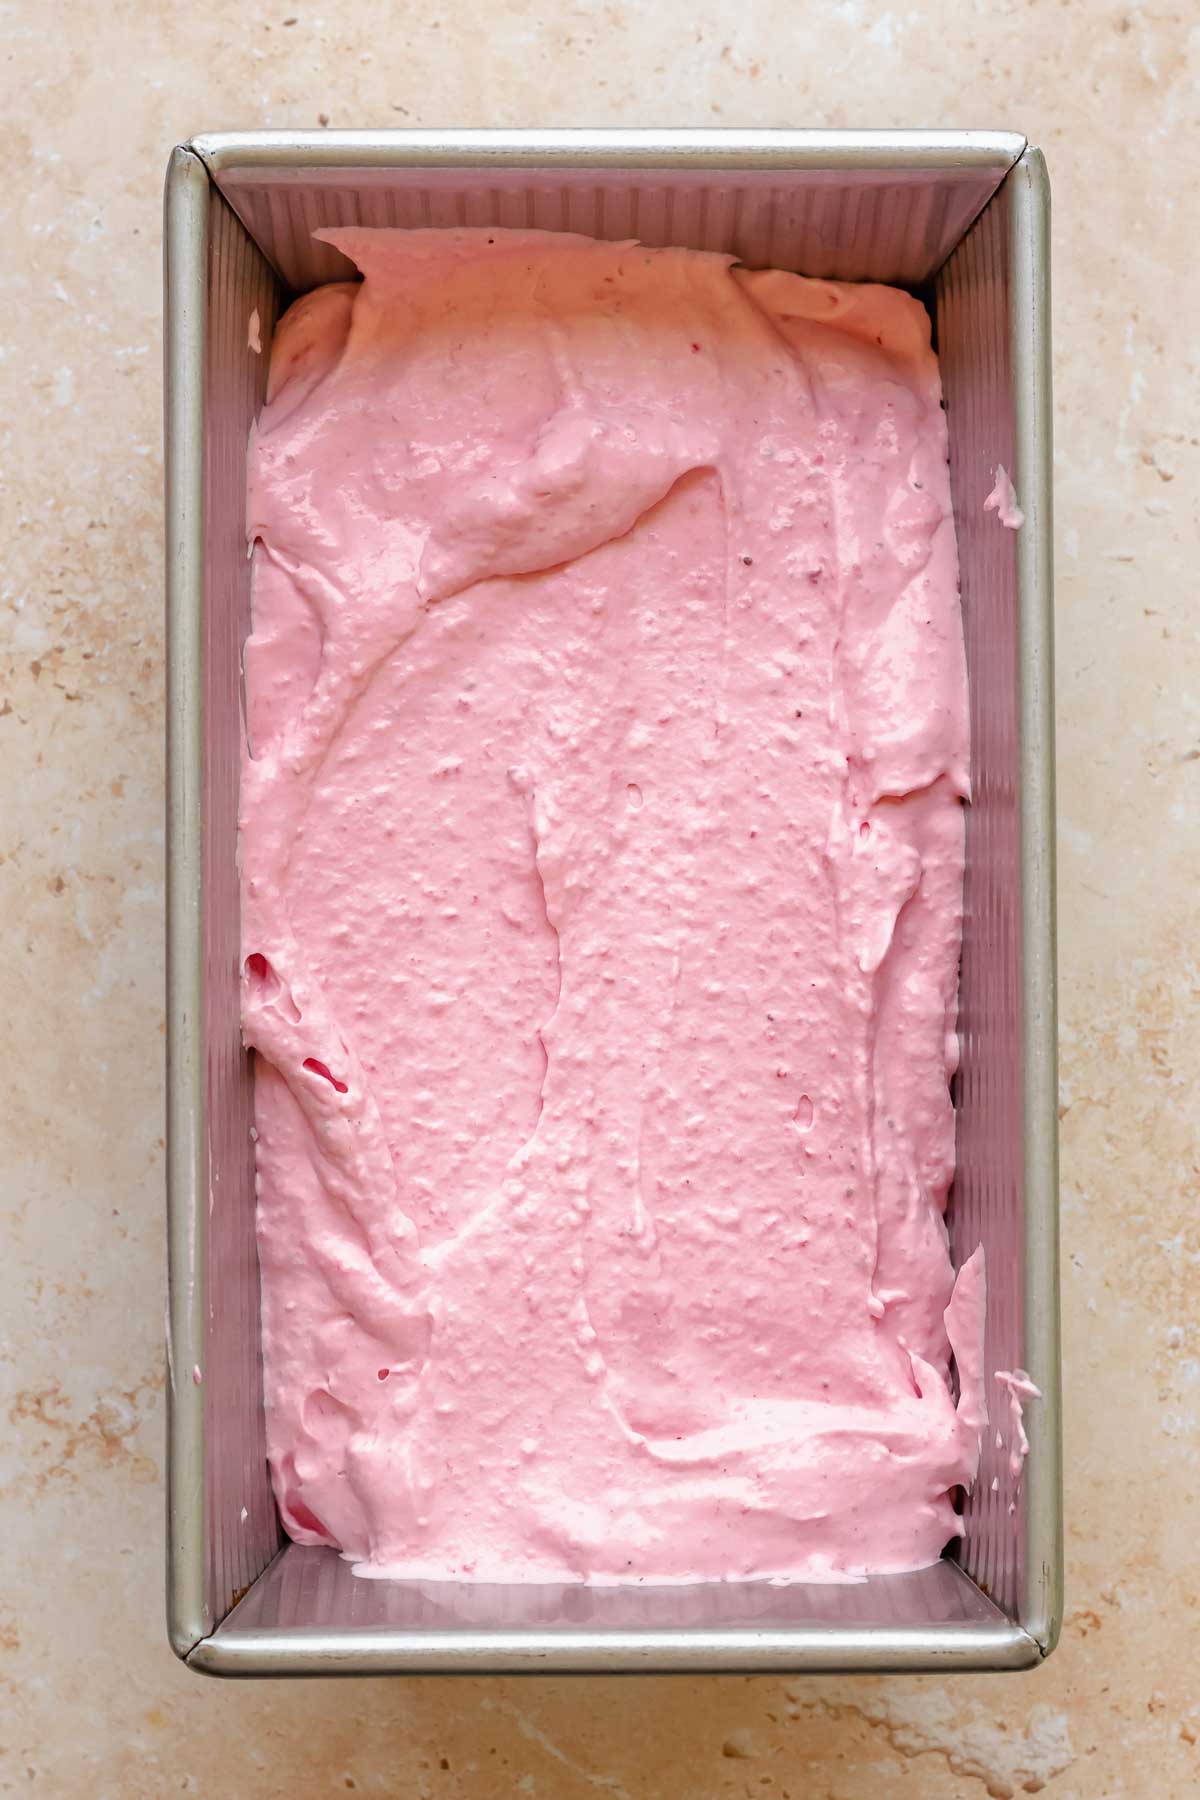
Four: Add half of the ice cream to a metal loaf pan and spread evenly.
💌 Save This Recipe
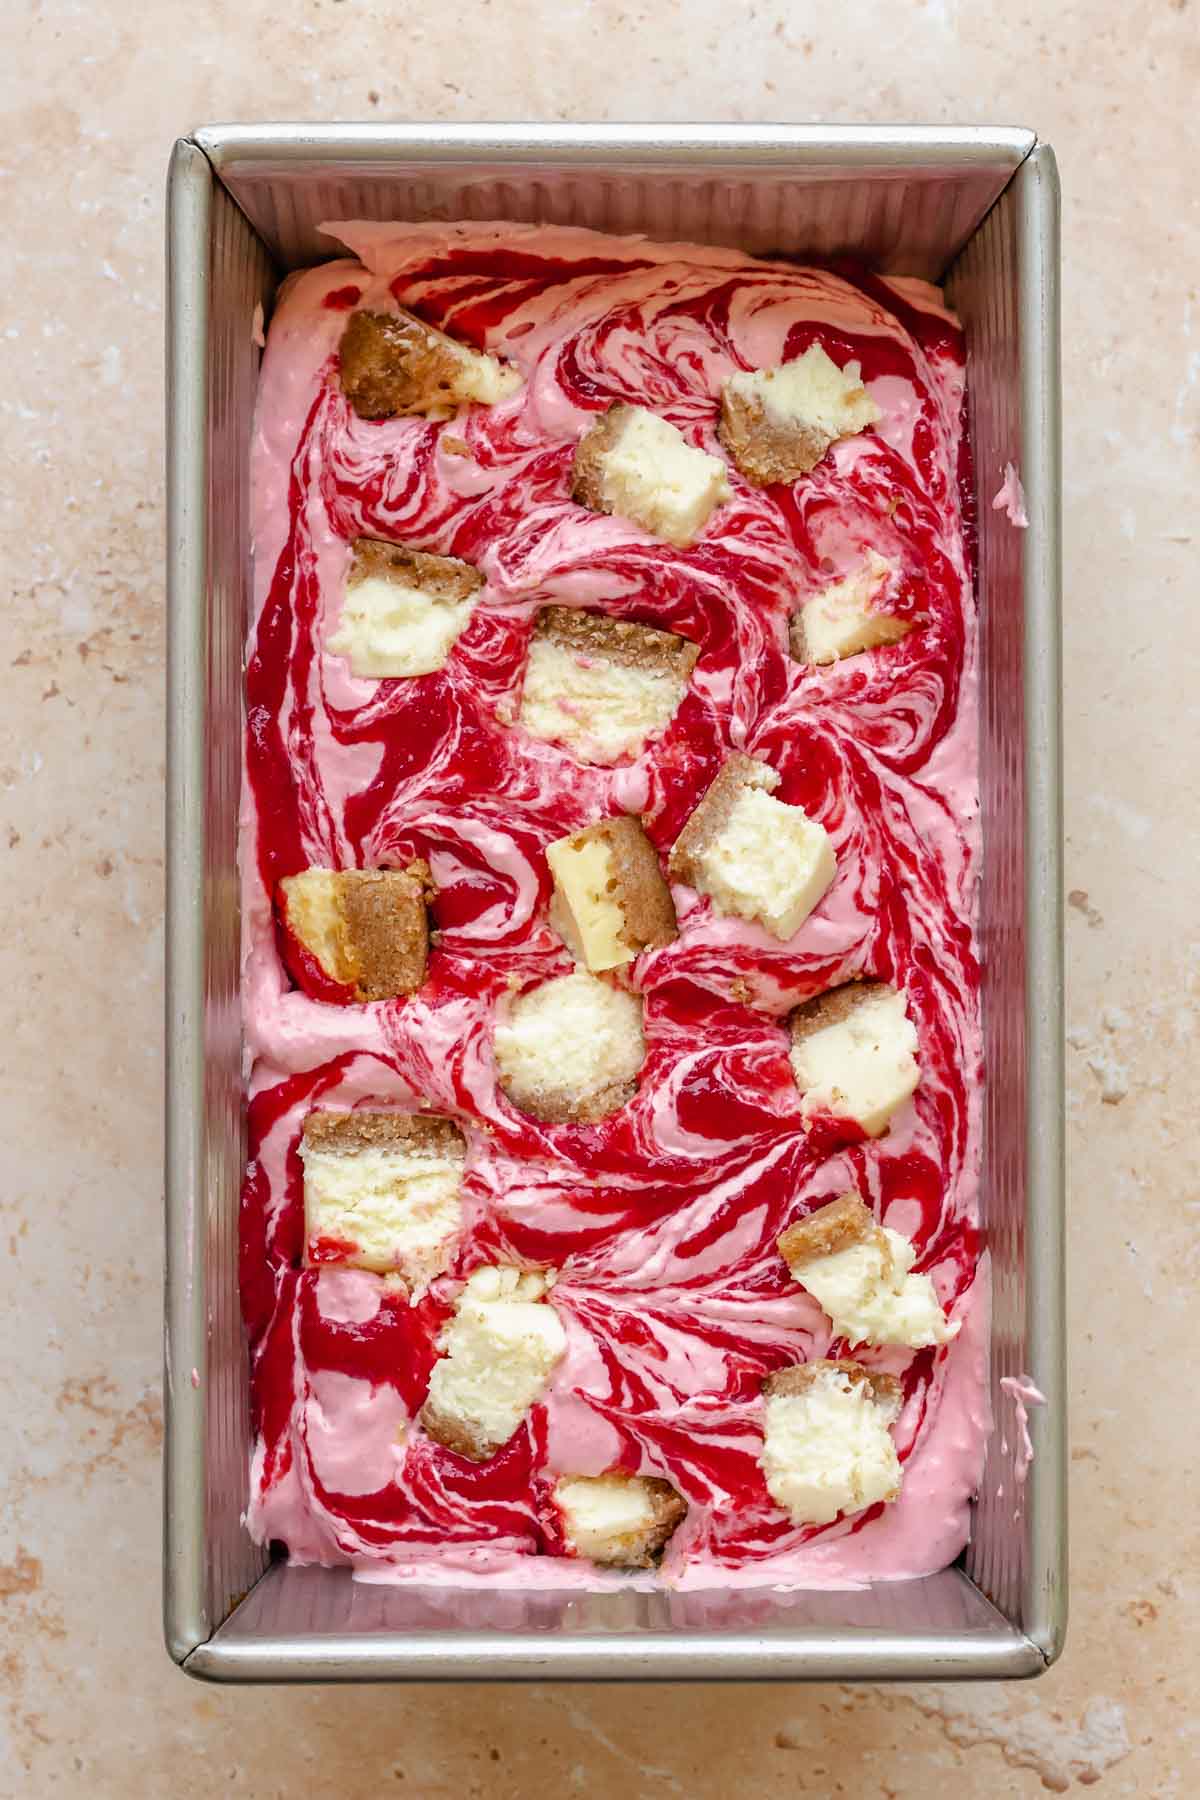
Five: Drizzle with extra strawberry and swirl it in. Scatter on cheesecake chunks (if using).
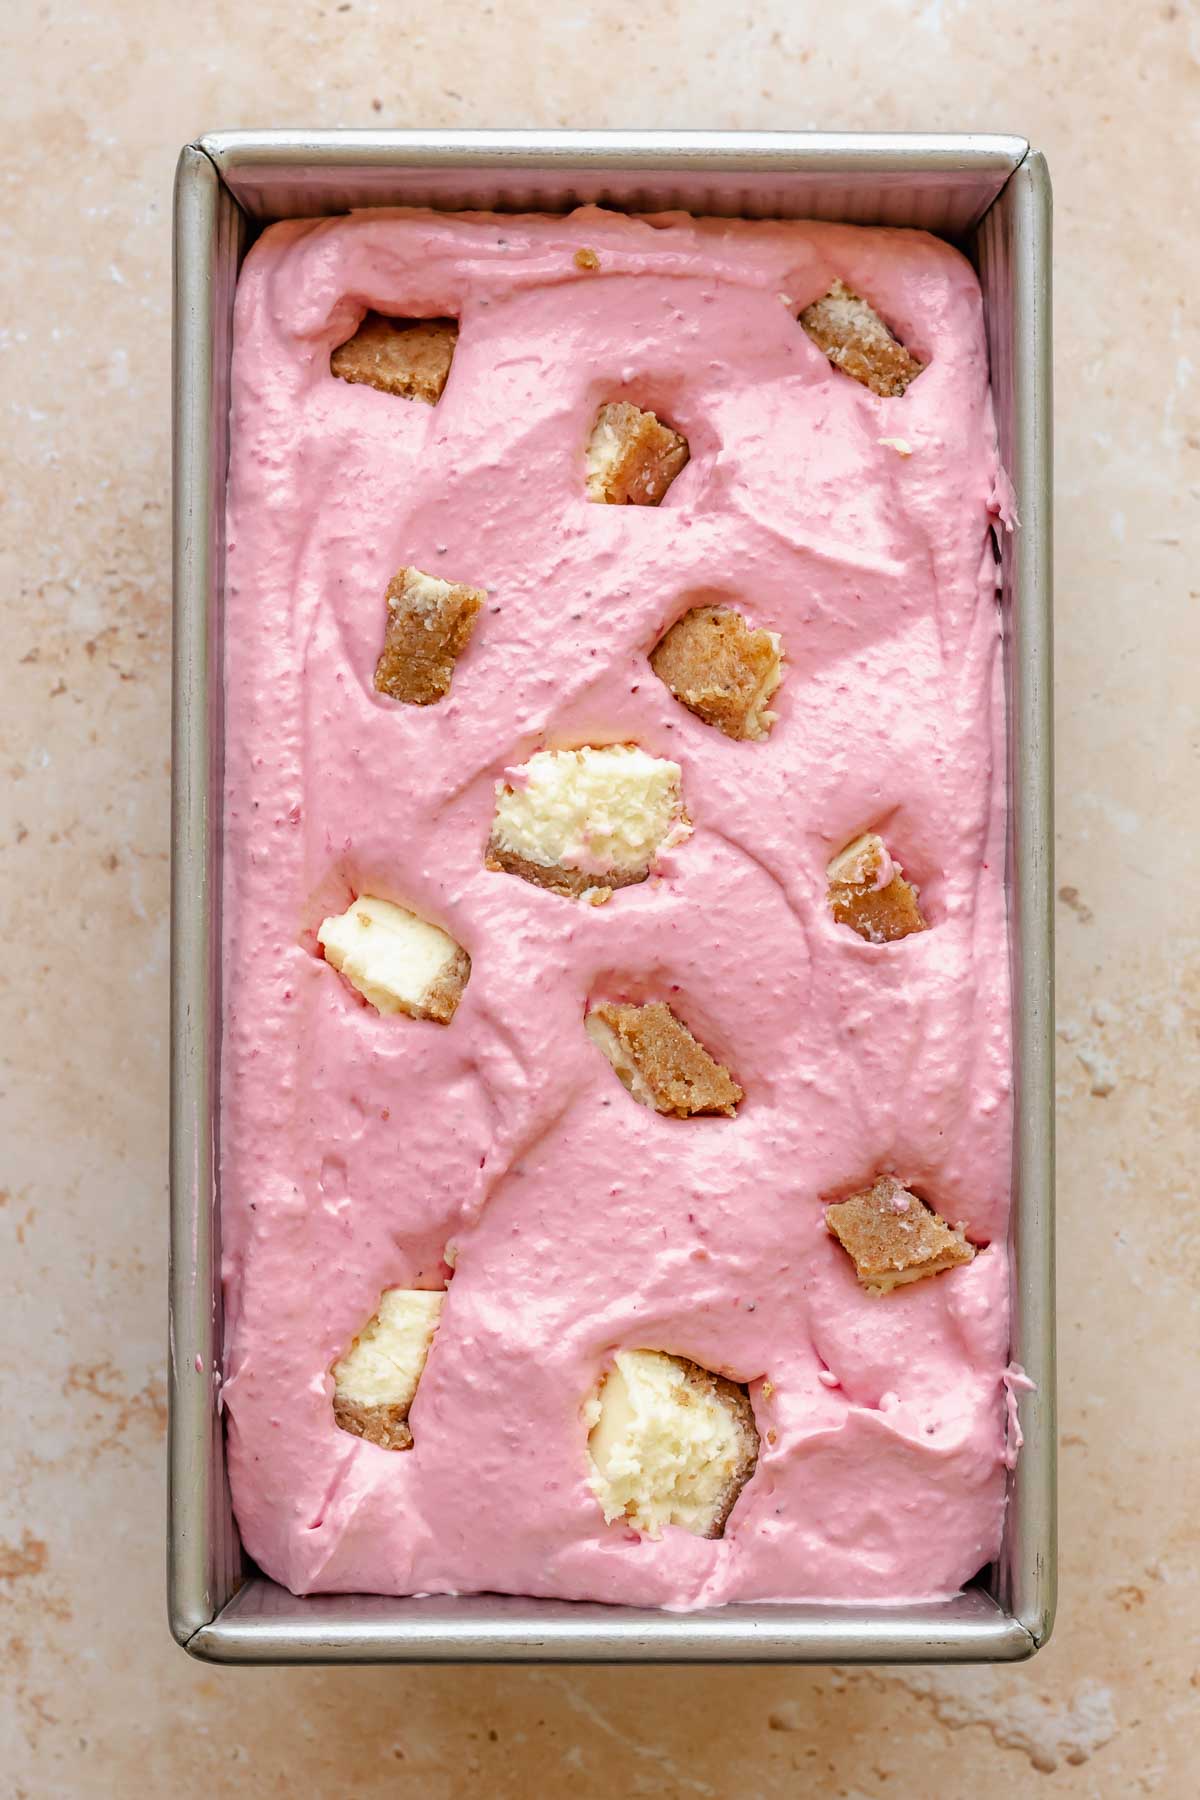
Six: Add almost all of the remaining ice cream, spread evenly, and press in more cheesecake pieces (if using).
Hot tip! Use a piping bag or zip-top bag to drizzle on the strawberry puree. For the swirl effect, a chopstick or butter knife are great tools!
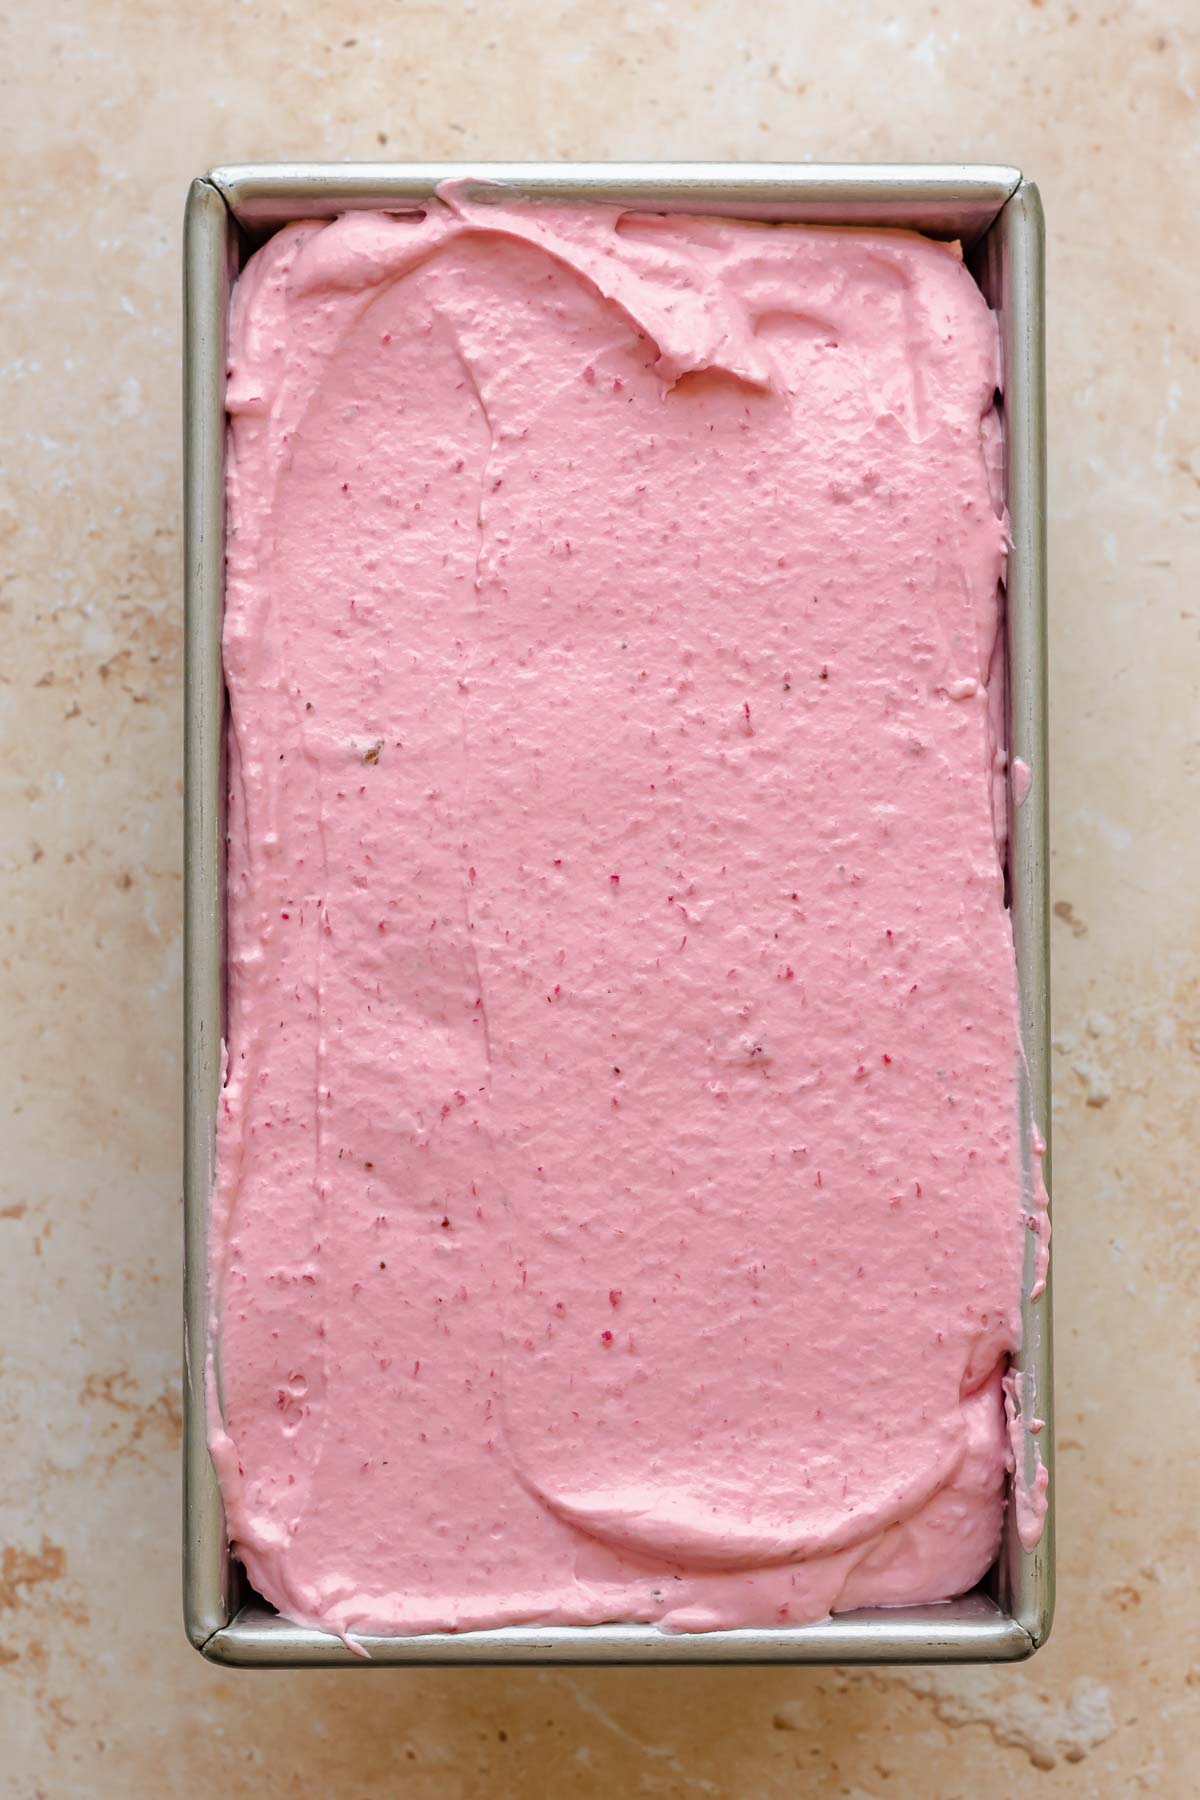
Seven: Add the last bit of remaining ice cream and spread to meet the edges.
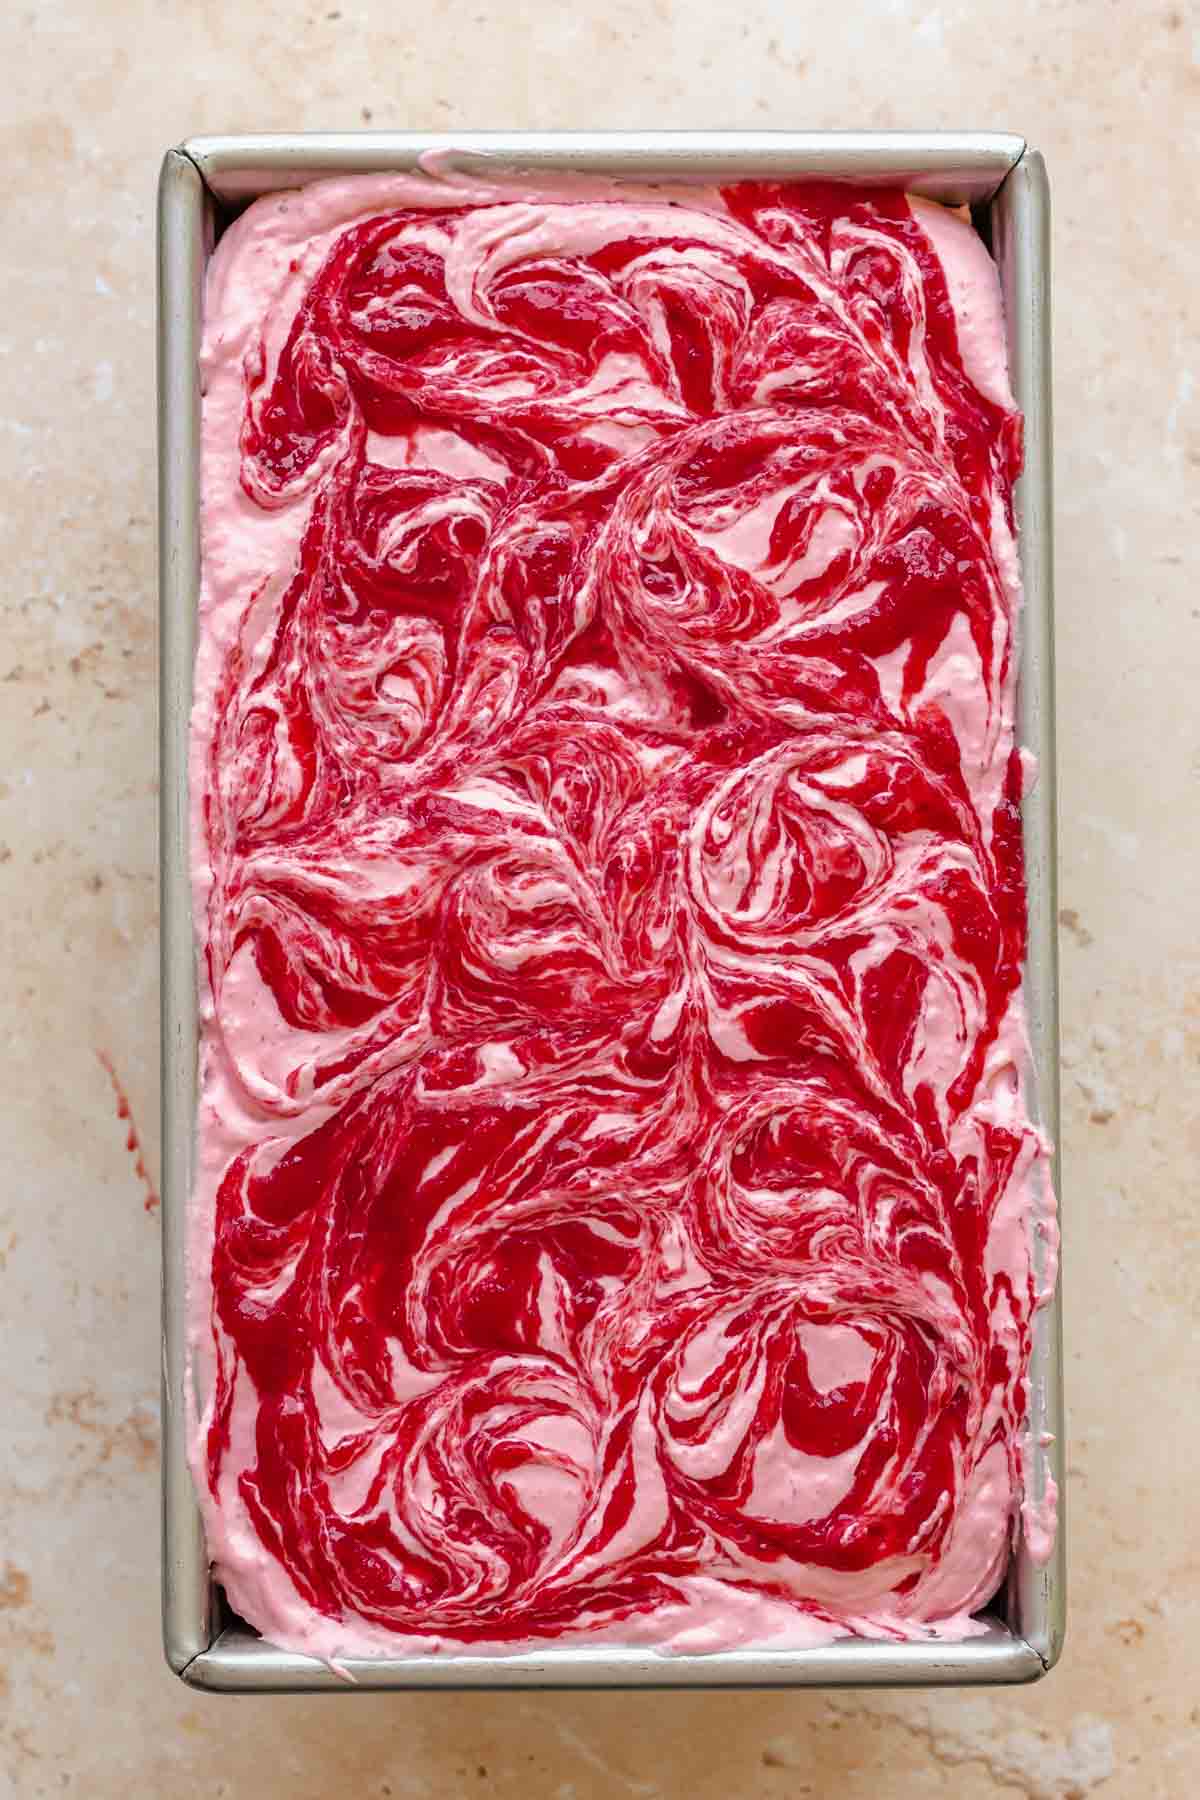
Eight: Drizzle on more strawberry puree and swirl it in. Cover tightly and freeze for at least 6 hours.
Expert Tips
- Allow the cooked strawberries to cool completely in the fridge prior to mixing them into the ice cream.
- Whip the heavy cream to stiff peaks for the fluffiest ice cream.
- Fold the whipped cream in gently, as to not deflate the mixture, but be sure it's totally mixed in and no streaks remain.
- Transfer the ice cream to a metal pan to freeze for the best results. Otherwise, glass or plastic can be used.
- Let the ice cream sit at room temp for at least 10 minutes prior to scooping.
Recipe FAQs
One uses a custard base (made with eggs, milk, and cream) that goes into an ice cream machine to get slowly churned to create air. No churn ice cream skips this step and uses whipped cream to create air, and no machine is needed.
No churn ice cream can be stored for up to three months in a tightly sealed container. Note that any air that gets in will create crystallization.
The best way to replicate churned ice cream is by using a base of sweetened condensed milk and heavy whipping cream (whipped to stiff peaks). This makes the creamiest version of an ice cream. Solely using heavy whipping cream and sugar will create icy, hard ice cream.
Storage
Store the strawberry ice cream tightly covered (plastic wrap and foil) in a metal pan or in a tightly sealed container for up to one month.
More No Bake Desserts You'll Love


Did you make this recipe? Share it with us! Tag @thecozyplum on Instagram & Facebook and leave a star rating ⭐️ below!
📖Recipe
No Churn Strawberry Ice Cream
Equipment
- 9 x 5 inch loaf pan metal preferred
Ingredients
- 24 oz strawberries fresh or frozen
- ½ cup granulated sugar
- 2¼ cups heavy whipping cream
- 1 can sweetened condensed milk
- 1 tablespoon vanilla paste or extract
- 1 slice cheesecake chopped into bite sized pieces (optional)
Instructions
- Pulverize the strawberries in a food processor or blender until smooth.24 oz strawberries
- Add the puree and sugar to a saucepan over medium low and simmer (stirring every few minutes, scraping the sides) until the strawberries reduce by half and the mixture falls slowly from a spatula or spoon and turns much thicker. About 20-30 minutes.½ cup granulated sugar
- Transfer to a bowl, place in the fridge, and cool to at least room temperature, stirring every few minutes to release heat and steam.
- Place the stand mixer bowl and whisk attachment in the freezer for 15 minutes. Then, whip the heavy cream on high speed until stiff peaks form.2¼ cups heavy whipping cream
- In a large bowl, combine the sweetened condensed milk, vanilla, and ¾ cup of the strawberry sauce and mix until incorporated.1 can sweetened condensed milk, 1 tablespoon vanilla paste or extract
- Optional: Add a few drops of red food coloring to brighten up the final product. Adding the whipped cream will lighten the color significantly.
- In two batches, fold in the whipped cream until completely combined and no white streaks remain. Do this carefully so the mixture doesn't become deflated.
- Add half of the ice cream to a standard loaf pan, drizzle half of the remaining strawberry sauce over the top, and swirl it in with a butter knife. Scatter on half of the chunks of cheesecake if using.1 slice cheesecake
- Add almost all of the remaining ice cream, then add more cheesecake pieces, pressing them down slightly. Add the remaining ice cream and smooth it out on top, then drizzle on the remaining strawberry puree and swirl it in.
- Cover tightly with plastic wrap and foil and freeze for at least 6 hours.
Megan says
So so freaking good. I was pleasantly surprised with the limited ingredient list, but was blown away with the flavor that it packed in. It was perfectly scoopable and delicious!
Callan Wenner says
Yay!! And yes, it's SO scoopable right?!
Tammy prete says
Love it!! And as a novice baker/cook… I even found it easy!!
The Cozy Plum says
Ahh yay!! So happy to hear this Tammy. Thanks for making!