

These ham and cheese scones are tender, buttery, and packed with sharp aged cheddar, savory ham, and a sprinkle of fresh chives. They bake up tall with light, crispy edges and soft, fluffy centers. Perfect for breakfast, brunch, or alongside a warm bowl of soup!

With no special equipment or complicated shaping, these savory scones come together in minutes. Cold butter, cold milk, a simple pat and cut method, and some extra chill time are the only secrets behind their perfectly light and flaky texture.
They'd be perfect served alongside some sweet scones like these earl grey lemon scones or apple cinnamon scones for a full spread!
Jump to:
Why You'll Love This Recipe
Savory and satisfying - packed with aged cheddar, bites of ham, and some aromatics, every bite is full of flavor and a tender texture.
Quick to mix - no kneading, laminated, or extended chilling is required!
Great for meal prep - easy to make ahead, freeze, and reheat like a charm!
Ingredients
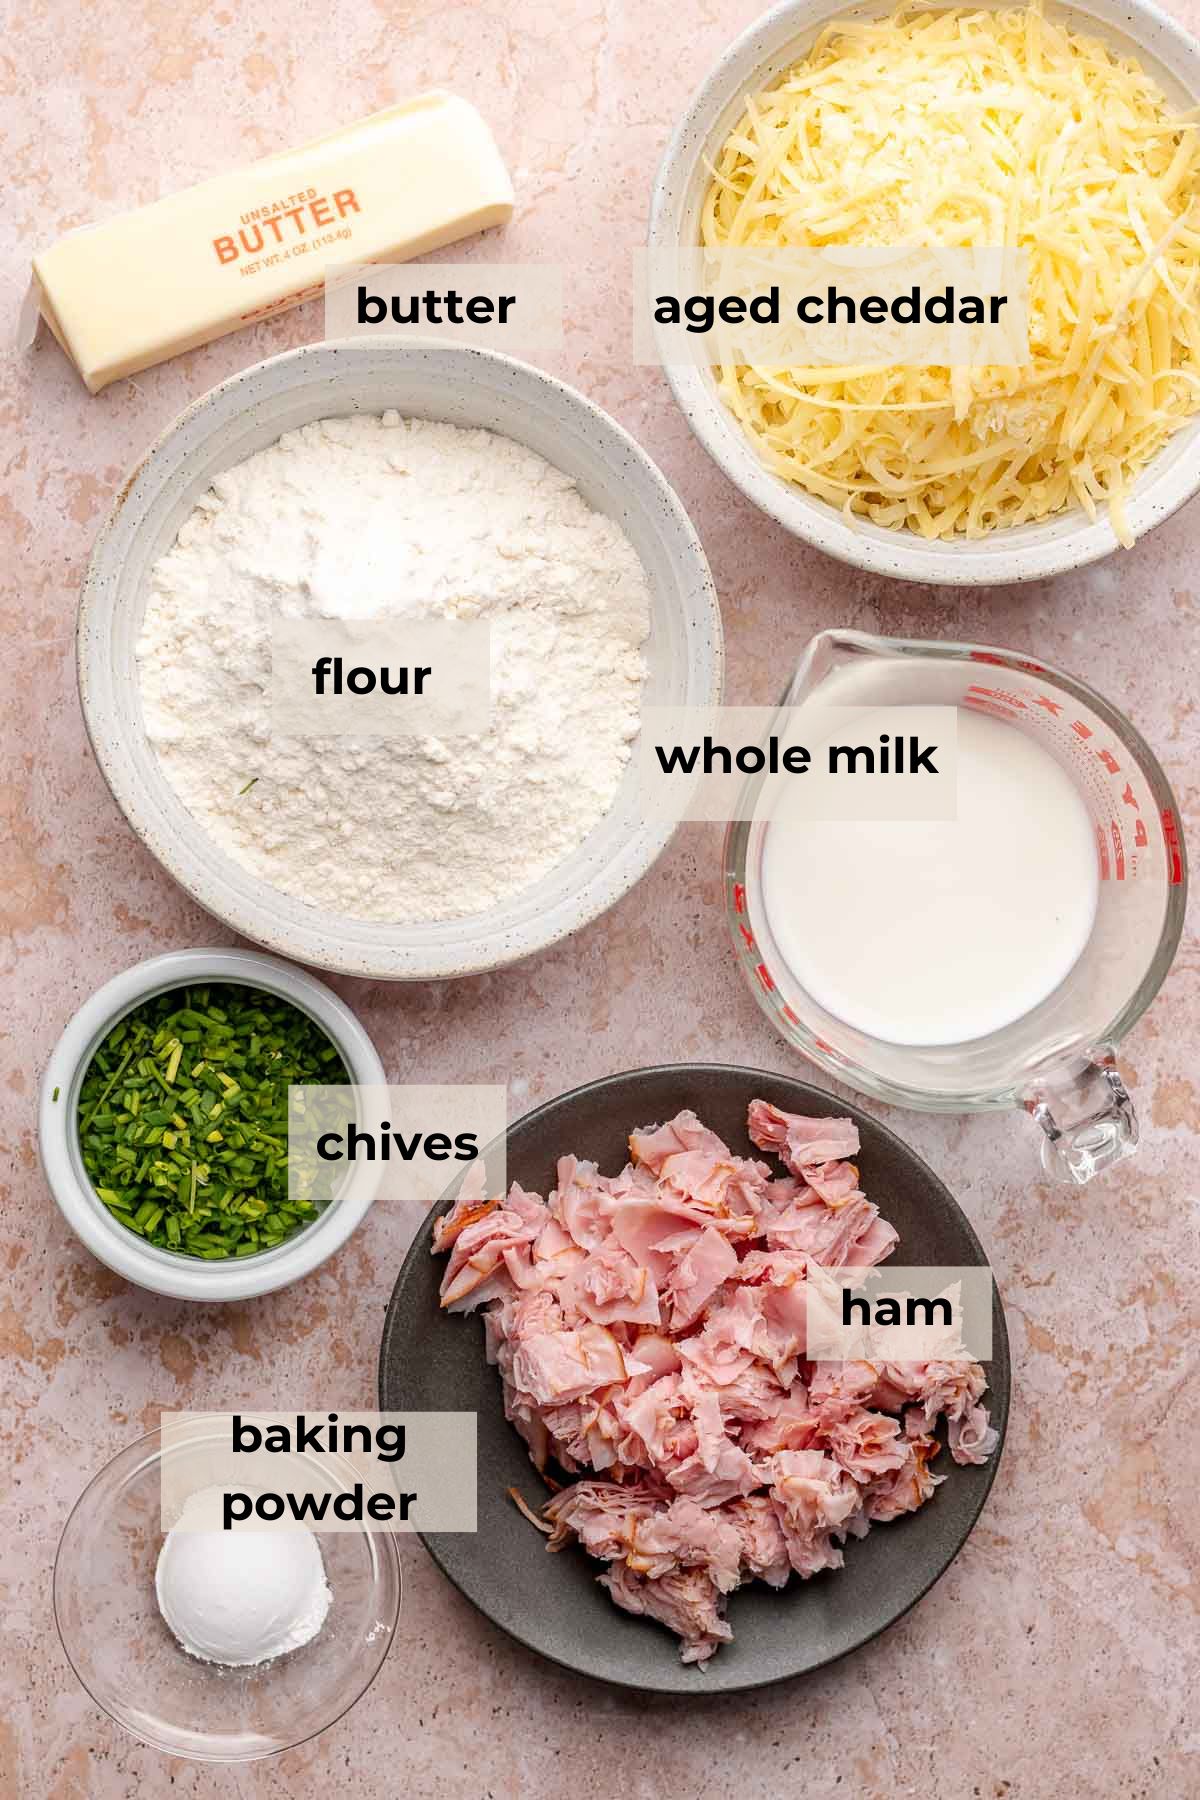
- Flour. Standard all-purpose flour is the base of the recipe to provide structure and absorb moisture. Use a digital scale to measure if you have one so you don't add too much flour!
- Baking powder. This gives the scones a tall, fluffy rise and should not be omitted!
- Unsalted butter. Grating cold butter is the key to flaky, tender layers.
- Cheese. Adds salty, nutty richness to every bite. I love to use Old Croc aged cheddar or Dubliner!
- Ham. Your favorite ham adds savory flavor and texture to every scone. Use any leftover ham to make these ham and cheese turnovers, ham and cheese quiche, or savory breakfast rolls!
- Chives. Adds mild, fresh onion flavor that pairs perfectly with the cheese and ham.
- Milk. Brings the dough together while keeping it tender.
See recipe card for full ingredients list and quantities.
Substitutions and Variations
- Cheese. Try gruyere, smoked cheddar, or pepper jack.
- Meat. Cooked bacon, prosciutto or sausage.
- Chives. Replace with green onions or a bit of parsley (or omit).
- Milk. Use buttermilk for extra tang, or any variety of milk you have on hand. Higher fat milks will be most tender.
- Add ins. Cracker black pepper, smoked paprika, or everything bagel seasoning.
How to Make This Recipe
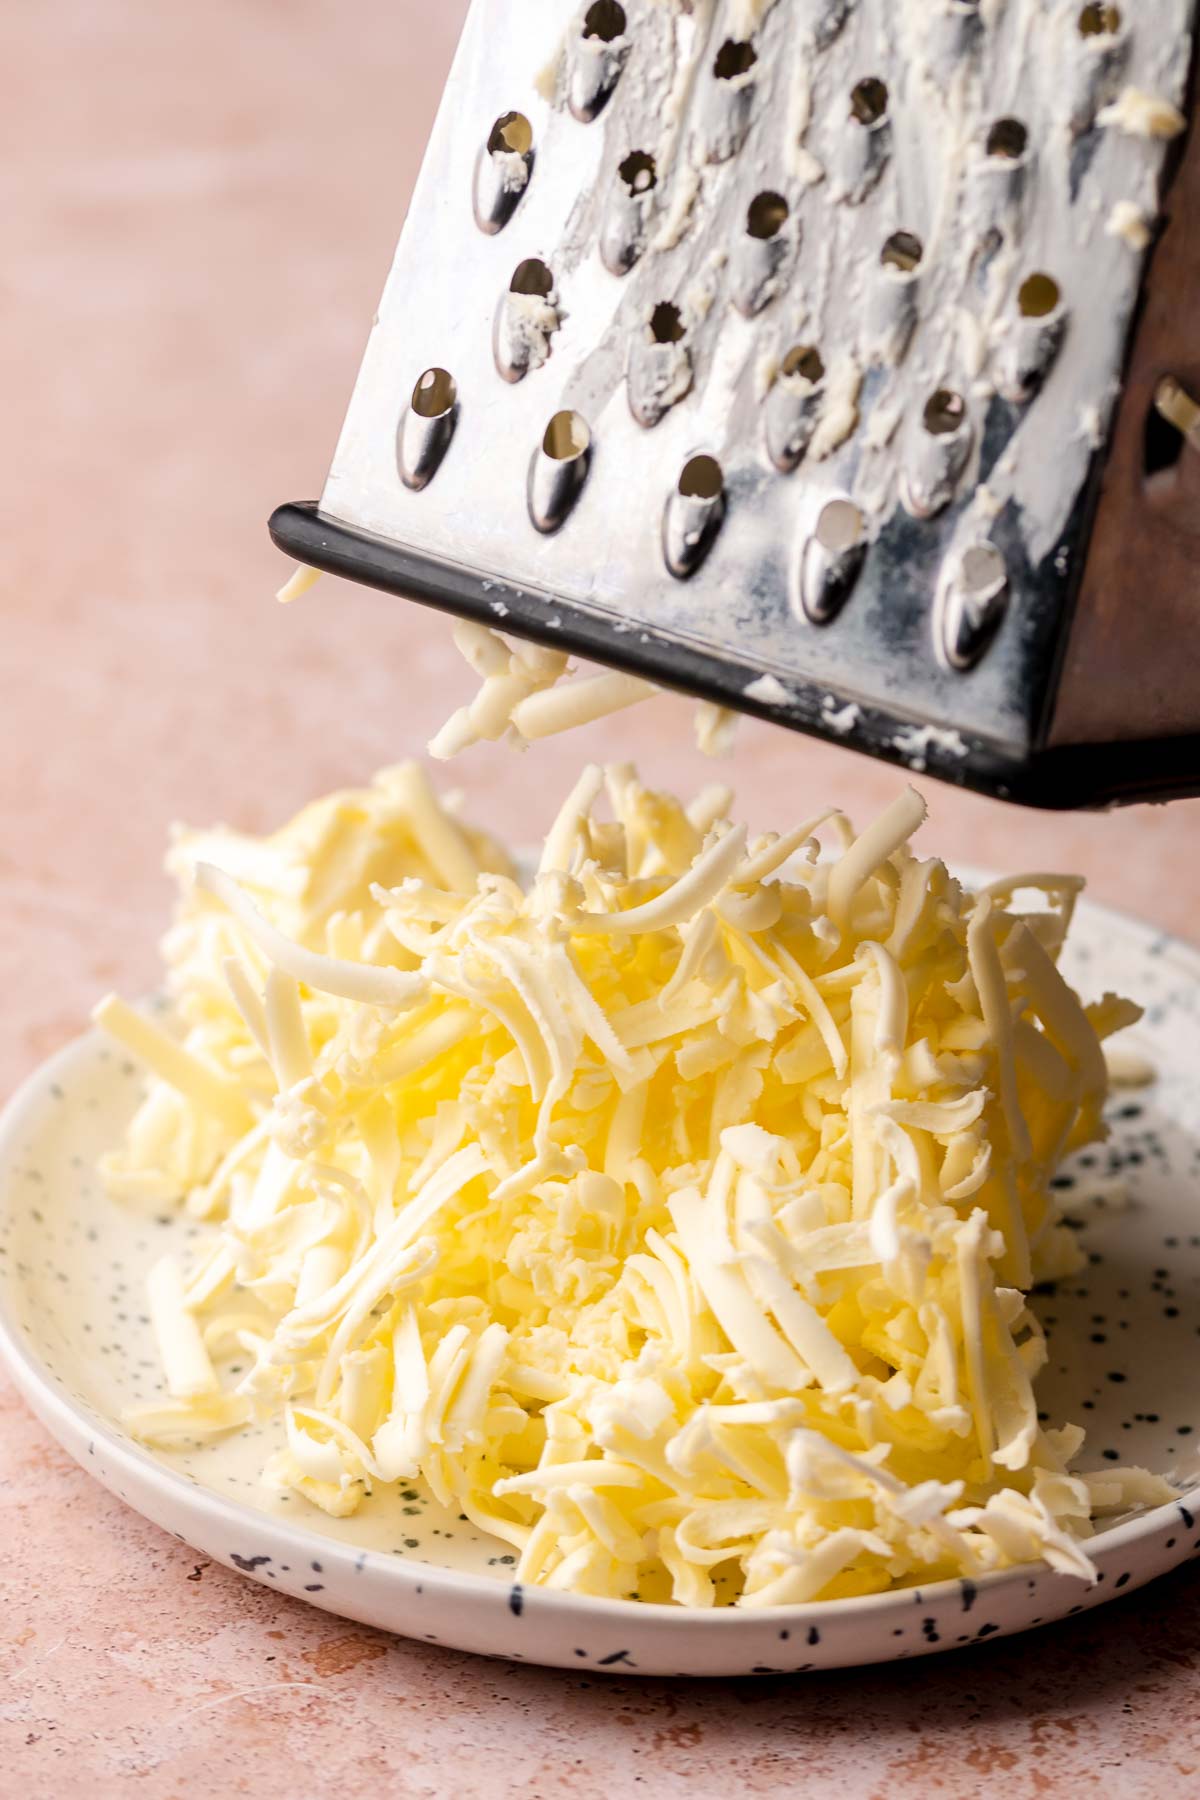
One: Grate frozen butter on the wide shred.

Two: Toss the butter with the dry ingredients until coated.

Three: Add the ham, cheese, and chives and toss again.
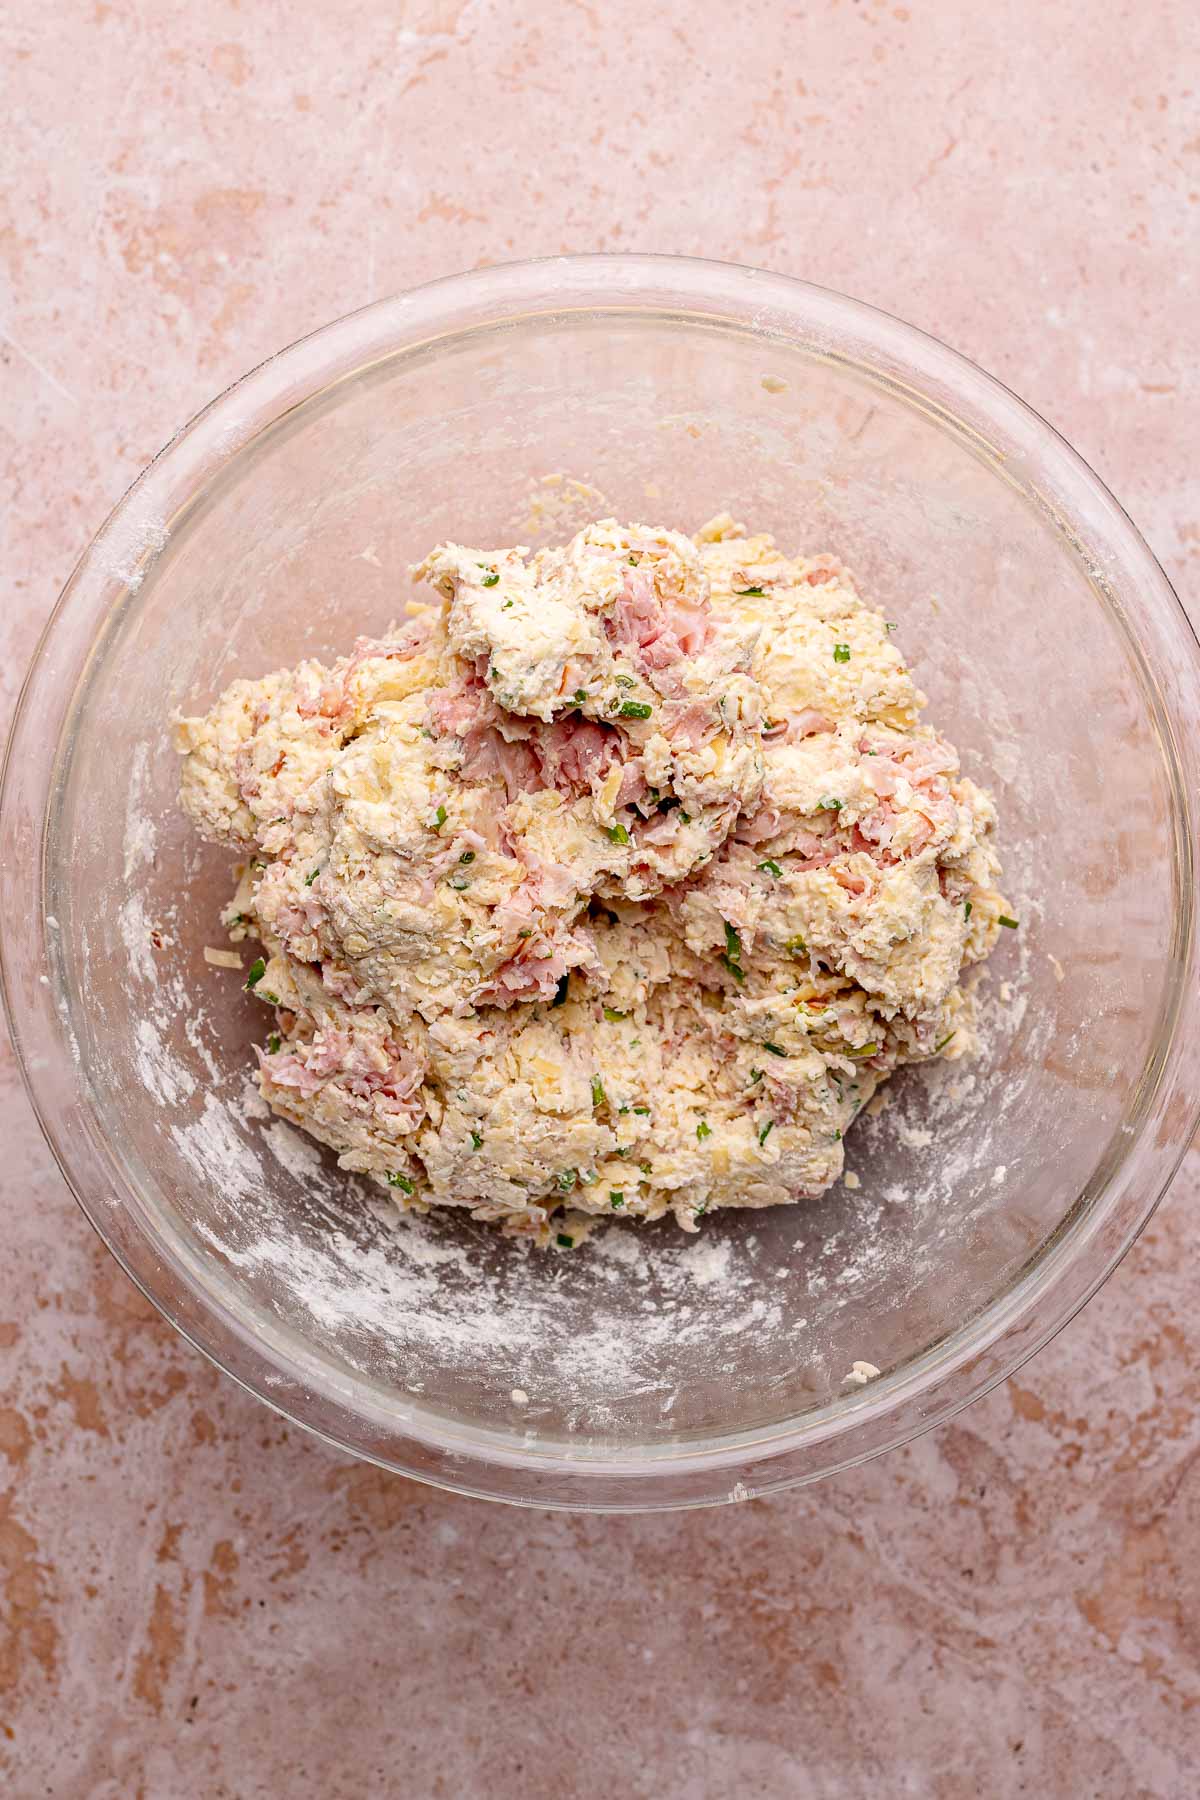
Four: Drizzle in the milk and mix until just combined.
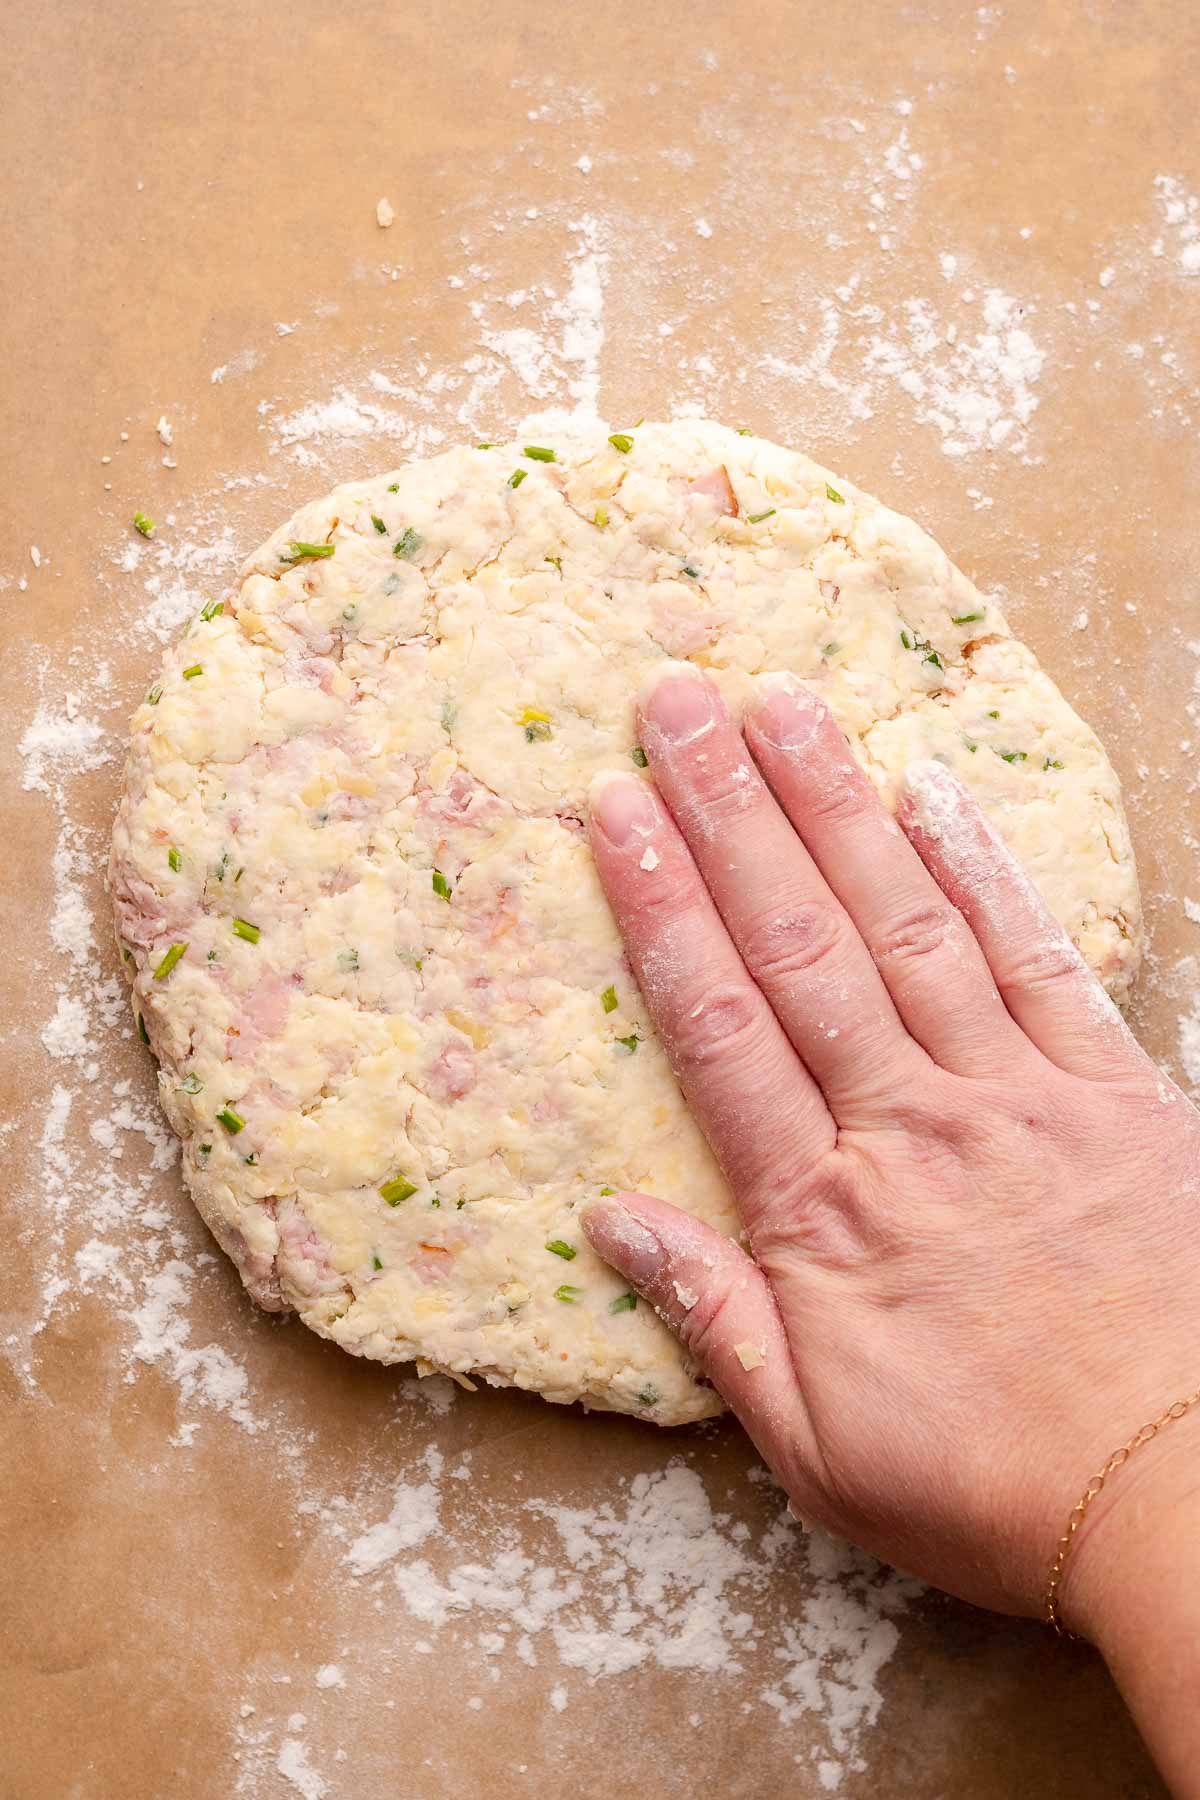
Five: Pat into a circle on a lightly floured piece of parchment paper.

Six: Use a knife or bench cutter to slice the scones into 8 wedges. Freeze while the oven preheats.
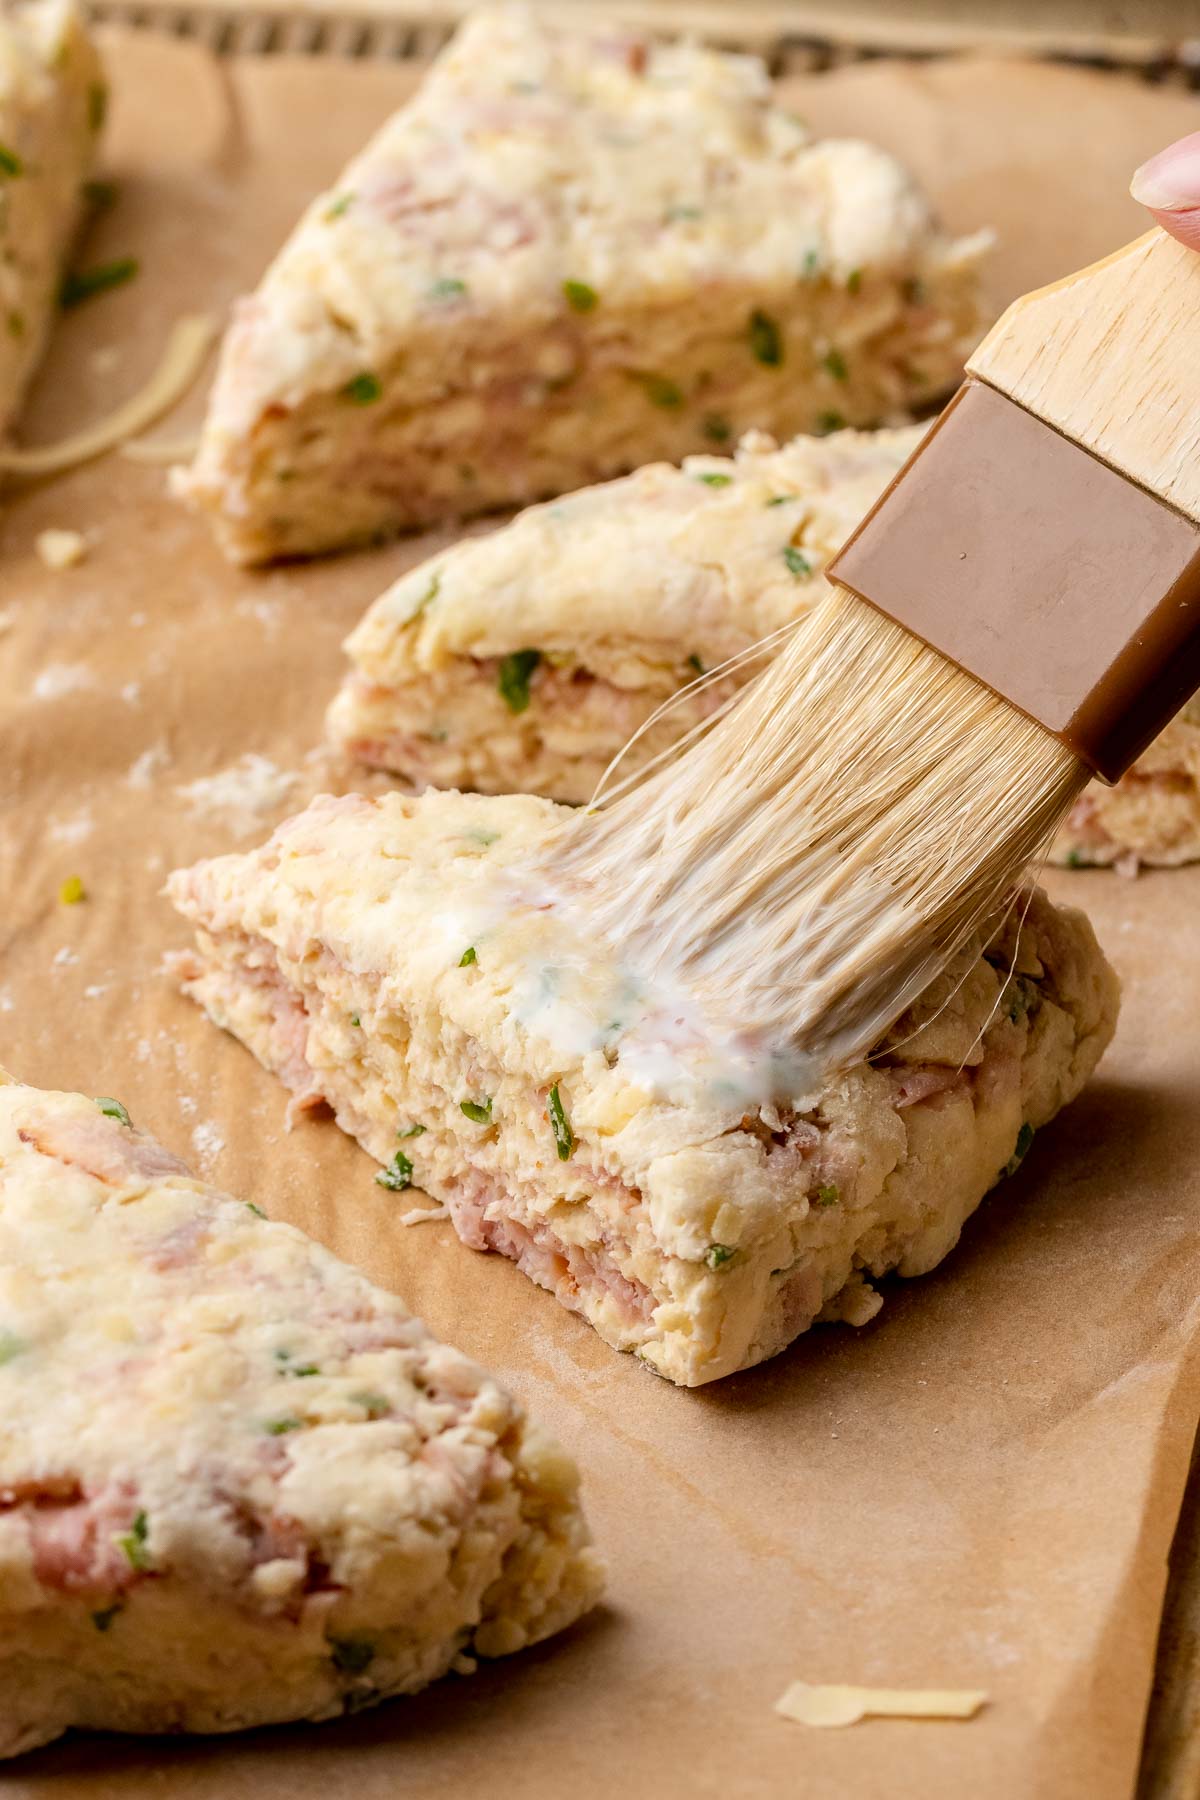
Seven: Brush the semi-frozen scones with milk.

Eight: Sprinkle with a bit of extra cheese and chives, then bake!

💌 Save This Recipe
Expert Tips
- Use frozen butter for easy grating and maximum flakiness.
- Keep ingredients cold. Cold dough and a hot oven produce the most lift.
- Don't overmix! A shaggy dough is perfect. Overmixing can lead to a dense scone.
- Space the wedges apart about 2". Having them slightly close together actually helps them rise up!
Testing Notes
- I really loved the clumps of thinly sliced ham throughout the scones. Larger pieces made it feel too chunky, but this is likely a personal preference, so use whatever flavor and cut you want!
- I decided to add the garlic powder to give it a little note of "cheddar bay biscuit," and it made a big difference for me! Totally optional, though.
- Using a highly flavorful cheddar is key. A lightly flavored cheese will definitely get lost in the scone.
Recipe FAQs
Yes! Shape and cut the scones, freeze completely, then transfer to a bag or container. Bake straight from frozen with the same bake time!
Freshly shredded cheese will always melt better, but pre-shredded cheese works in a pinch.
Totally! Divide the dough into two smaller circles and cut each into 6-8 wedges. Reduce the bake time by a few minutes.
Storage
Room Temperature: store cooled scones in an airtight container for up to 2 days.
Refrigerator: keep for up to 4 days, reheating gently before serving.
Freezer: freeze baked scones for up to 3 months. Reheat in a 325°F oven until warmed through.
Freeze Before Baking: freeze the raw wedges (before adding milk), then bake from frozen.

More Savory Breakfast Recipes You'll Love


What to Know When Cooking with The Cozy Plum
- All recipes are created with Diamond Crystal kosher salt, the least salty variety of kosher salt. If using Morton's, you'll need to cut the amount of salt in half as it's 2x as salty. This will be the same for sea salt. Please do not use table salt.
- Switch between Cups vs Metric using the toggle on the recipe card. Baking by weight using a digital scale will always produce the most accurate results.
- Scale the recipe using the '1X' '2X' '3X' buttons on the recipe card. Note that this does not make an adjustment for baking times, only quantities.
📖Recipe

Ham and Cheese Scones
Equipment
- Large sheet pan
Ingredients
- ½ cup unsalted butter grated & very cold
- 2 cups all-purpose flour
- 1 tablespoon baking powder
- ½ teaspoon kosher salt
- 1 teaspoon garlic powder optional
- 1 ½ cups shredded sharp aged cheddar cheese
- 1 ½ cups chopped ham
- ¼ cup minced fresh chives optional
- ¾ cup whole milk cold
Instructions
- Note: Grate the ½ cup butter first, then place the grated butter in the freezer while you prepare the rest of the ingredients.½ cup unsalted butter
- Whisk together the flour, baking powder, and salt, then toss with the butter shreds to coat them completely.2 cups all-purpose flour, 1 tablespoon baking powder, ½ teaspoon kosher salt
- Mix in the cheese, ham, and chives (if using) to coat in flour, then drizzle the milk all over. Use a wooden spoon to bring the mixture together into a shaggy dough, then finish bringing it together with your hands until combined.1 ½ cups shredded sharp aged cheddar cheese, 1 ½ cups chopped ham, ¼ cup minced fresh chives, ¾ cup whole milk
- Note: if the mixture is still very dry and crumbly, drizzle in a bit more milk until it's mostly moistened (but not wet) and sticks together.
- Transfer the dough to a sheet pan lined with parchment paper, sprinkle with flour, and pat it into an 8” circle, at least 1” thick.
- Cut into 6 or 8 wedges, and pull them apart from each other slightly - at least 1” (use a bench scraper or spatula to do this).
- Pop the pan in the fridge or freezer while the oven preheats to 400℉.
- Once preheated, brush the top of the scones with milk and sprinkle with a bit of extra cheese (if you have some).
- Bake for 20-24 minutes until golden. Cool for a few minutes, then serve.
Cindy says
Delicious! I made these to have alongside a bowl of soup as an alternative to bread on Soup Night. Don't think they'll make it though: everyone pounced on them when I pulled them out of the oven and they are getting pulled out of the freezer as soon as people wake up. I split the dough in half and made 24 smaller scones. They're still a good size. I also dusted them with a little pink Himalayan salt after the milk instead of using cheese as a topping. Came out great and not too salty. These would be nice to serve if someone came over for an impromptu glass of wine, or to bring to any kind of potluck. Excellent and easy!
Callan Wenner says
Thanks so much for sharing this, Cindy! Love the idea of the smaller scones and glad to hear they baked up well for you. Now I want to have a Soup Night! Sounds wonderful.
~Chrissie O. says
I'm not certain I have the words to describe how lovely and unexpected these scones are! The flavor is off-the-chain! The method is foolproof (though I brush 1/2-1/2, or light cream, over the top and sprinkle with grated Parmesan - the flavor is brilliant with the sharp cheddar and ham!!). I used SHAVED, smoked deli ham - shaved ham is already pretty much falling apart, so running a knife through it coarsely gave me shreds that incorporated easily into the scone. Froze the cheese for about an hour and used my Cuisinart with a shredding blade. Couldn't have been easier!
Confession: I doubled the recipe and baked these in a 9"x13" pan rather than in a round, so that I could cut it into more squares, so the texture came out more like biscuits - and EVERYONE LOVED!!! They were DEVOURED!!! I have ZERO doubt that it will be even better in wedges, as all edges benefit from baking and get browned, but I had a larger crowd coming, so wanted a few more pieces!
Question: Have you ANY ideas other than grating butter??? I did it, for this recipe, but it's a task I sorely hate... Have you ever tried this with cold butter and a metal pastry blender?? Have you ever used a food processor grinding plate attachment? I used one with the cheese but didn't think to try with butter... LOVELY recipe!!! THANK YOU for posting!!! I'll be watching for new posts, for certain!! ~Chrissie
Callan Wenner says
Oh I'm so happy to hear this review and love that you doubled it, haha. I totally agree that grating the butter is a pain, I've just found it creates a super light and flaky final product since you really don't have to work it into the flour. As an alternative, I'd cut the butter into cubes as small as you can get (without it smooshing), freeze and separate, and then toss them in. If they still feel slightly too big, then go for a pastry cutter! Let me know how it goes if you try it!